SVG Images
How to create your own images to work within impcat
With the impcat 0.2.1 BETA update we added the option to import and edit your own images. Unfortunately you can't simply import a photo into impcat and get started. All the data you need to simulate the painting process is stored within every image and the system merely manipulates that data.
Sadly there's currently no simple way of creating such a file.
So here's a detailed step-by-step tutorial on how an image must be set up to work within the system.
Caution! This process is complex and extremely time consuming!
We know the drill and it still takes us about a whole day to create one SVG file.
What is an SVG in the first place?
SVG (Scalable Vector Graphic) is an image format like JPG or PNG, except that it's based on vectors instead of pixels, meaning that it not only never suffers from quality loss when being scaled, but also can be packed with information. And boy oh boy, are we packing those!
How an impcat SVG works
Here's a short summary of the principle that keeps impcat running:
Every impcat image is a vector graphic file with a line of very specific layers. Each layer has its own function within the app. Some are mandatory, some simply won't have a function if you skip them in your production:
From bottom to top:
- Background: This layer is only relevant for the appearance of your image when being loaded. If your file won't have a Background layer, the editable content of your image will be white instead of a custom colour when freshly loaded.
- Base: Mandatory. Without this layer your image won't have any foundation colour.
- Layer: Only neccessary if you want layering effects in your image. Requires an image mask (see 1.2 below).
- Shade: Only neccessary if you want shading effects in your image. Requires an image mask (see 1.3 below).
- Highlight: Only neccessary if you want highlighting effects in your image. Requires an image mask (see 1.4 below).
- Image: Mandatory. Without this overlay your whole image will be basically blank, so all of this would be pointless.
- Met: Only neccessary if you want metallic effects in your image. Requires an Metallic filter image (see 1.5 below).
- selectionMap: Mandatory. These contents generate the colour preview in the first place. Without these the images wouldn't change at all.
What you're going to need
Every image is being edited in 2 steps:
Editing the image contents we're going to need for our SVG (which we'll be doing in Adobe Photoshop) and building our SVG (which we'll be doing in Adobe Illustrator).
We'll be using Adobe CC 2019 for this tutorial, but technically all those steps should also work in older Adobe versions. We'll be referring to shortcuts like Ctrl + I, which are commands for Windows PCs. If you're using a Mac, simply replace Ctrl with Cmd. That's the only difference.
Note: You probably can recreate the following steps in similar programs, but that (in particular the second part) has never been tested by us.
Choosing a photo
To get the best result, your photo should meet some conditions:
There shouldn't be any depth of field (since the vectors we'll be working with are very sharp and wouldn't go well with blurry images). The object(s) in the photo shouldn't be too bright or too dark (best is a light grey colour and smooth lighting, so the shadows and highlights you want to extract are clearly visible) and the object should be opaque. Glossyness doesn't harm the process, but it shouldn't be metallic or transparent. Also the source image should have a good resolution (we usually work with a width of 1080px, since this is sufficient for most mobile devices without generating a too large file size).
IMPORTANT: We do not encourage anyone to use any source material that doesn't belong to them! Please respect copyright regulations.
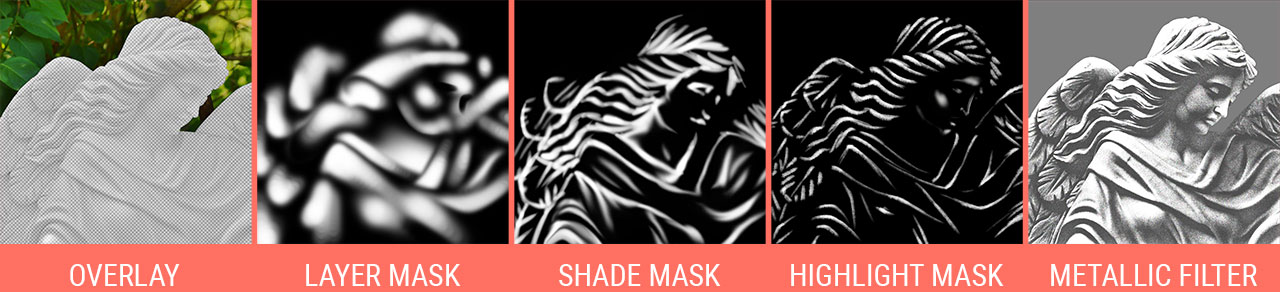
We're going to need 5 images in total:
- An Overlay image
- A Layer mask
- A Shade mask
- A Highlight mask
- A Metallic filter
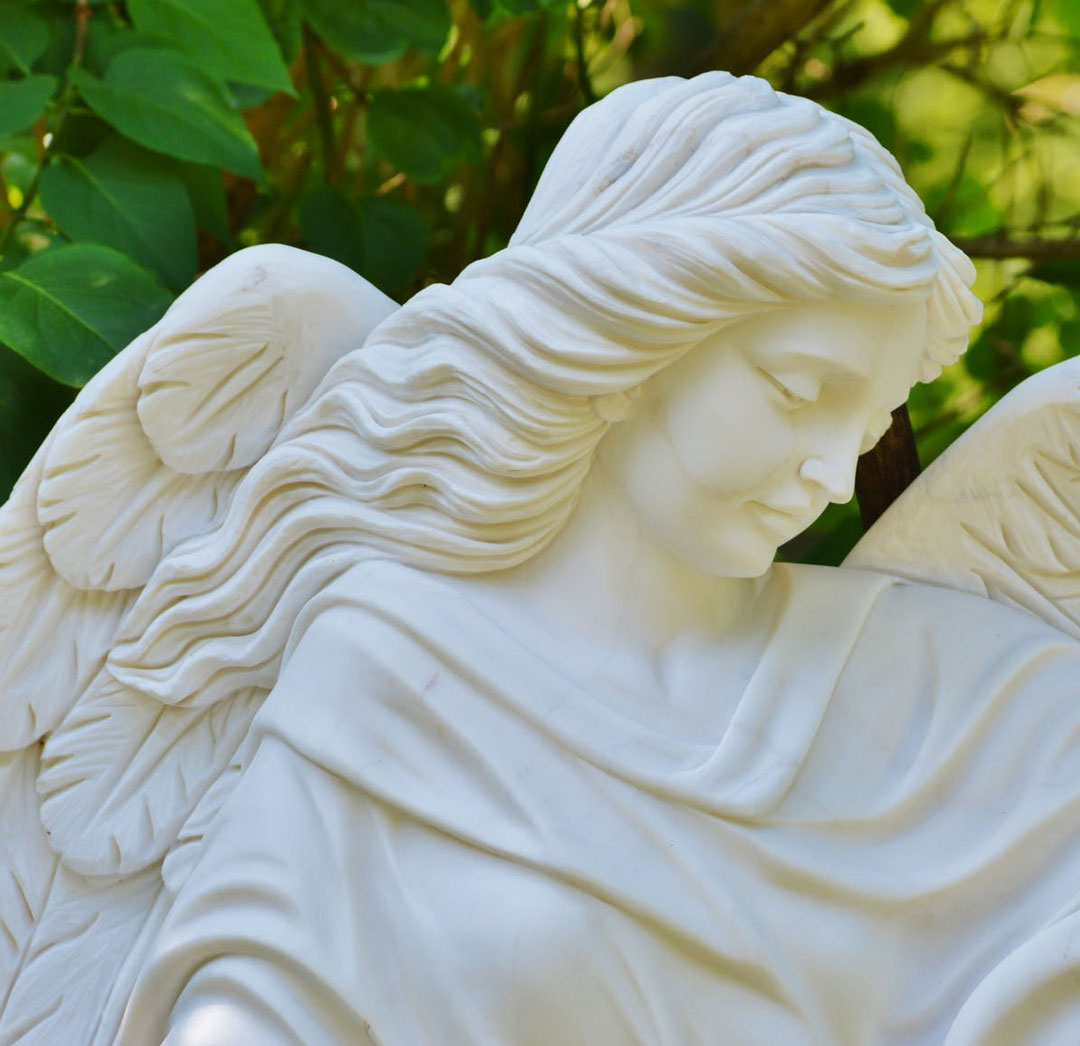
In our example we'll be working with a photo of a sculpture, provided by Pixabay on pexels.com:
1.1 Creating an Overlay image
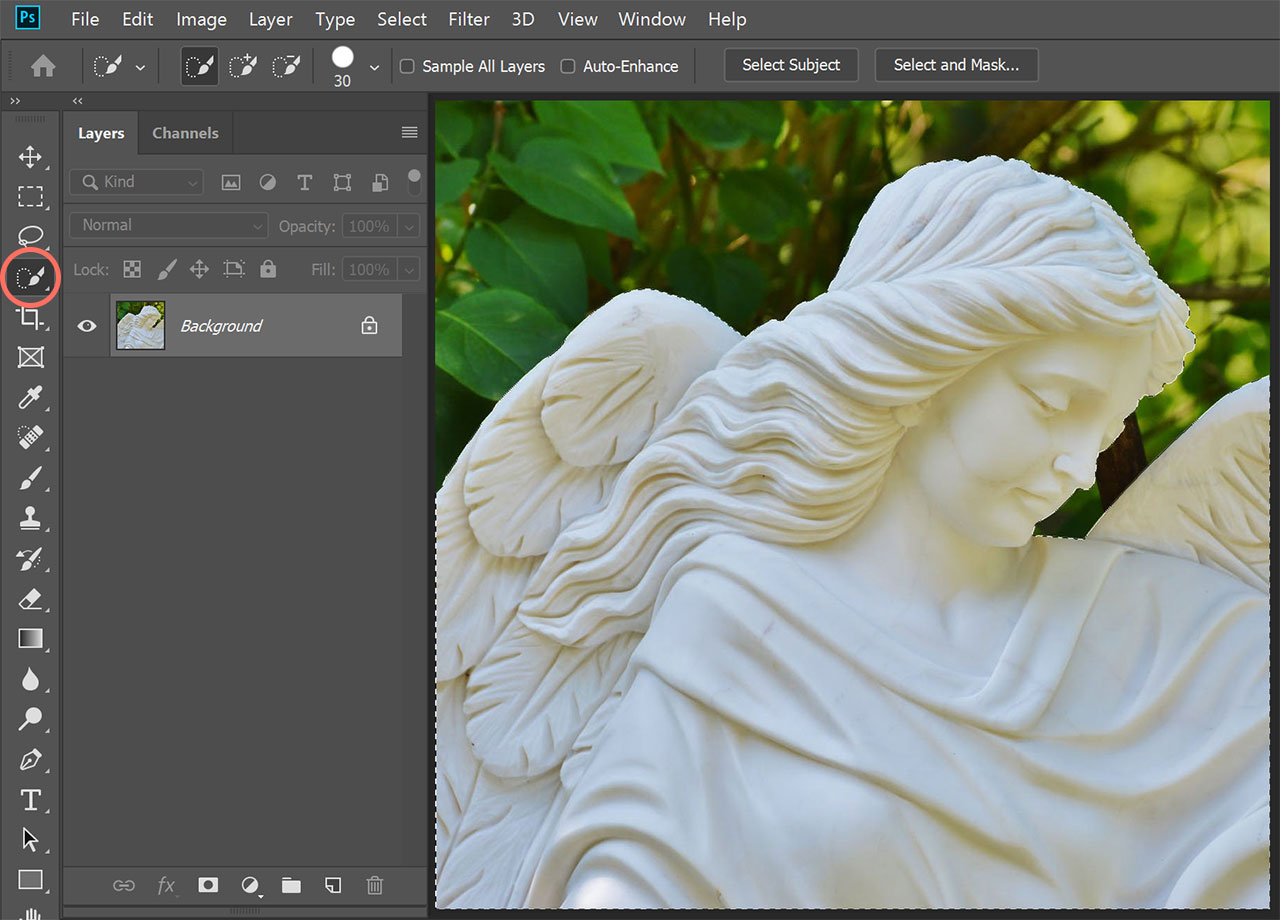
Open your image in Photoshop and make sure the Layers and Channels windows are active. If not, click on the Window tab and activate those two.
Press W to activate the Quick Selection Tool and select the areas in your image you want to be editable:
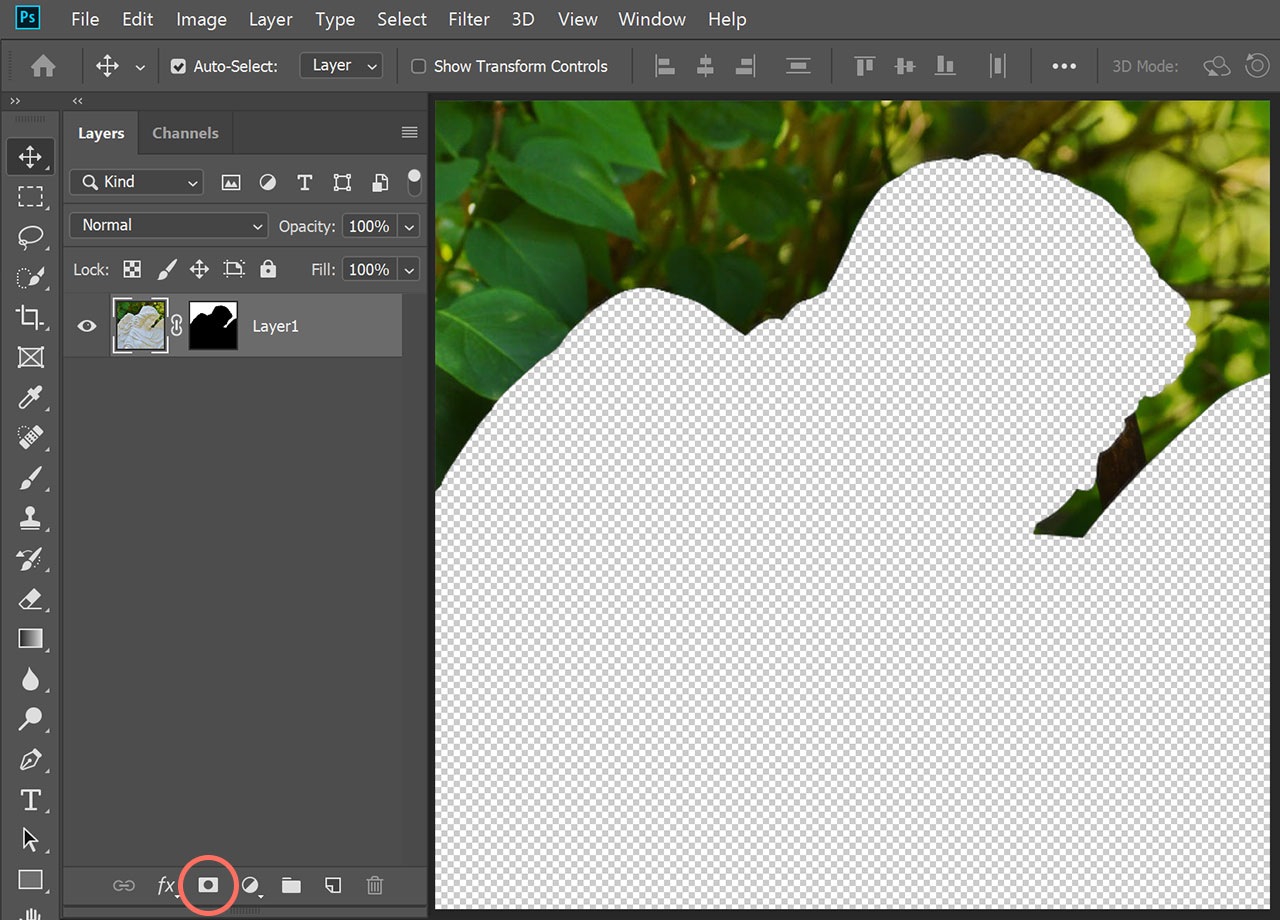
Press the Add a Mask icon at the bottom of the Layers window. This will automatically generate an opacity mask (notice the second icon in your layer), based on your last selection. Click on the mask icon and press Ctrl + I to invert it. Now only the opposite of your selection should be visible. We're going to need this layer later. You may as well select the leaves instead and not invert the mask, but in this case it was simply easier to select:
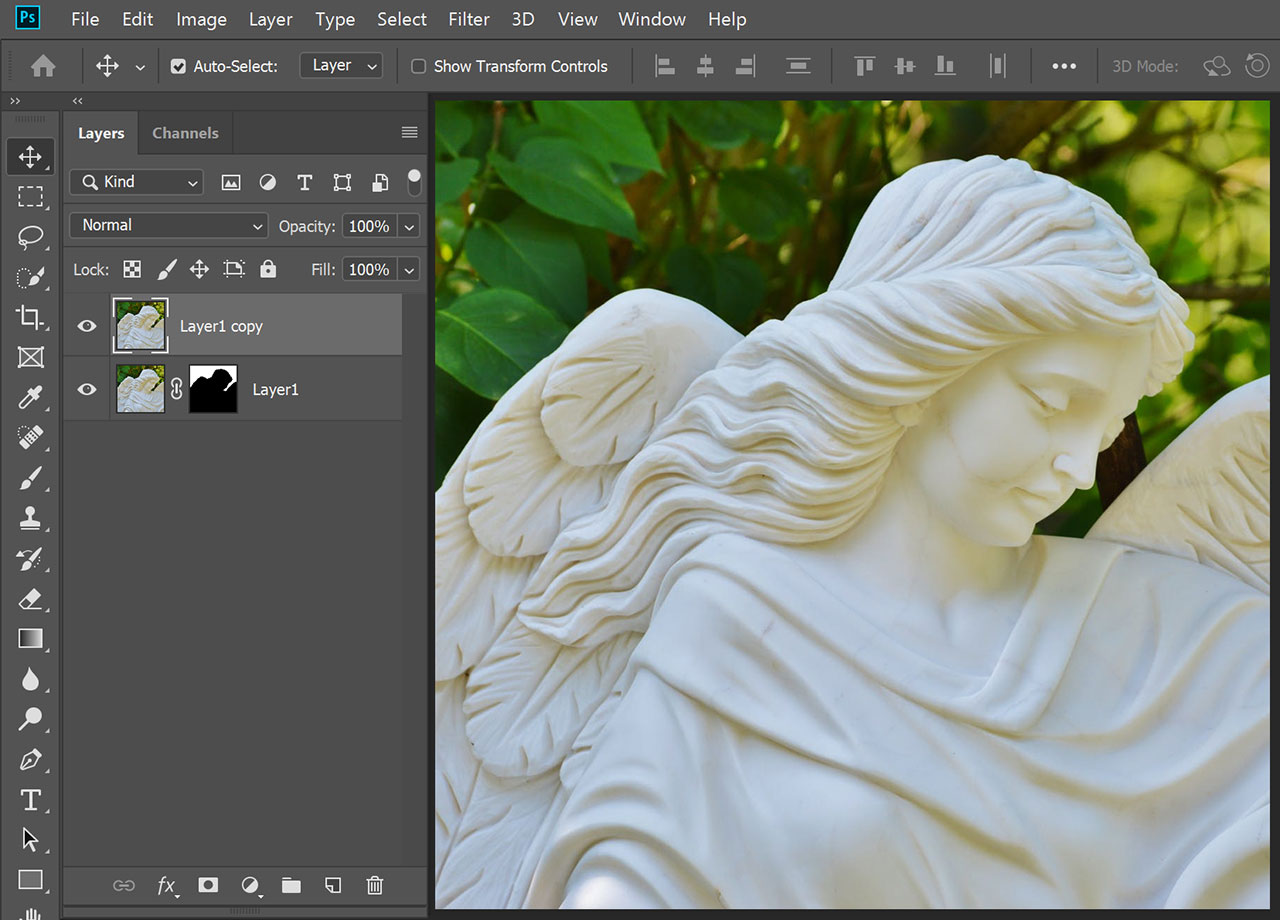
Hold Alt and drag your masked layer upwards to create a duplicate. Then click on the duplicate's mask icon and delete it (right click > Delete Layer Mask):
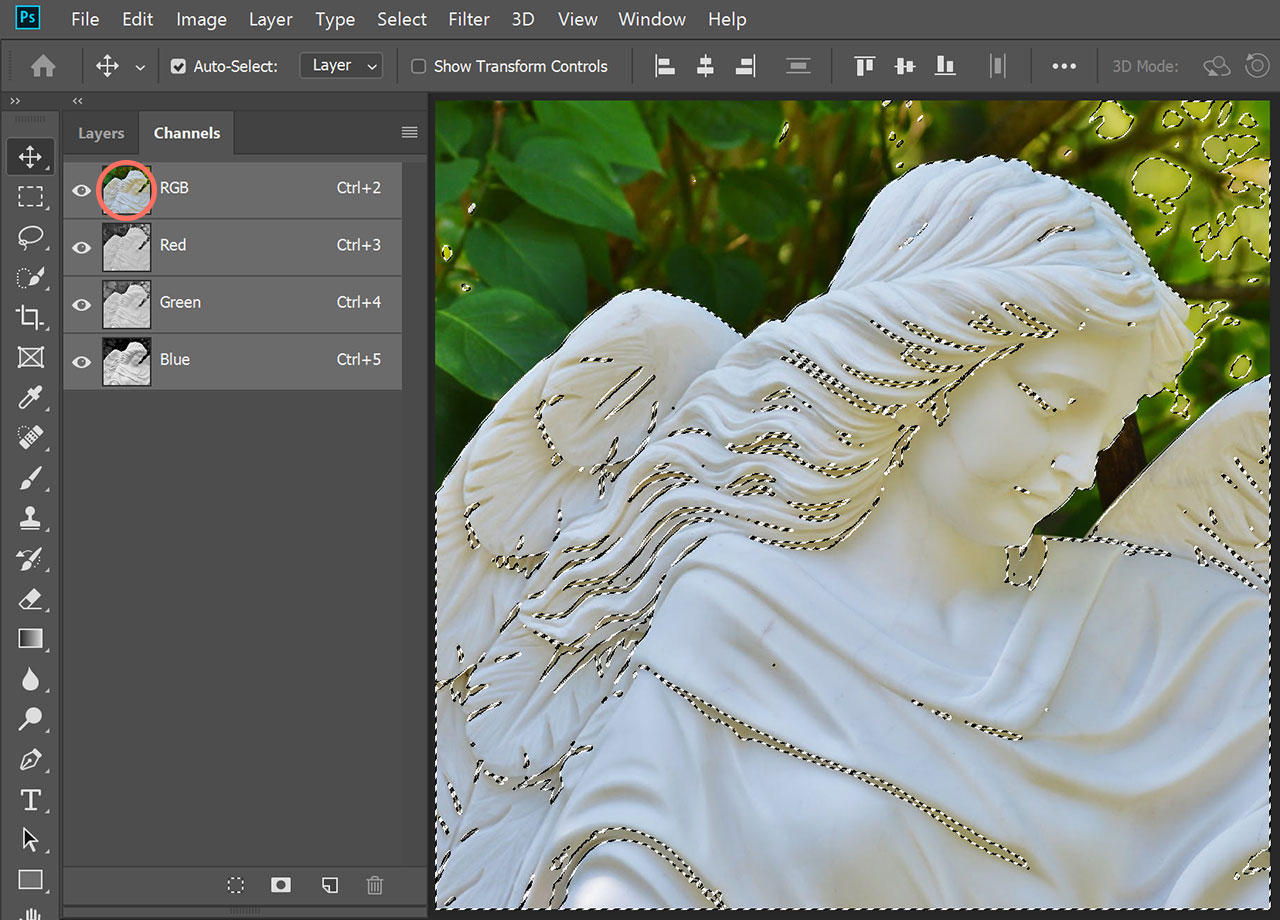
Switch from the Layers to the Channels window and click on the RGB channel's icon while holding Ctrl. This will create a selection of all lighting information in your image:
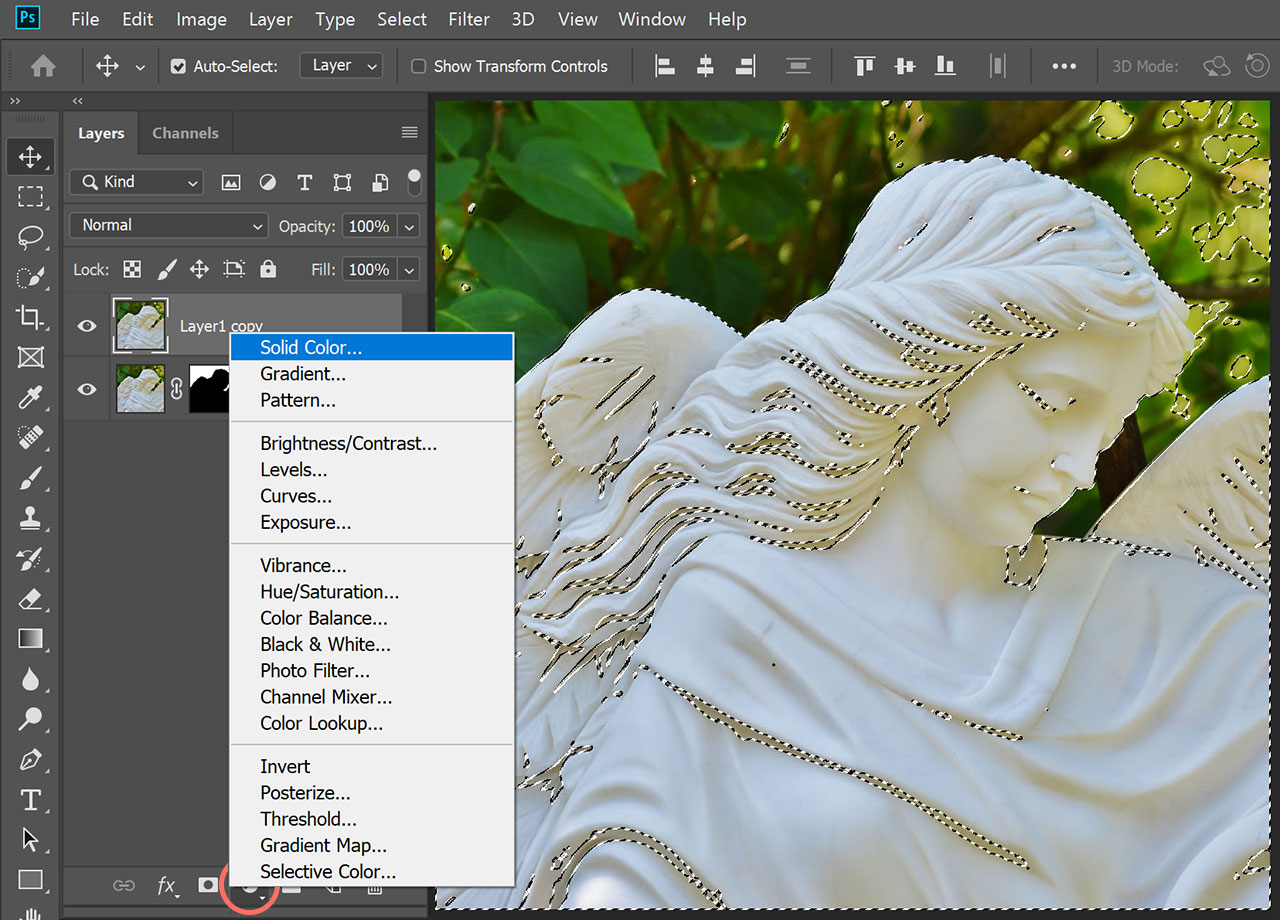
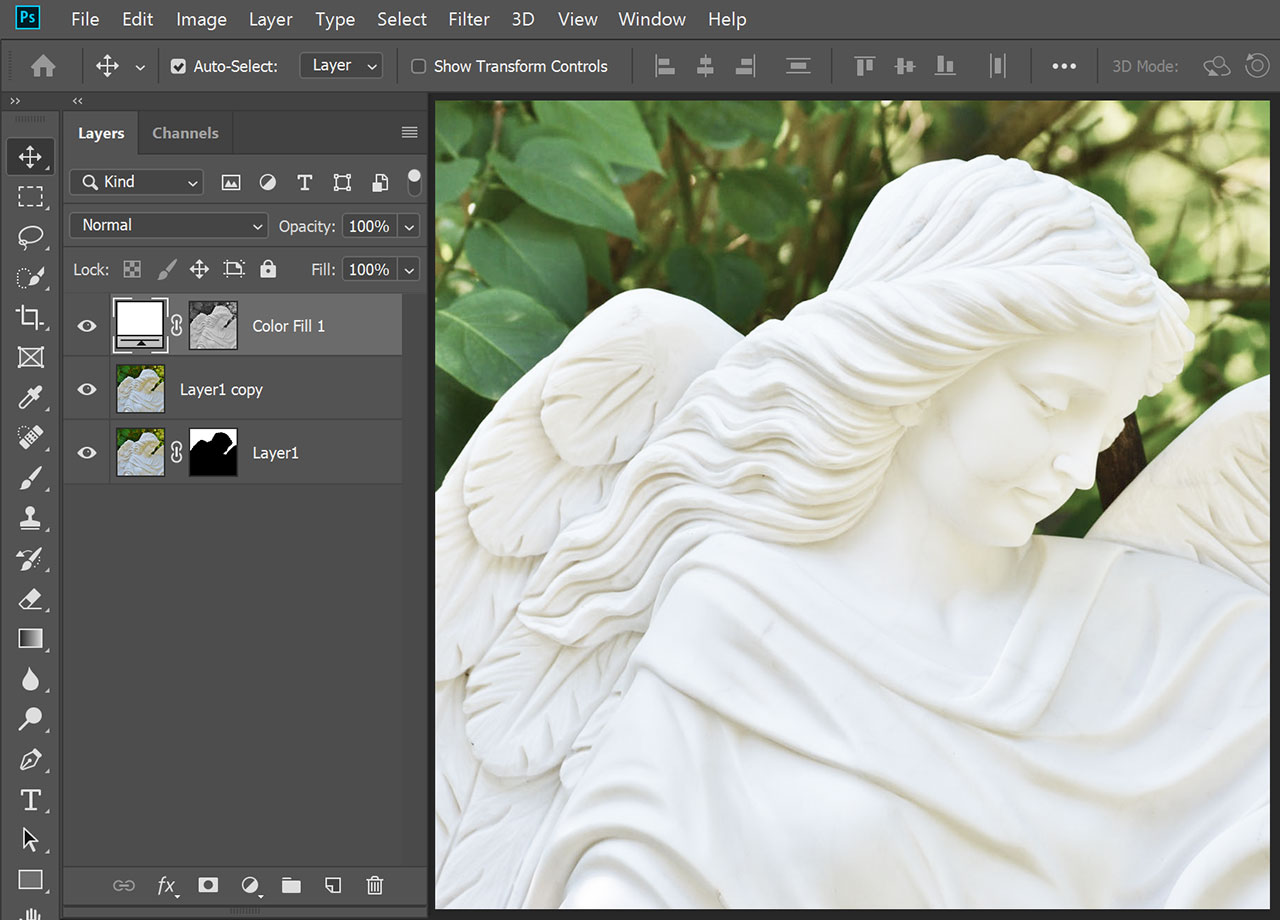
Go back to your Layers window and click the Create new fill icon at the bottom to create a Solid Color Layer. Choose a white colour for this:
This will create a new white layer with an automatically generated layer mask, based on your previously selected lighting information:
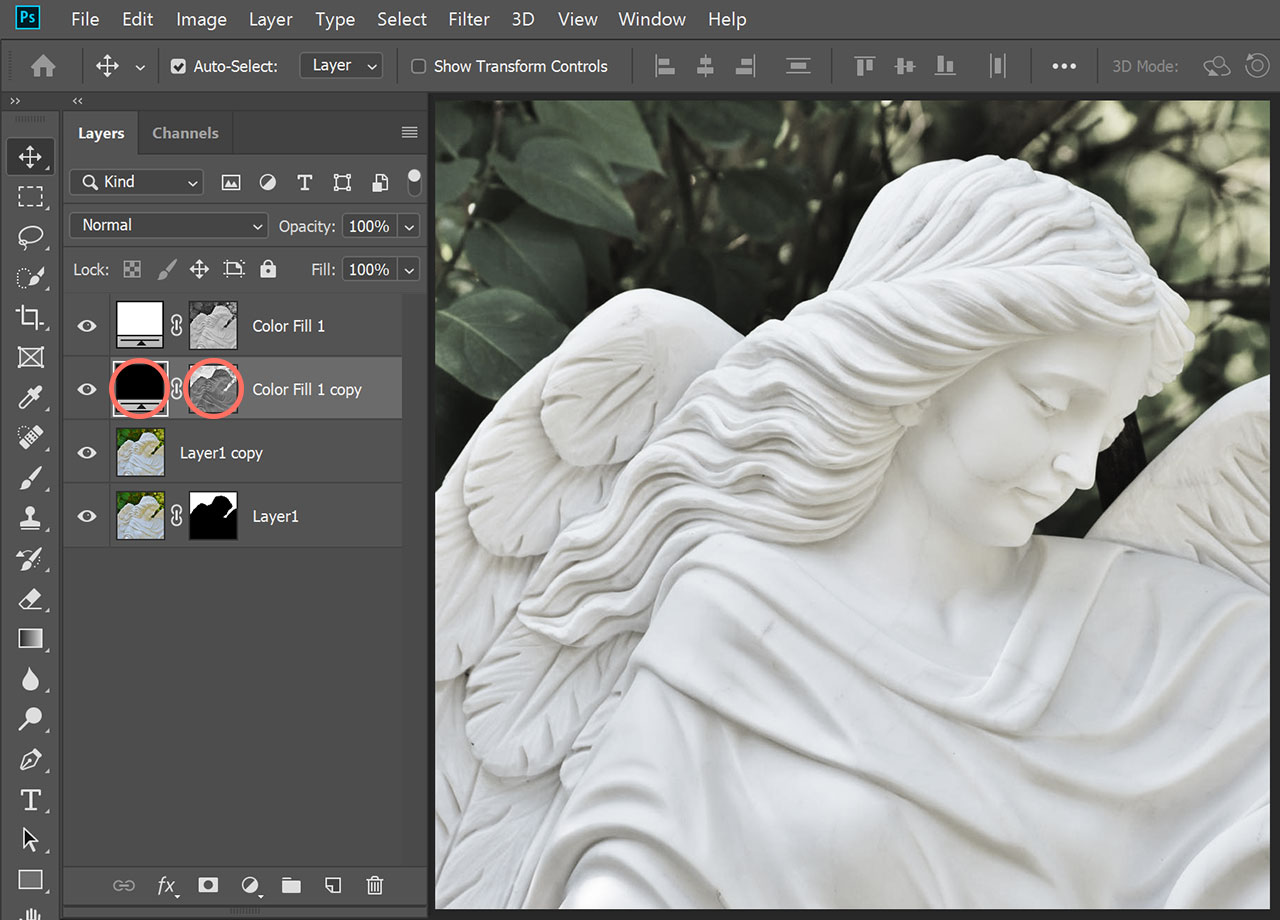
Hold Alt and drag this layer one level below to create a duplicate. Double-click the white colour icon of the duplicate, switch the colour to black and confirm. Then click on its layer mask icon and press Ctrl + I to invert the mask:
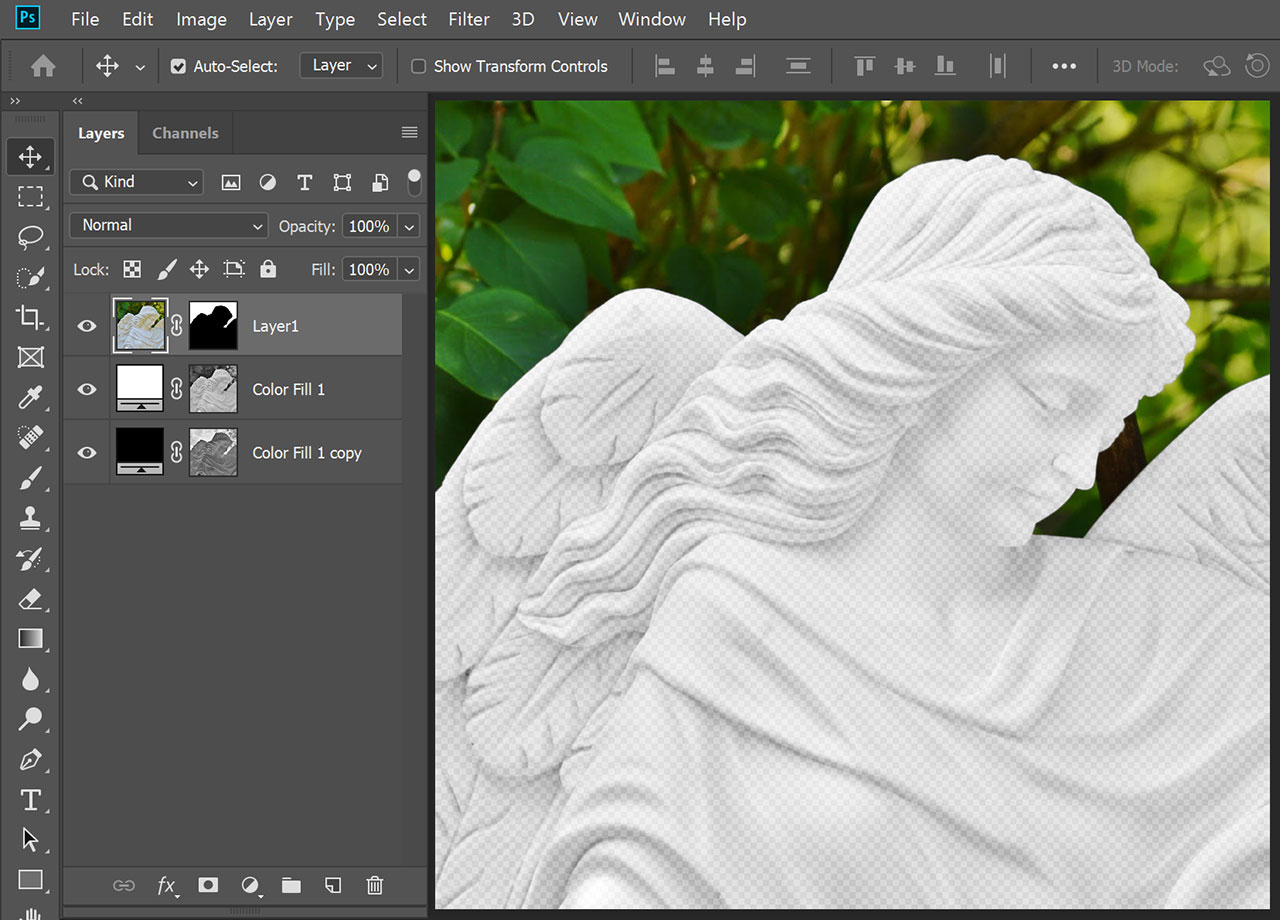
Drag the bottom layer (I told you we'd need it later) to the top and and remove its duplicate (the one without the mask) by selecting it and pressing the Delete key:
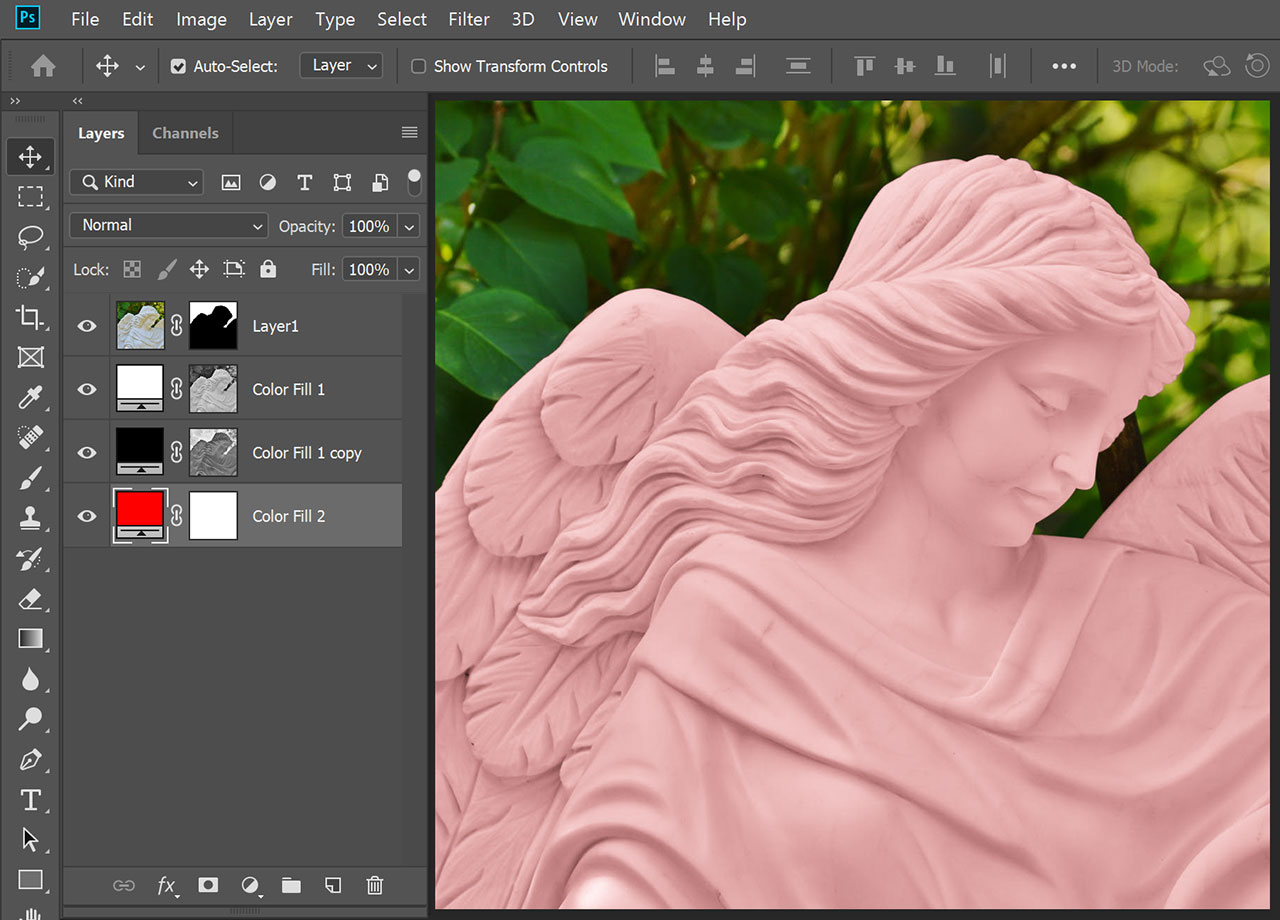
Congratulations! You successfully extracted the light and shadow information from your image. If you now create a new Solid Color layer (we'll use red) and drag it to the bottom of our layers, this colour will shine through the sculpture.
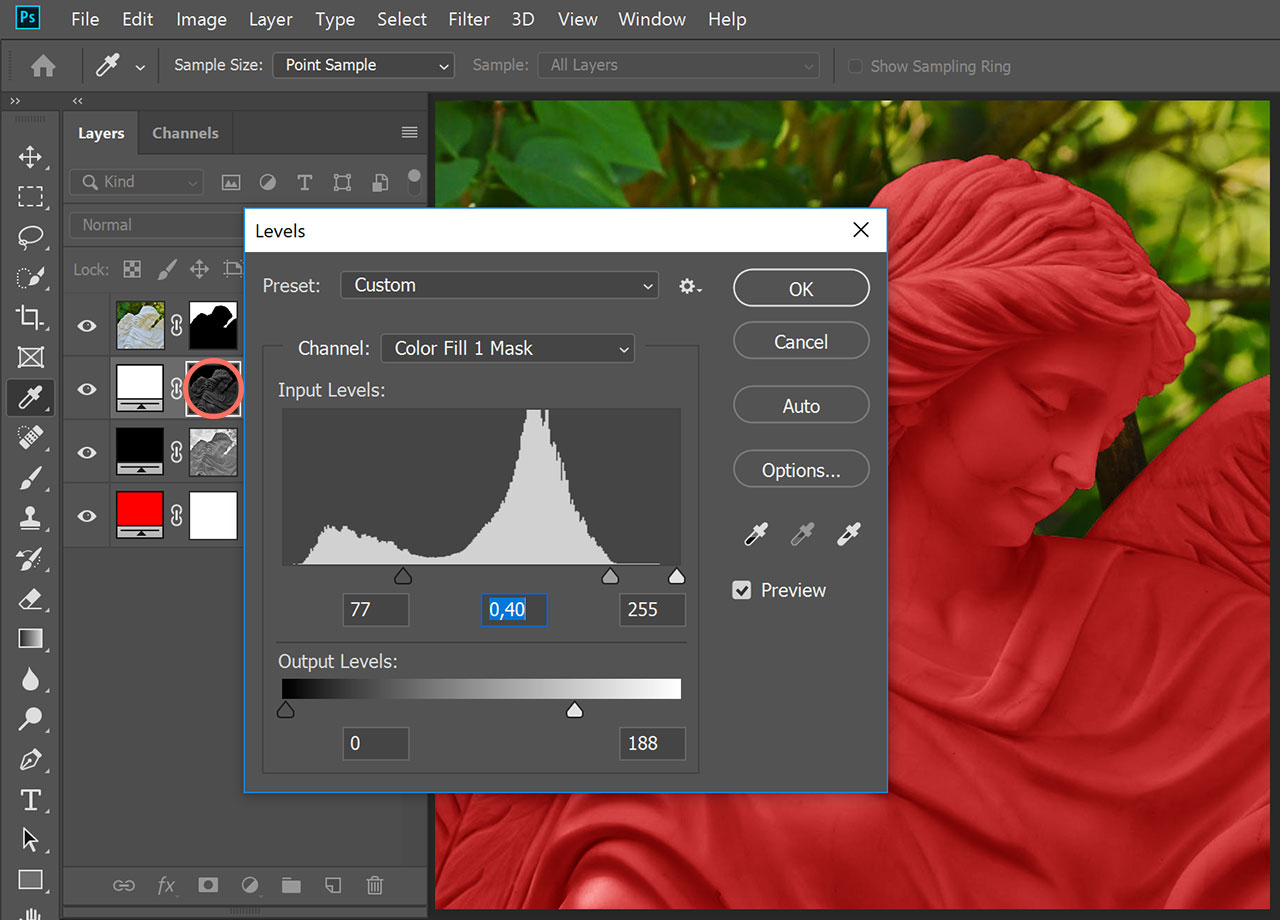
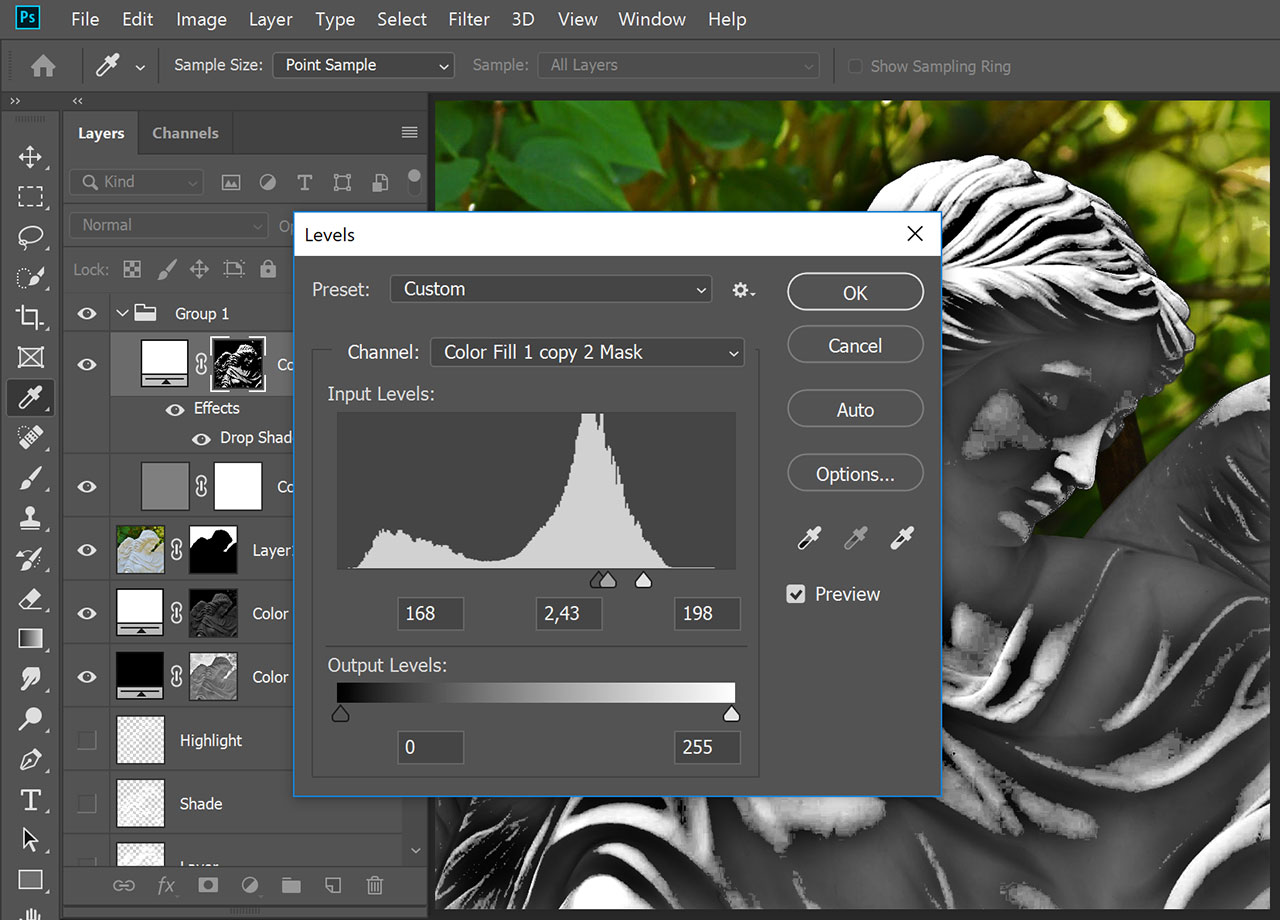
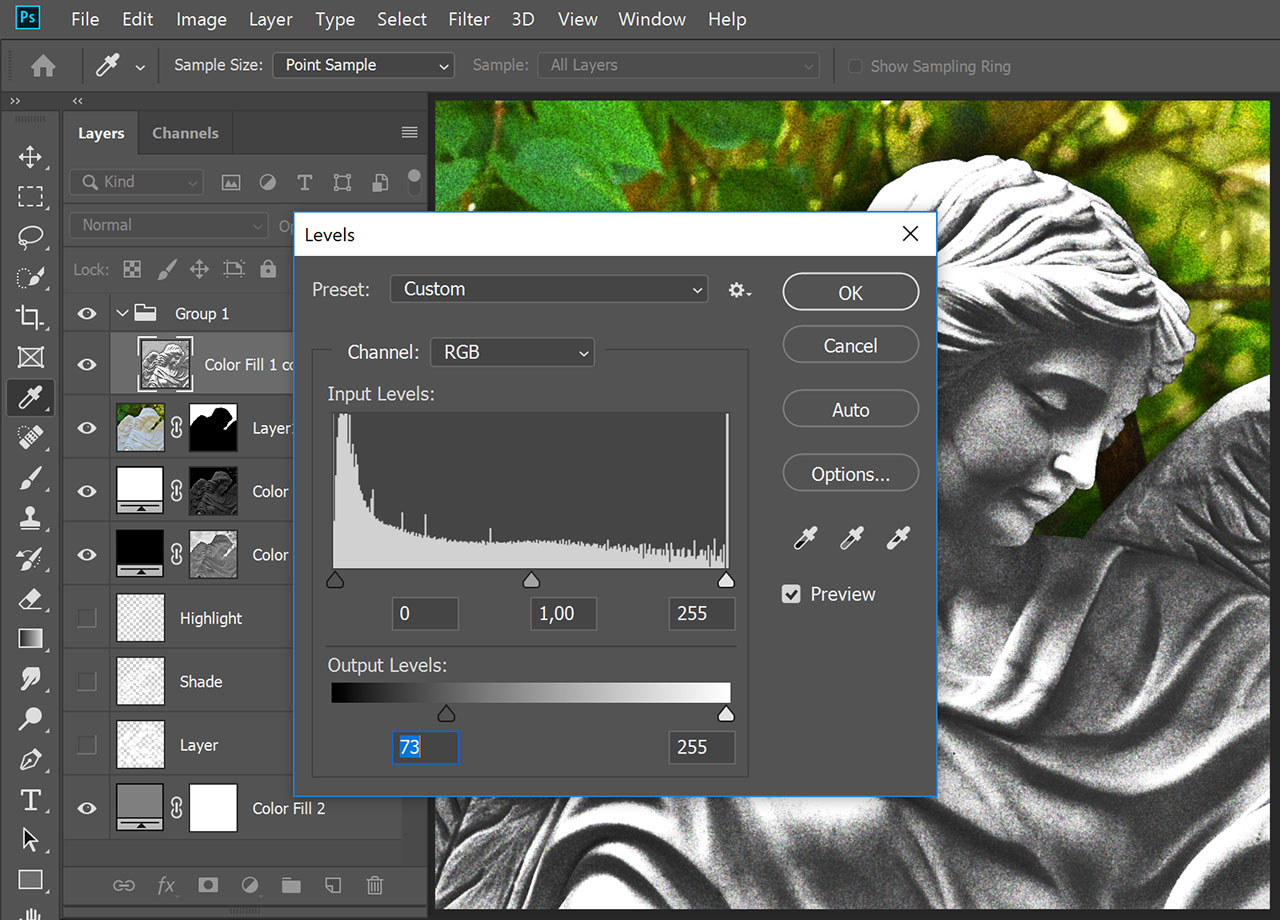
But this isn't right yet. In fact it's way to bright. That's because your white colour layer is to strong. So you'll need to click on the white layer's mask and press Ctrl + L to adjust its levels. In the pop-up prompt shift the top rulers to the right to enhance the contrast of the mask. If you additionally shift the bottom right ruler to the left, you'll also reduce the highlights of the sculpture. Once you think 'this is what my colour should look like', you're done:
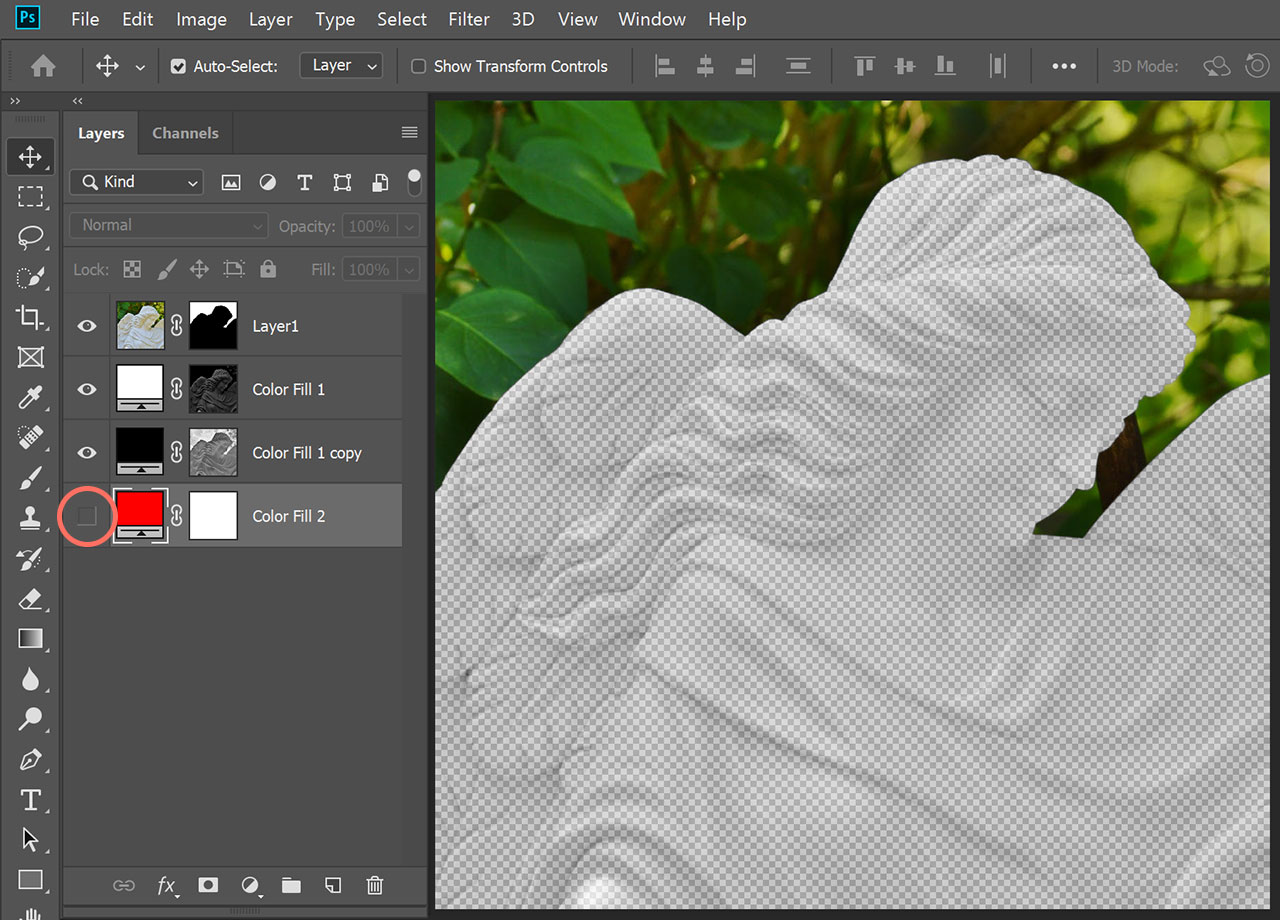
Now you only need to click the visibility icon of your bottom layer to hide it and your Overlay image is complete. Press Ctrl + Alt + Shift + S to export it as a PNG file. Leave all export settings at their defaults and confirm:
If your goal is finding out what your bathtub would look like in a different colour, you're done here and can skip to 2.0. But if you want all 4 layers of impcat to work, follow the next steps.
1.2 Creating a Layer mask image
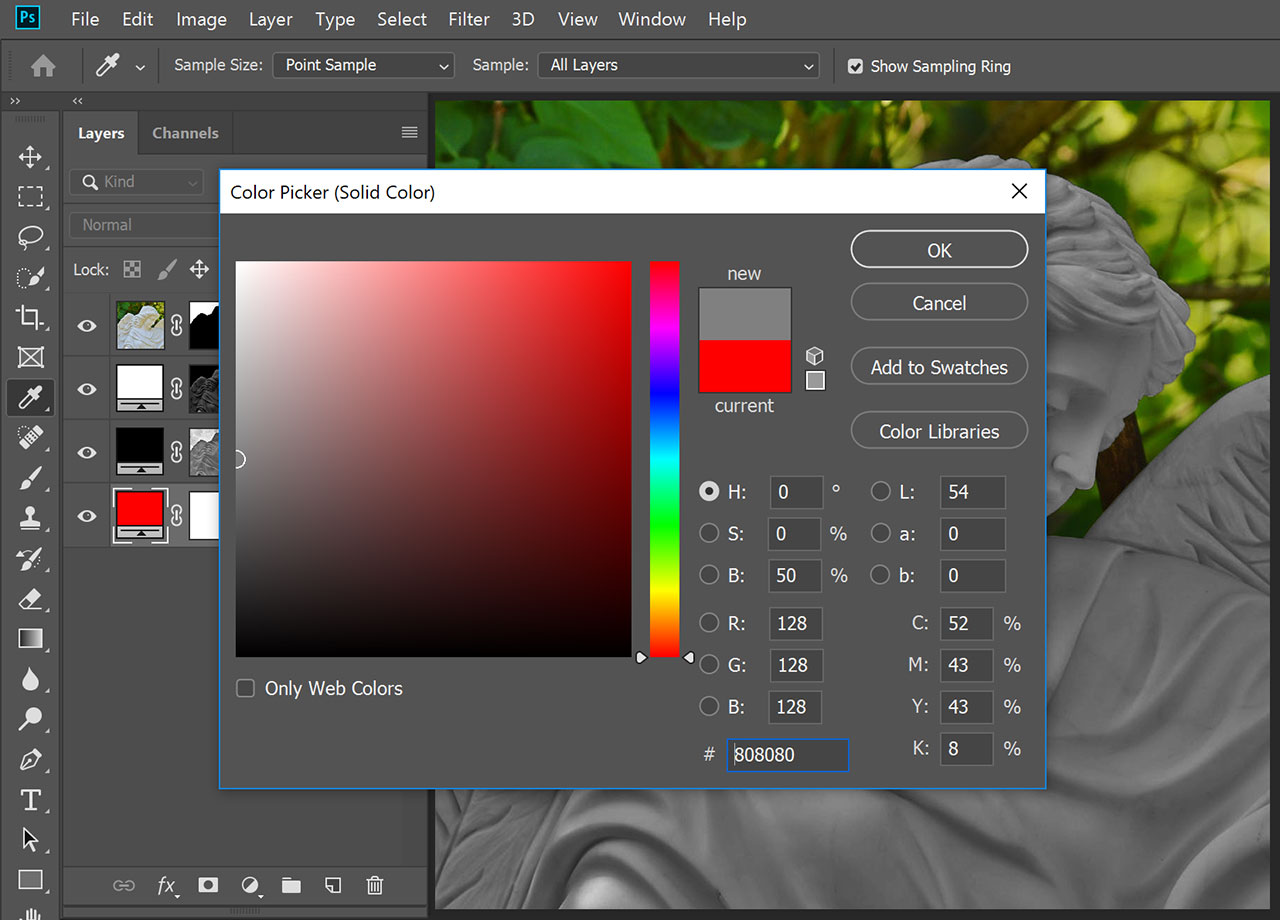
Click the visibility icon of your bottom colour layer again to make it visible. Then double-click its layer icon to change its colour to a neutral grey (#808080):
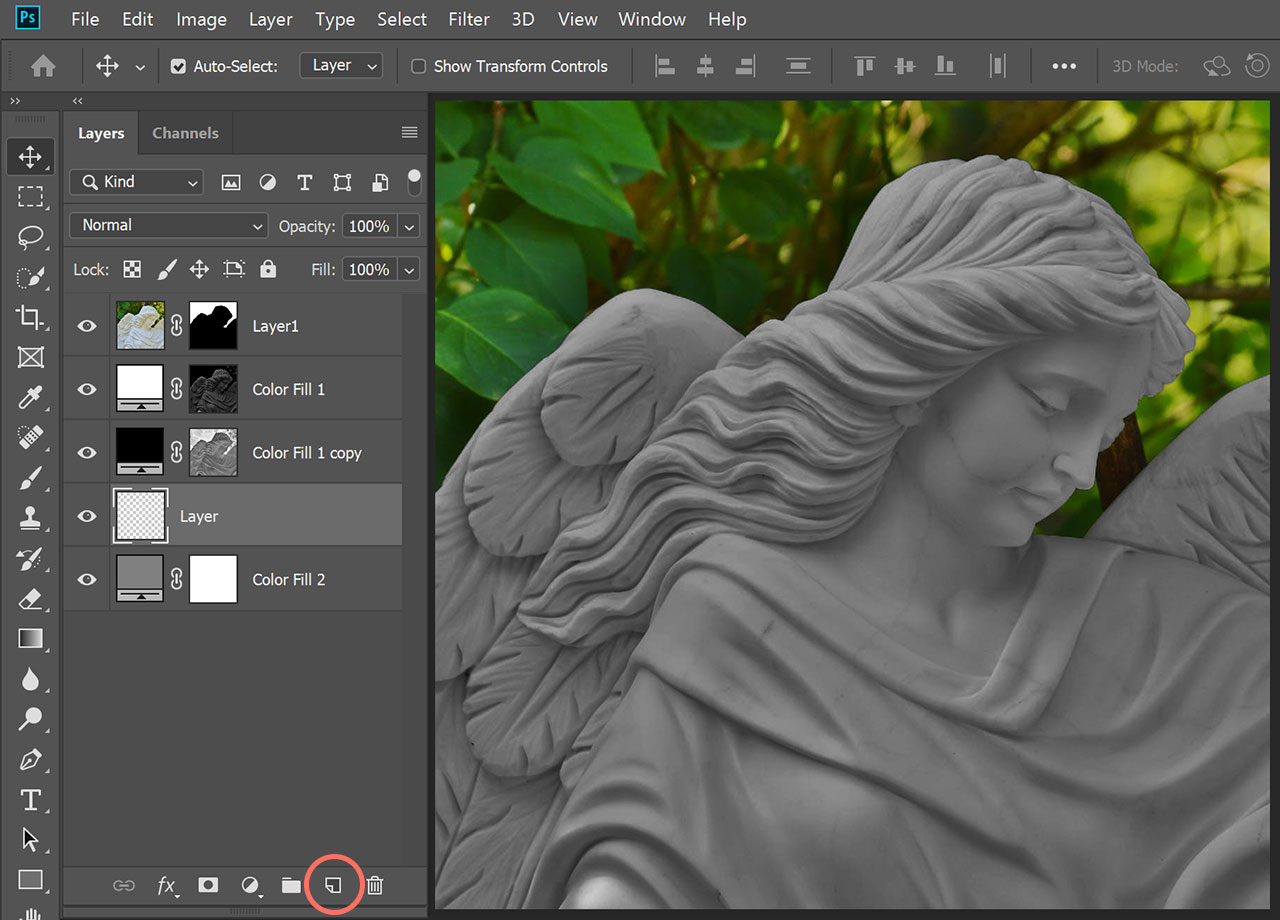
Then create a blank new layer by clicking the Create a new layer icon at the bottom of the window. Double-click the new layer's name to change it to 'Layer':
Press B to activate the Brush tool. Then right-click on your image to adjust its size and hardness:
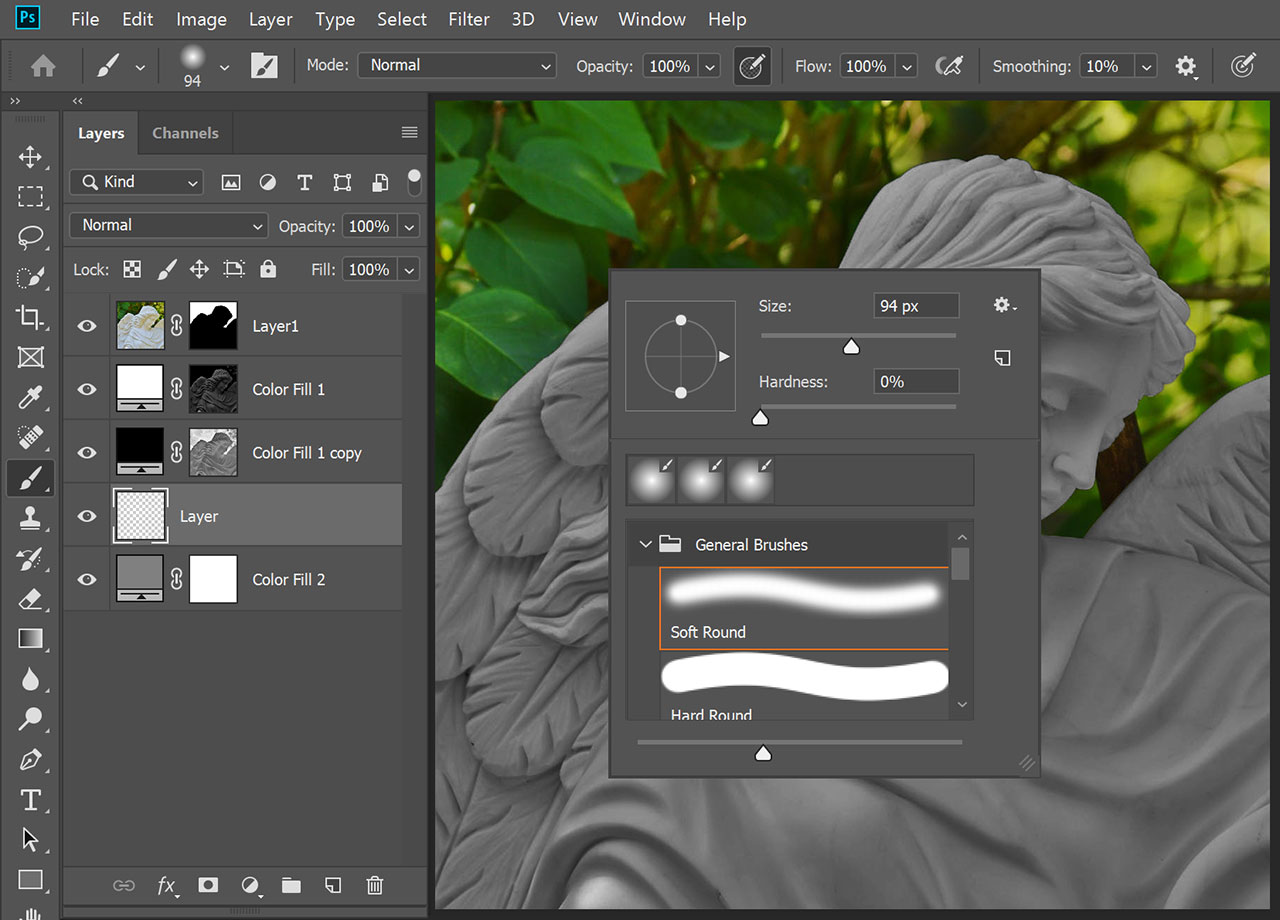
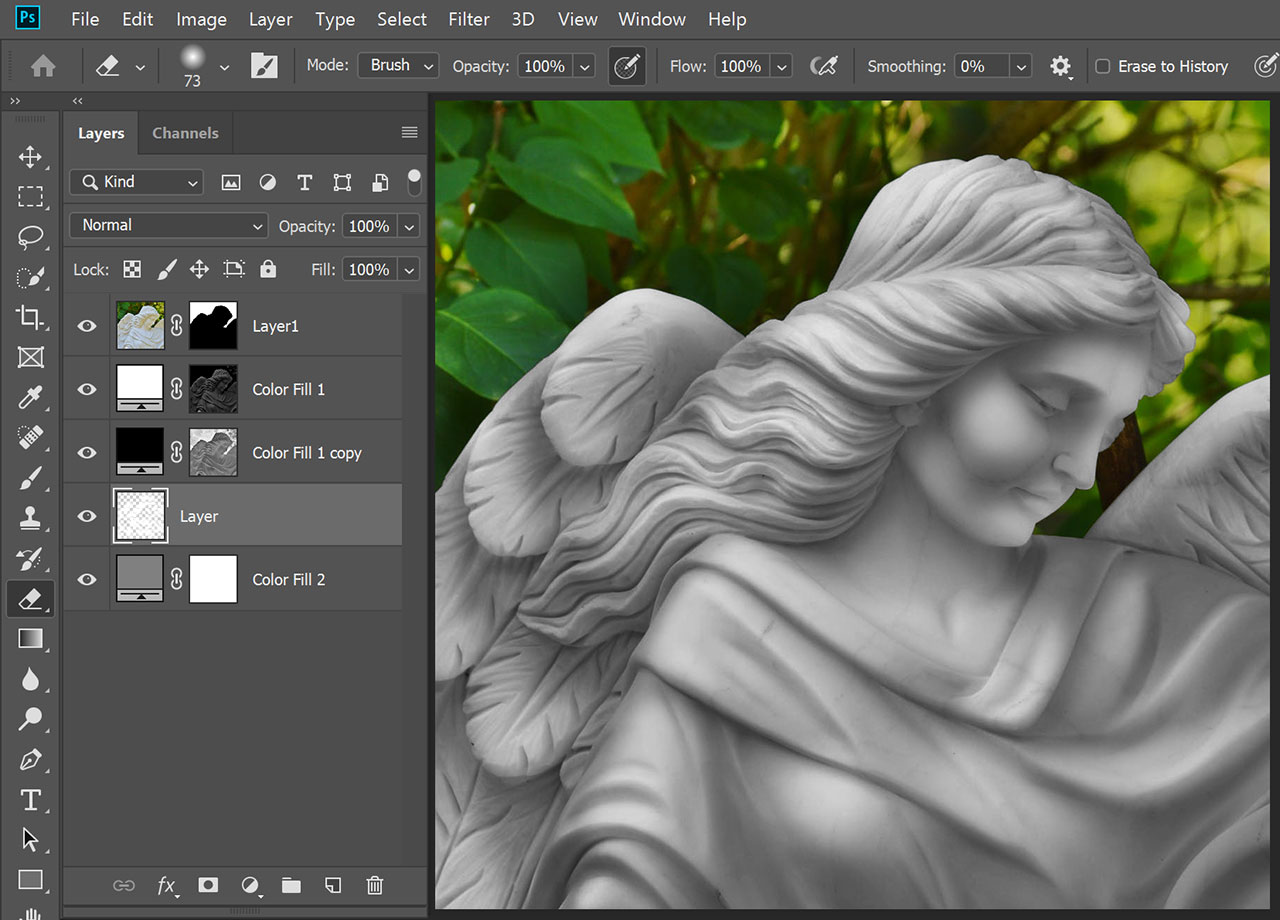
Select a white colour (by clicking the picker below the toolbar) and paint your Layer effect as you would paint it in real life. The style is entirely up to you:
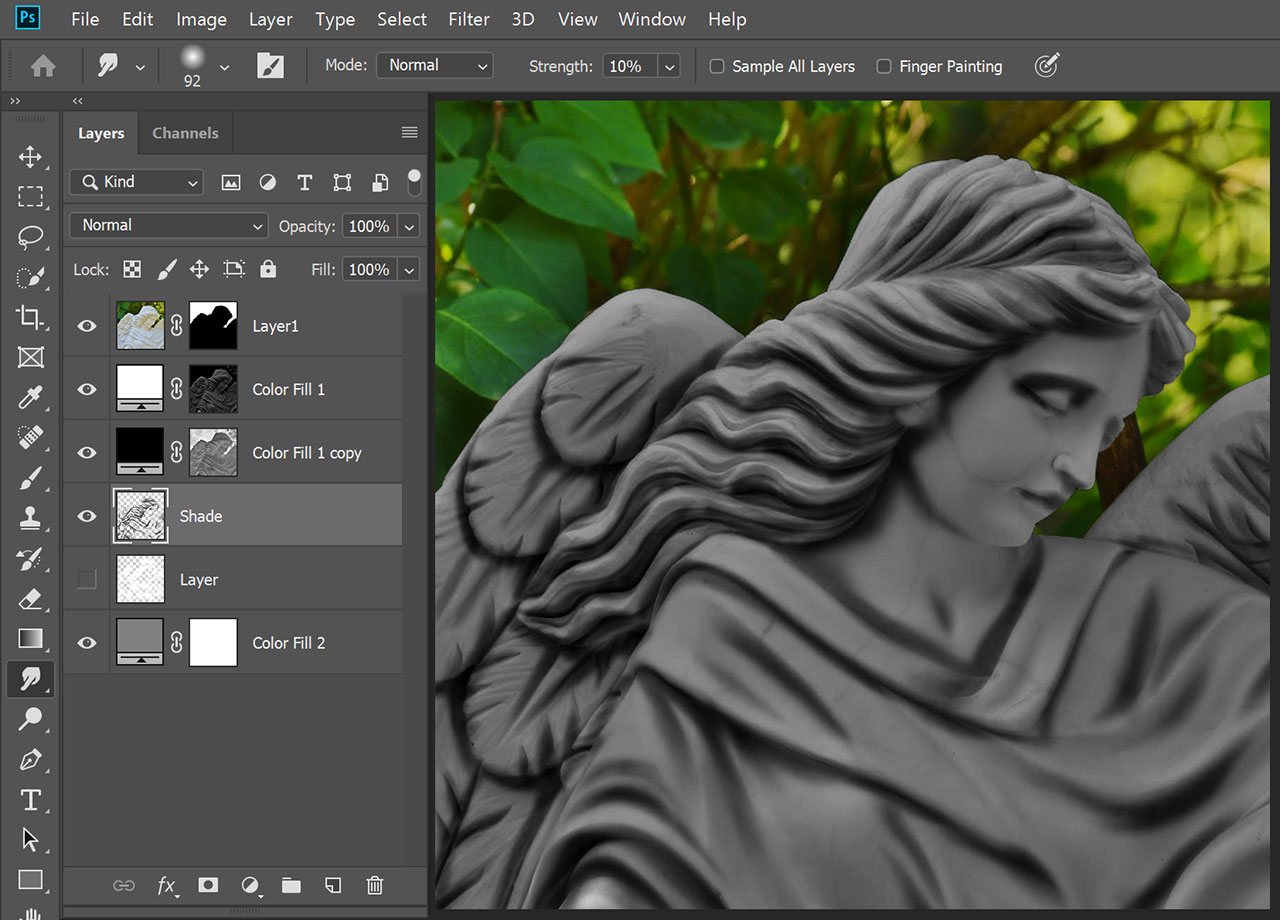
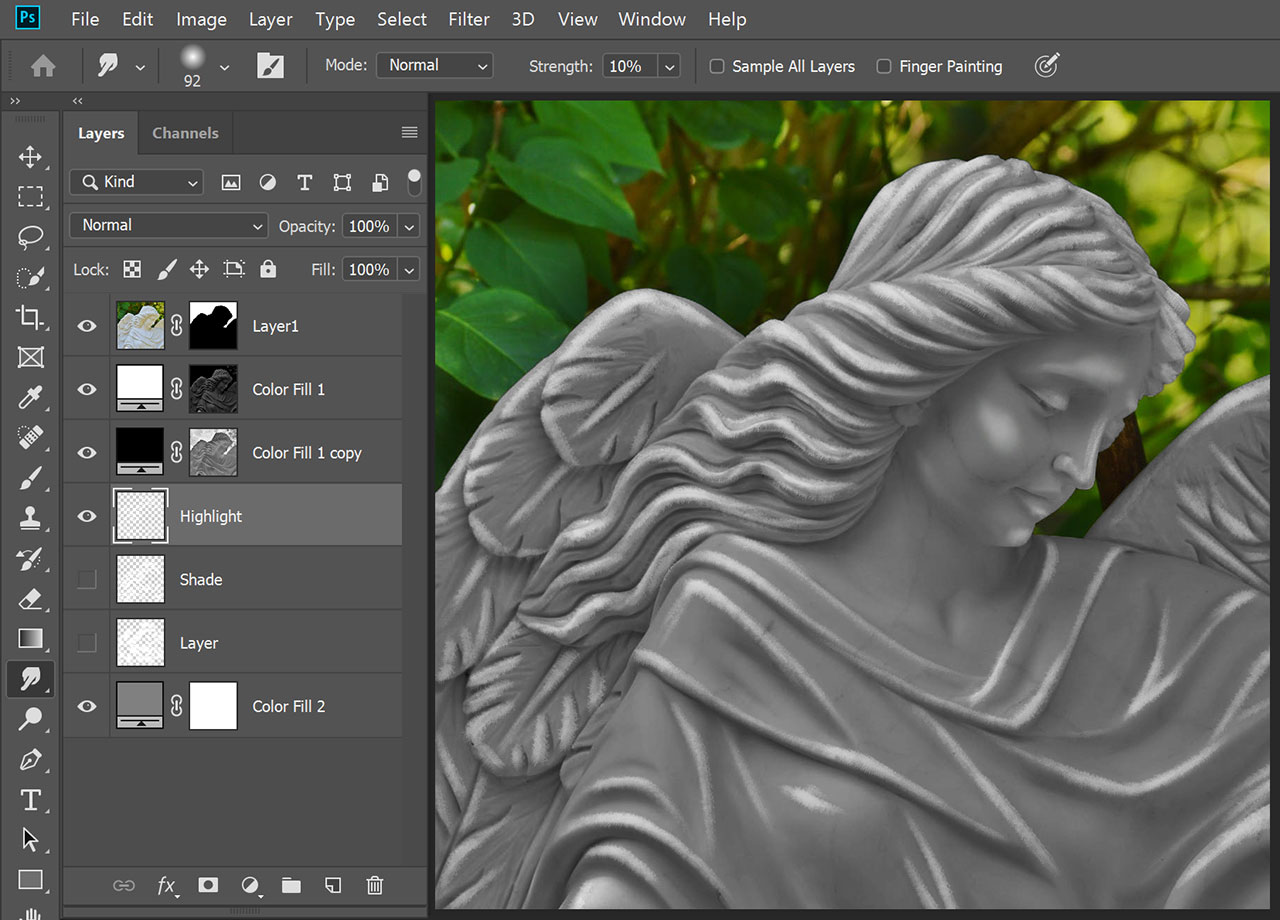
1.3 Creating a Shade mask image
Just like in the step above, create a new blank layer and rename ot to 'Shade'. Hide the previous layer, so all you'll see is the grey sculpture and whatever you paint to darken your image. Only this time we'll use a black colour:
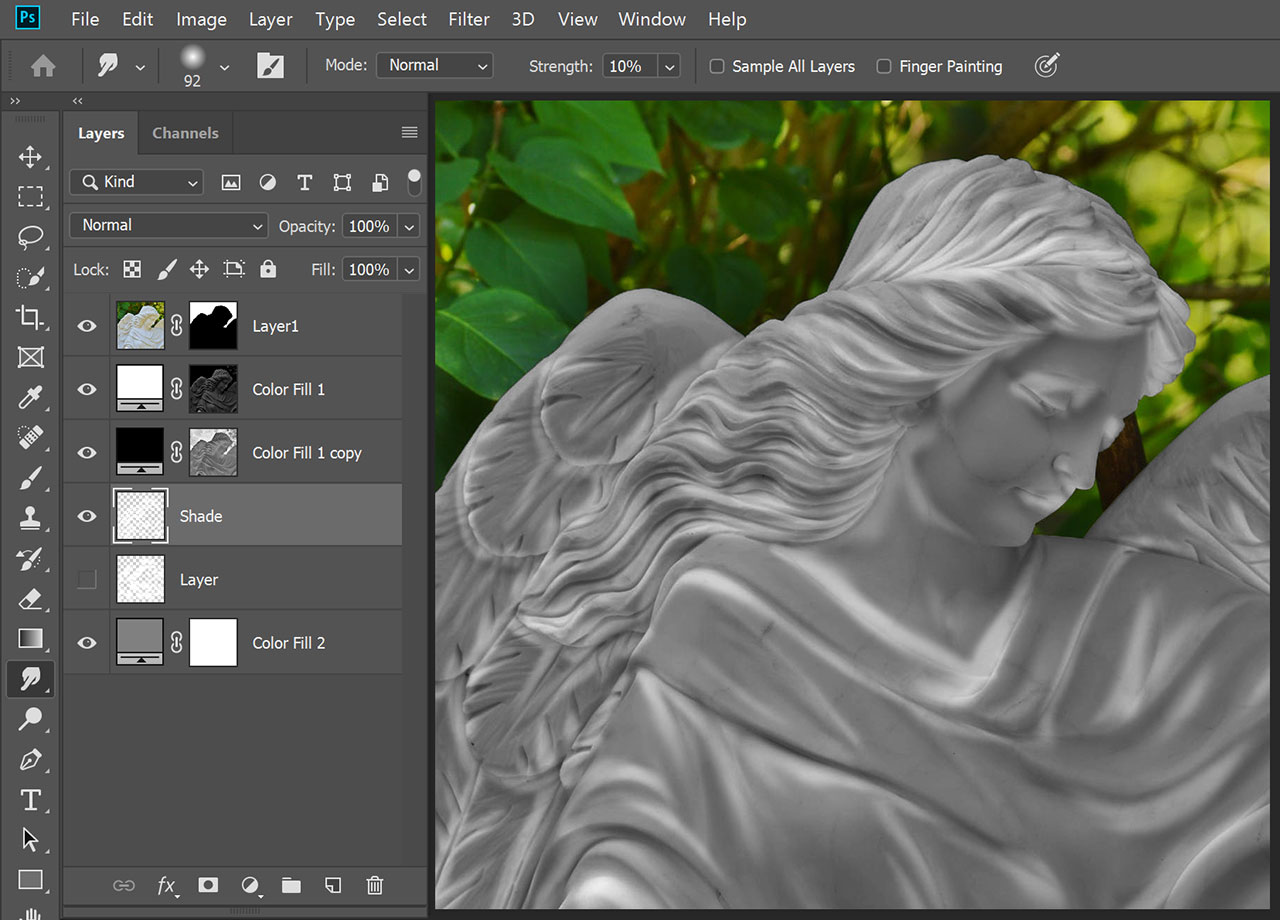
Once you're finished, press Ctrl + I to invert this layer. Eventually we'll be needing white information exclusively:
1.4 Creating a Highlight mask image
As in the steps before, create a new blank layer and name it 'Highlight'. Select your brush tool and paint the highlights as you want them, using white colour:
1.5 Creating a Metallic filter image
This one requires some explenation, so here's the general concept:

To achieve a metallic effect we need to extract the light information from the original image to an individual layer, give that layer a drop shadow and a neutral grey background, add some metallic flakes and adapt the contrast. The result can then be applied to the original image to give it a more metallic look.
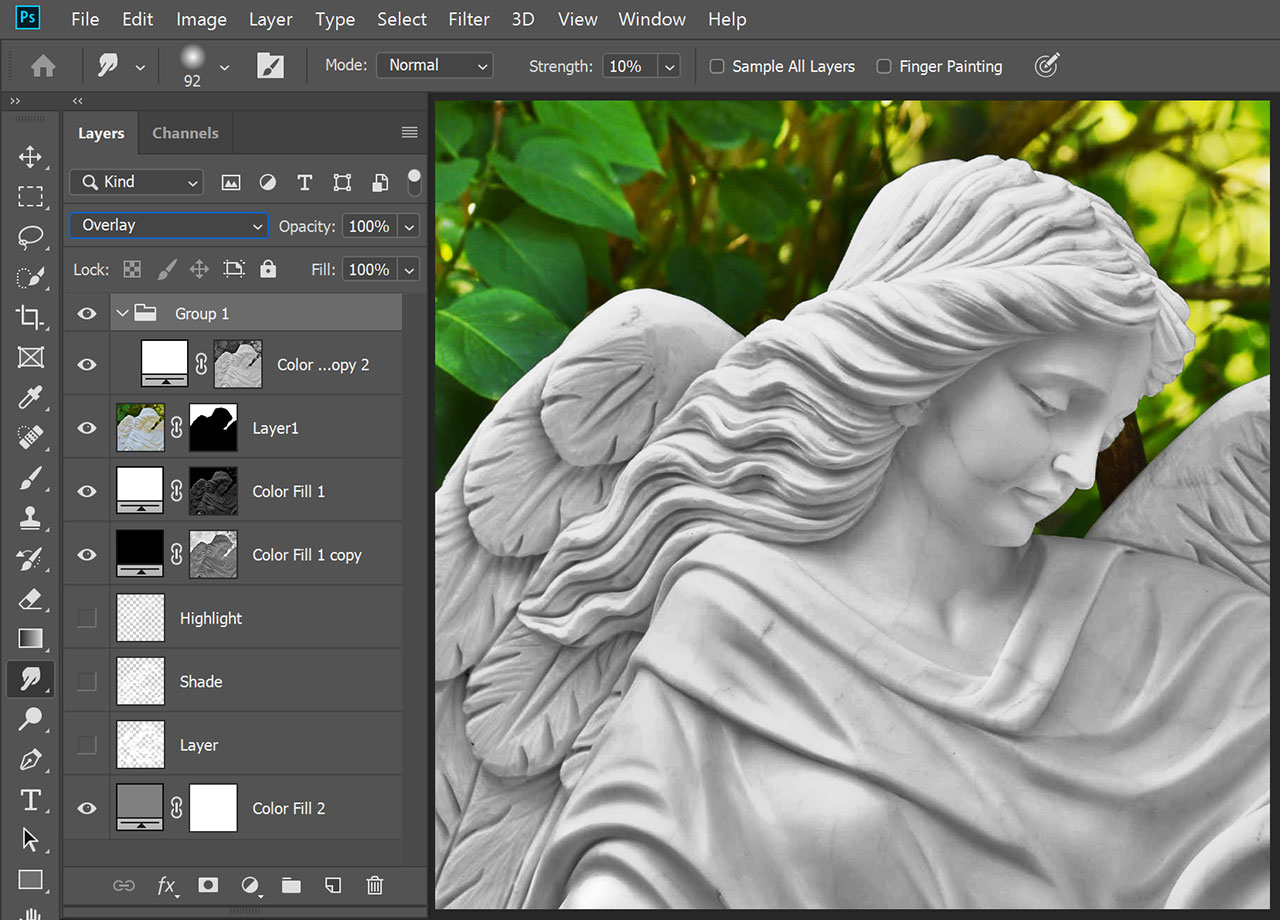
Since we've already extracted the light information of our image, simply duplicate the black Color Fill layer to the top, change it to white and invert its mask, as described above. We won't duplicate the white Color Fill layer, because it's mask has already been changed and lost valuable information. Press Ctrl + G to create a group around the layer. With this group selected, click the selector at the top of the Layers window and change the mode from Normal to Overlay:
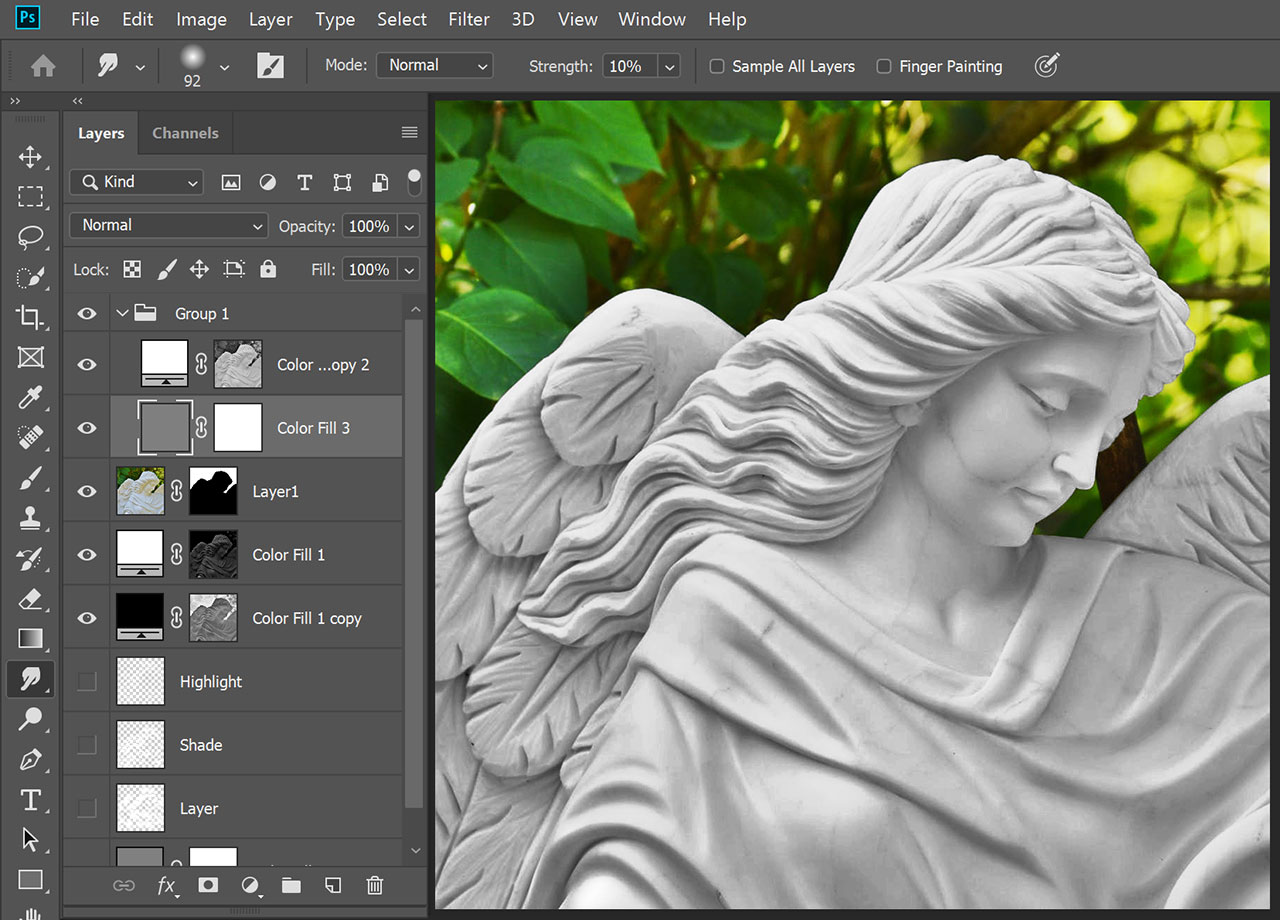
Create a new Color Fill layer with a neutral grey colour (#808080) and drag it below your lighting layer. But watch out to keep it inside the group you just created:
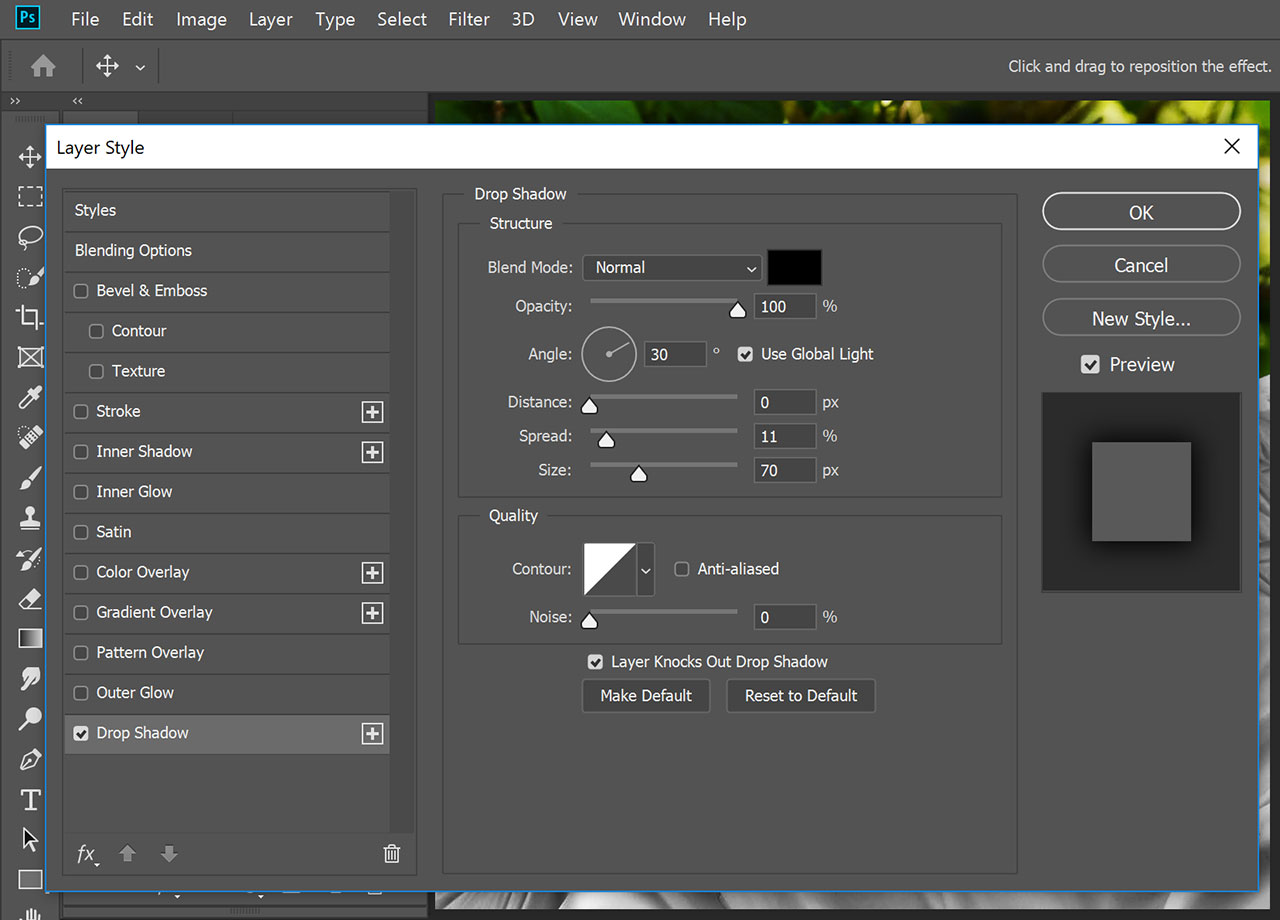
Your lighting layer's bar has 3 components: An icon, a name, and some blank grey space around it. Double-click somewhere on that blank space to open the Layer Style prompt. At the bottom of your styles options you can select Drop Shadow. Check its checkbox to add a drop shadow to the layer. Make sure the Opacity is at 100% and the Distance is set to 0. We're going to need some Spread (about 5 to 15%) and a Size between 50 to 100 px, depending on the details in your image:
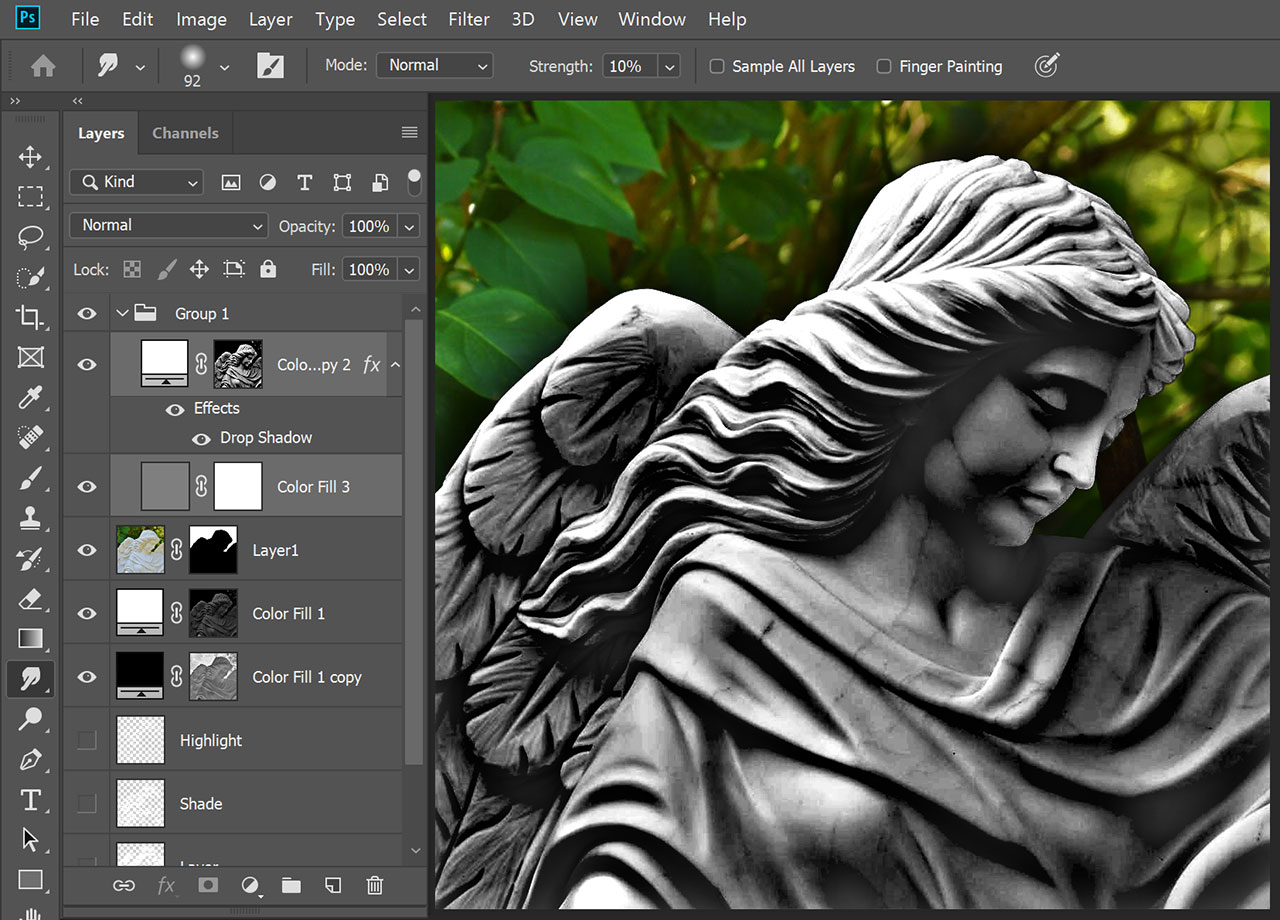
Since the lighting layer is very bright, we'll need to select its mask and once again and press Ctrl + L to change its Levels. Push the left ruler to the right to enhance the contrast. By doing this the drop shadow should get much more visible. You can also push the right ruler to the left to make the highlights brighter:
Once you're satisfied with the result (look at the sphere example image as an orientation), select one of the two layers, and then the second one while holding Shift to select both. Press Ctrl + E to merge those two layers into one:
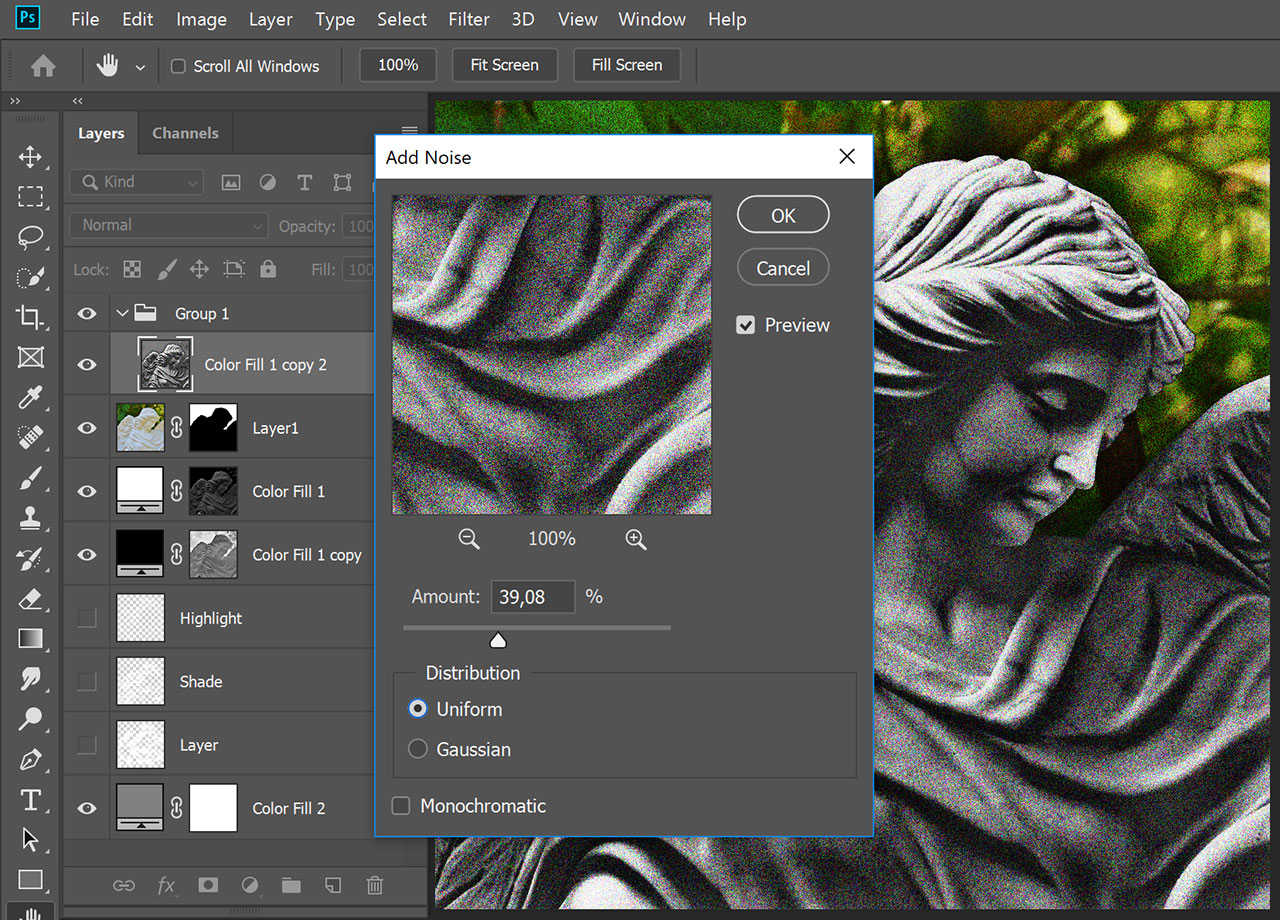
Click on the Filter menu at the top of your program and select Noise > Add Noise, set the Amount to a value you find best and confirm. This will be our metal flakes effect:
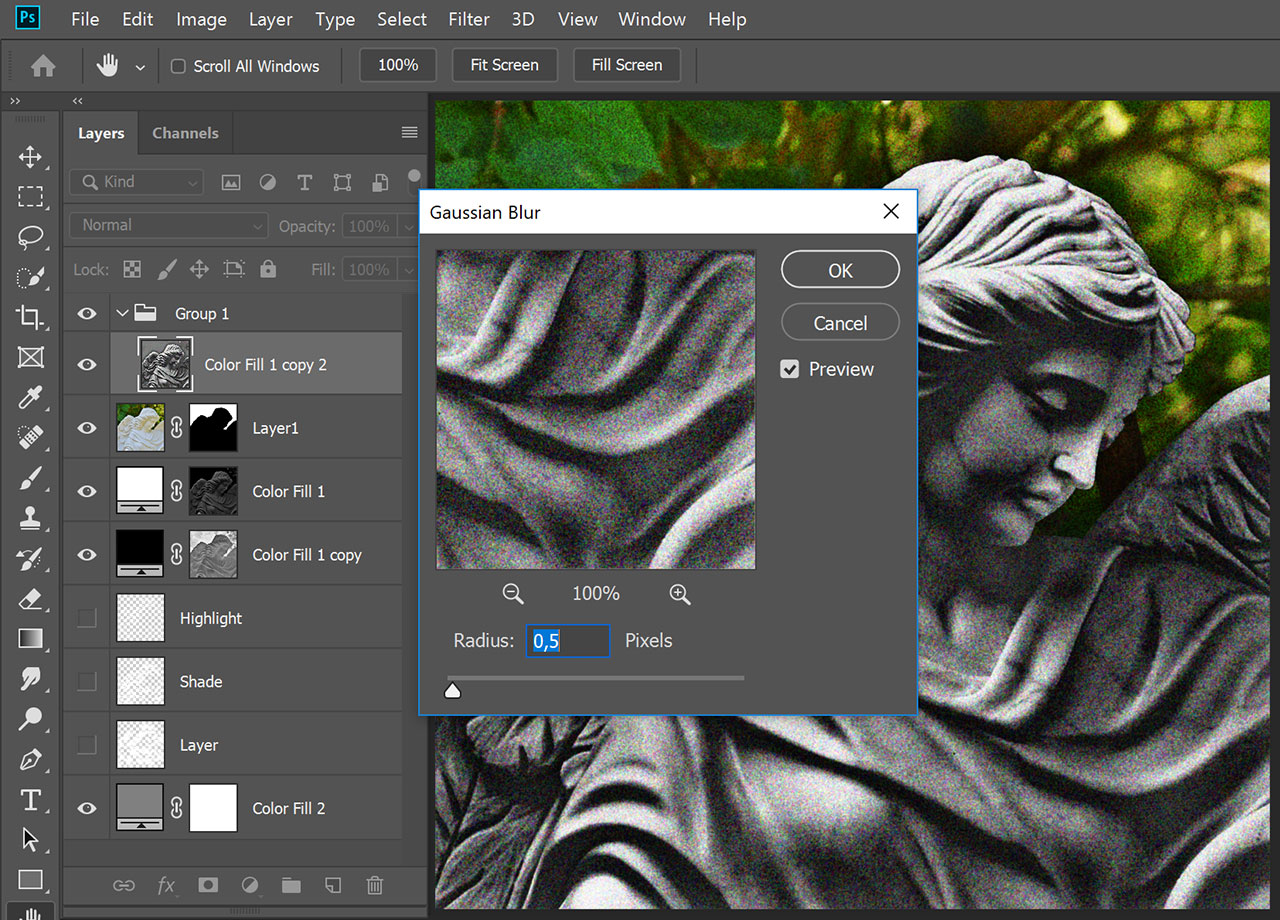
After confirming, once again click on Filter, but this time select Blur > Gaussian Blur, set it to a value of 0.3 to 0.5 and confirm:
Next press Ctrl + L to brighten the layer. Push the bottom left ruler to around 75 and confirm:
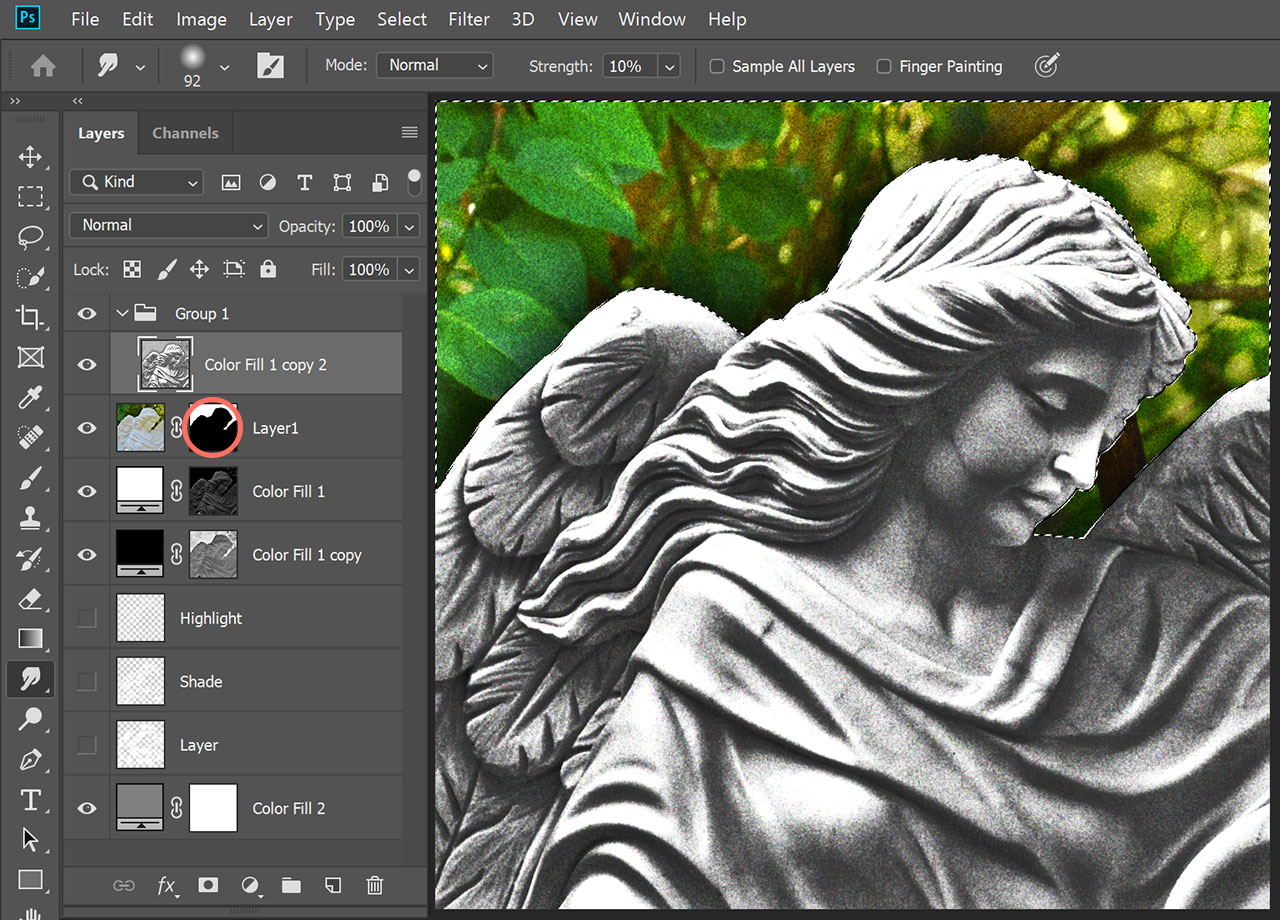
Now you'll notice, that our filter image also changes the leaves in the background, which we have to fix. Hold Ctrl and click on the mask of the very first layer we ever created (I really did tell you we'd be going to need this one):
Create an new neutral grey Color Fill layer (#808080). If our filter image was still selected, the new layer should now be right above it. If not, place the grey layer above your filter image layer.
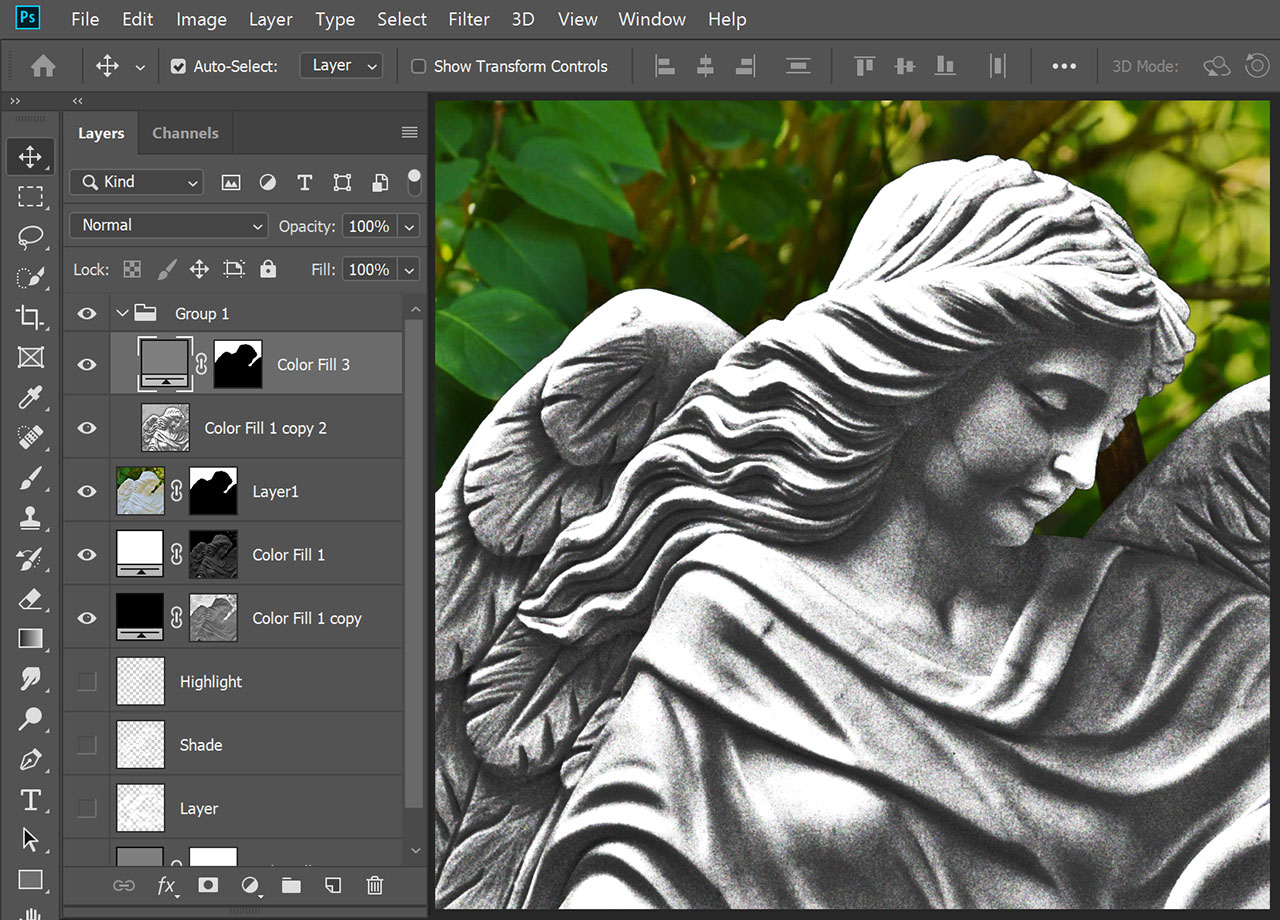
Change the group's mode from Overlay back to Normal. And here's our finished Metallic filter image:
1.6 Exporting all images
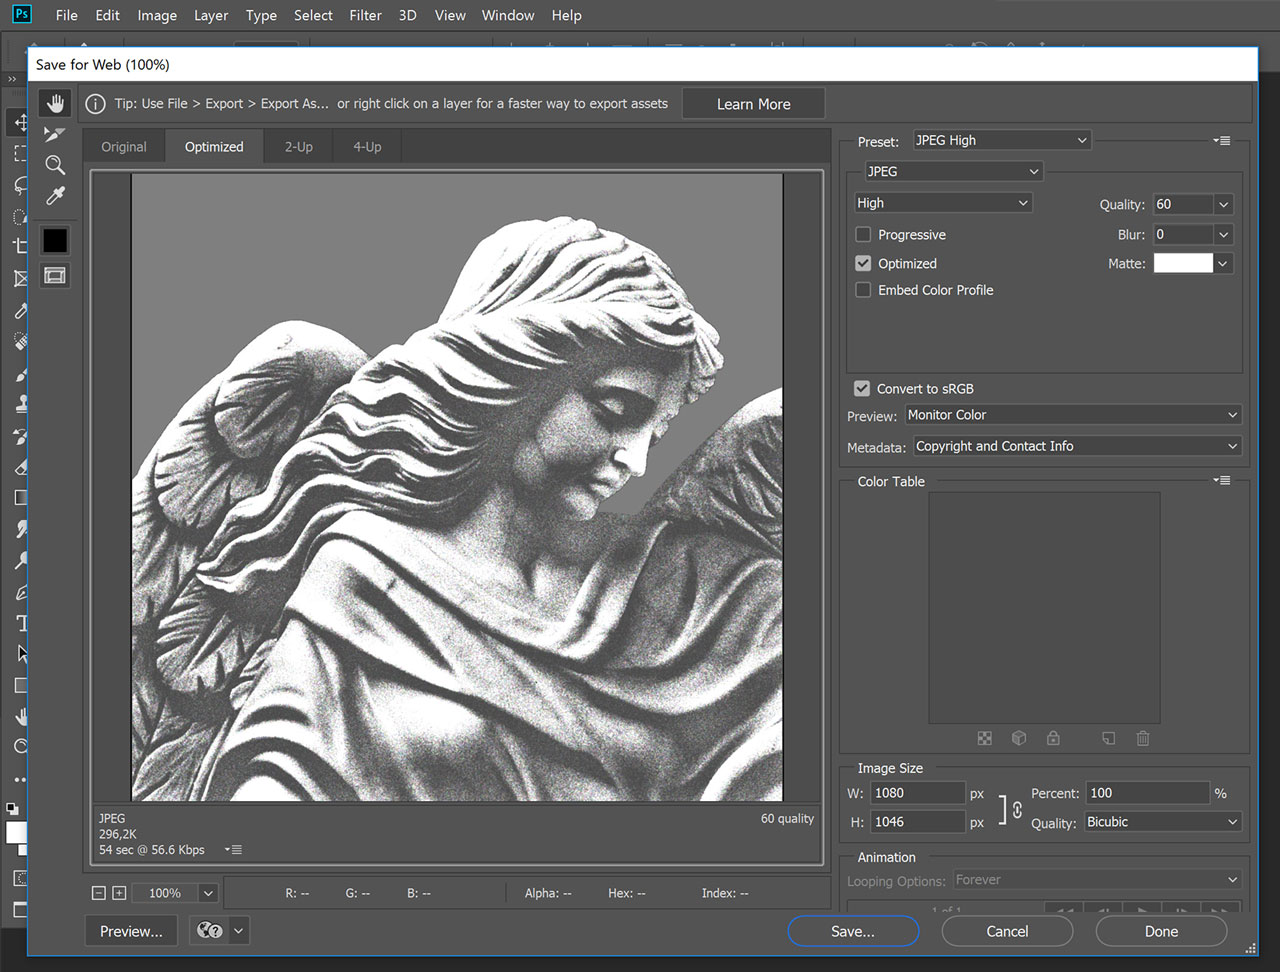
Press Ctrl + Alt + Shift + S and choose JPEG High as Preset. Make sure to set the Quality to 60%. The quality difference to 100% won't be noticable, but the file size will be a lot smaller. Confirm the export settings and save the image:
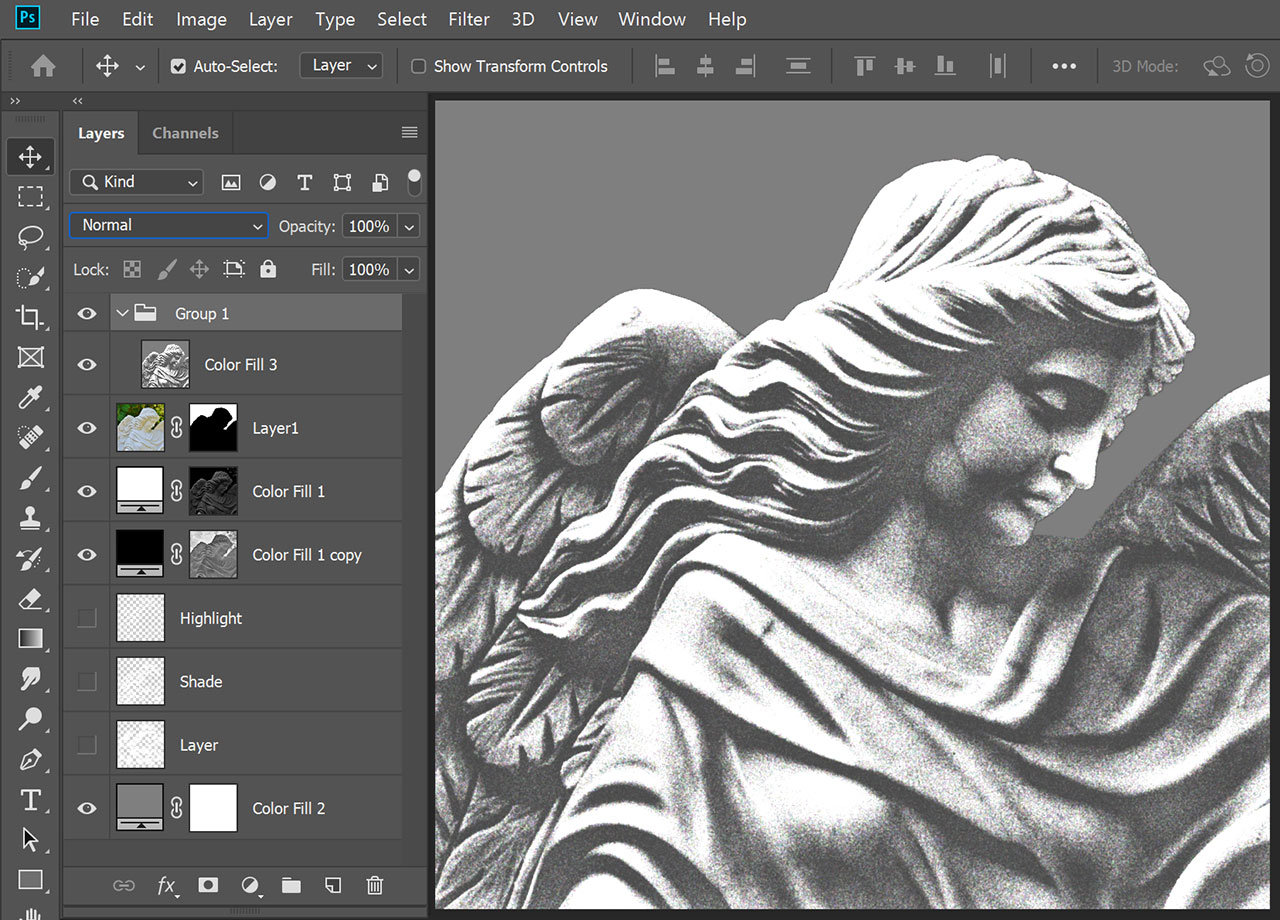
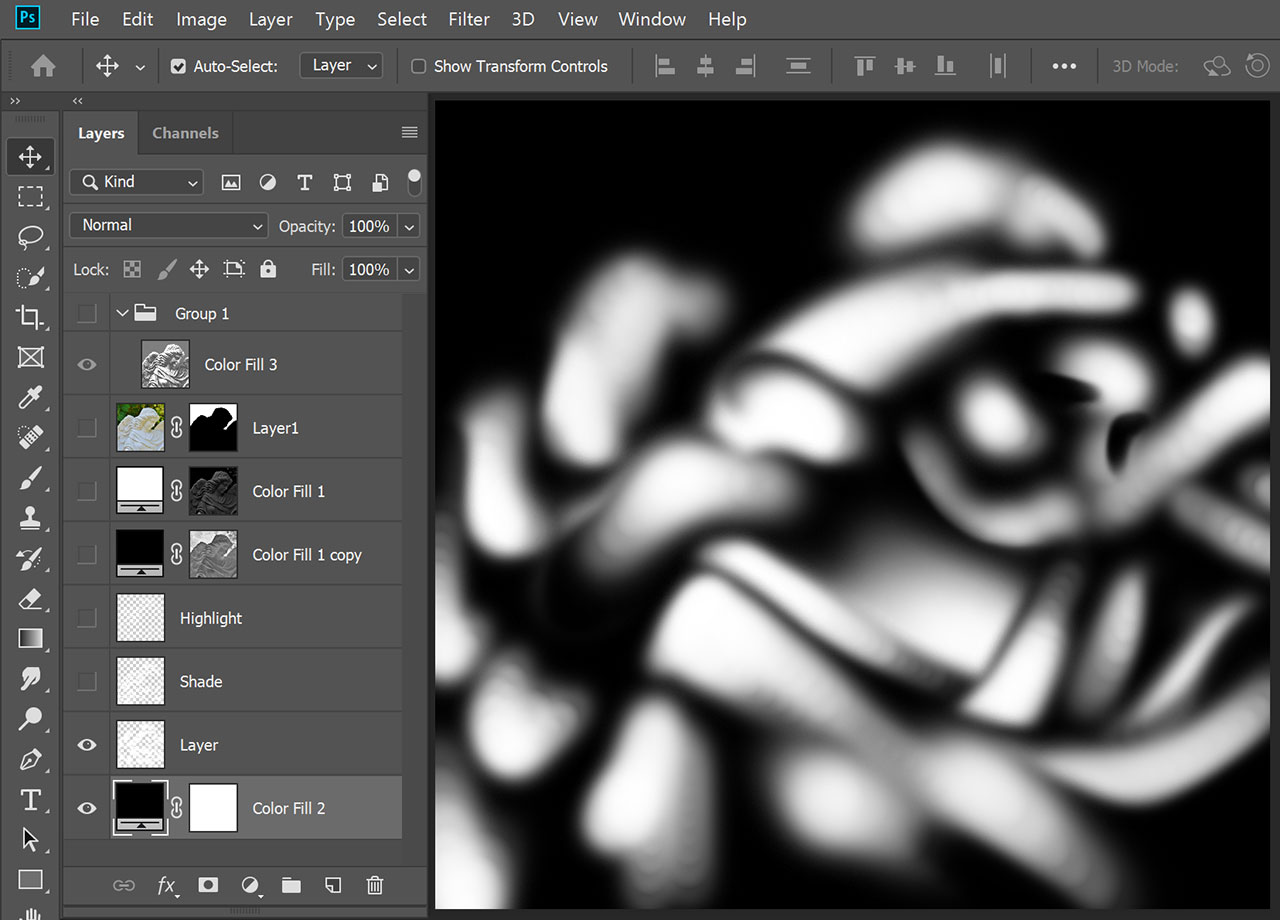
Hide all layers, except for the bottom Color Fill and Layer. Then change the Color Fill layer to black and also export the result as a 60% quality JPG:
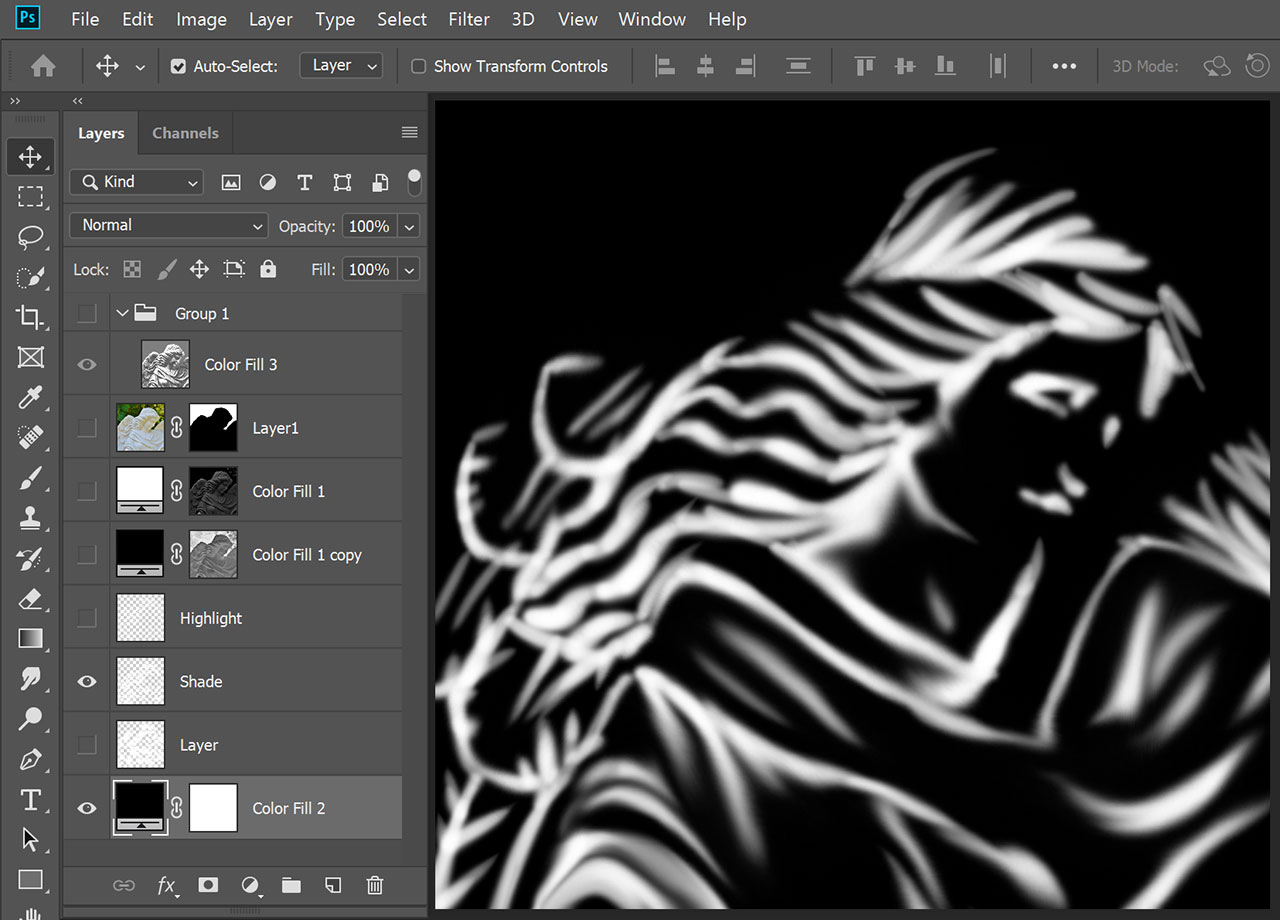
Hide Layer, display Shade and export it as a 60% quality JPG:
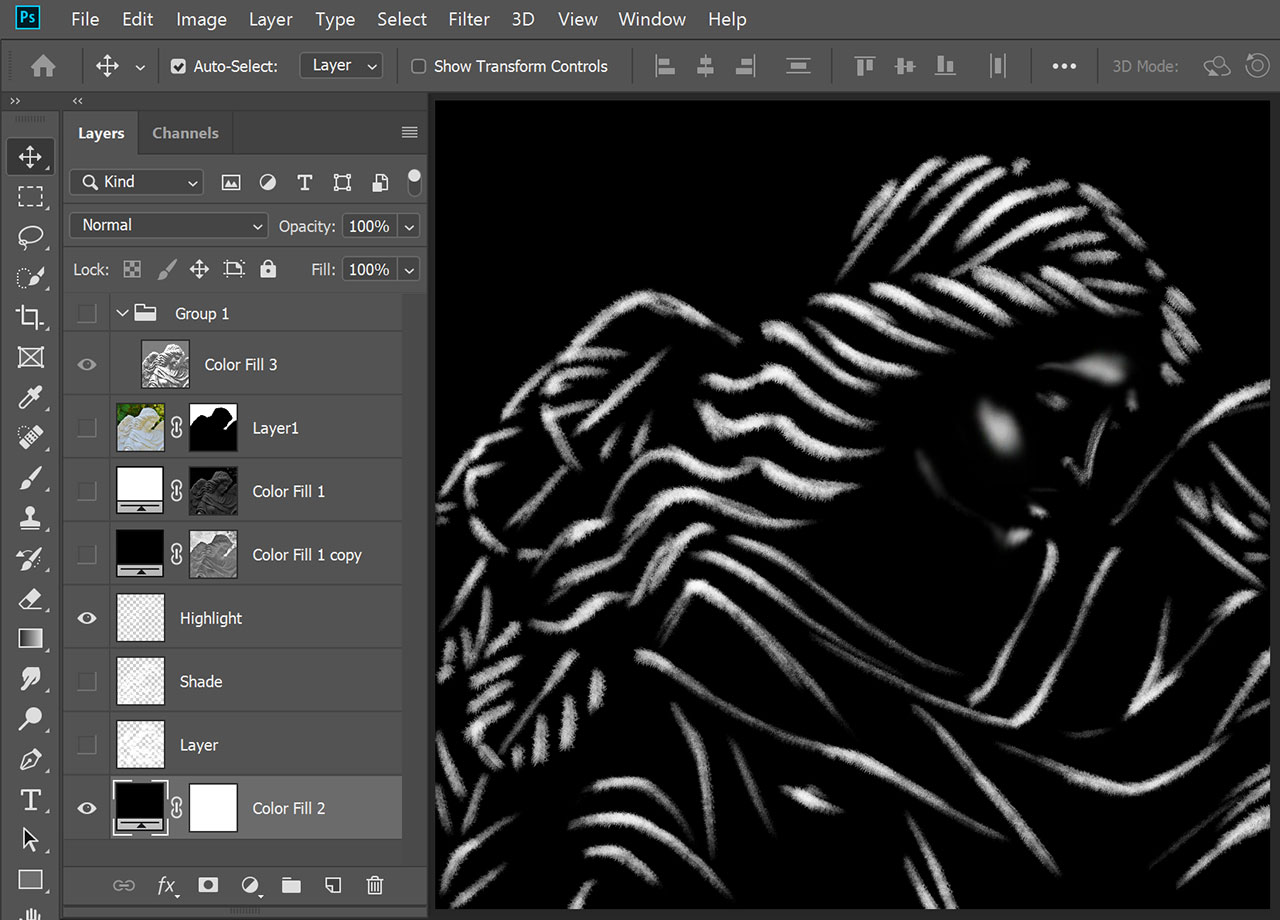
Hide Shade, display Highlight and export it as a 60% quality JPG:
You now should have these 5 images:
2.1 Setting up the SVG file
Open Adobe Illustrator and create a new document with exactly the same pixel size of the images you just exported. Make sure to have the Toolbar, the Transparency, the Pathfinder, the Layers and the Links windows active. You can activate them in the Window top menu.
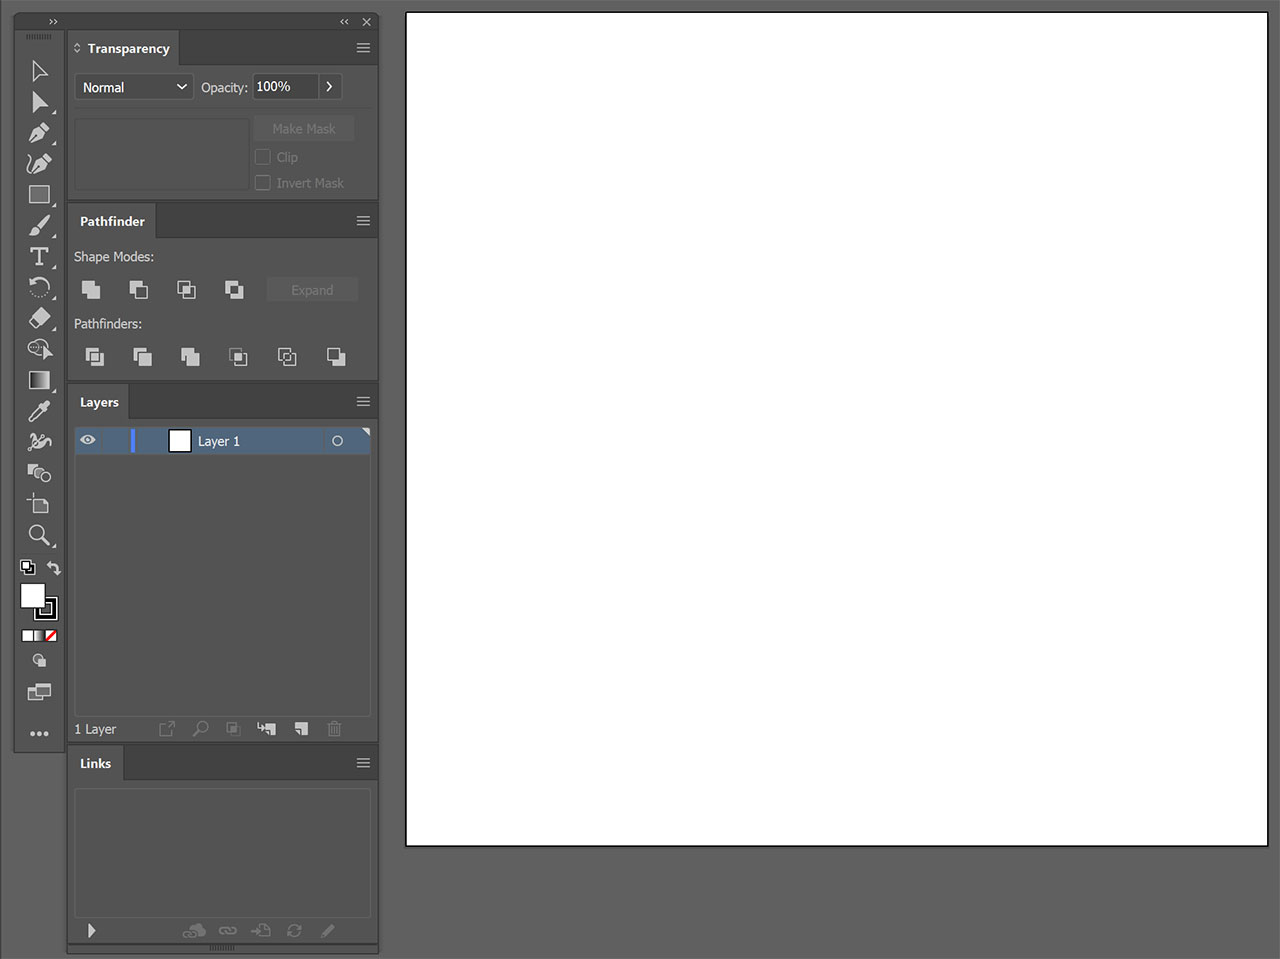
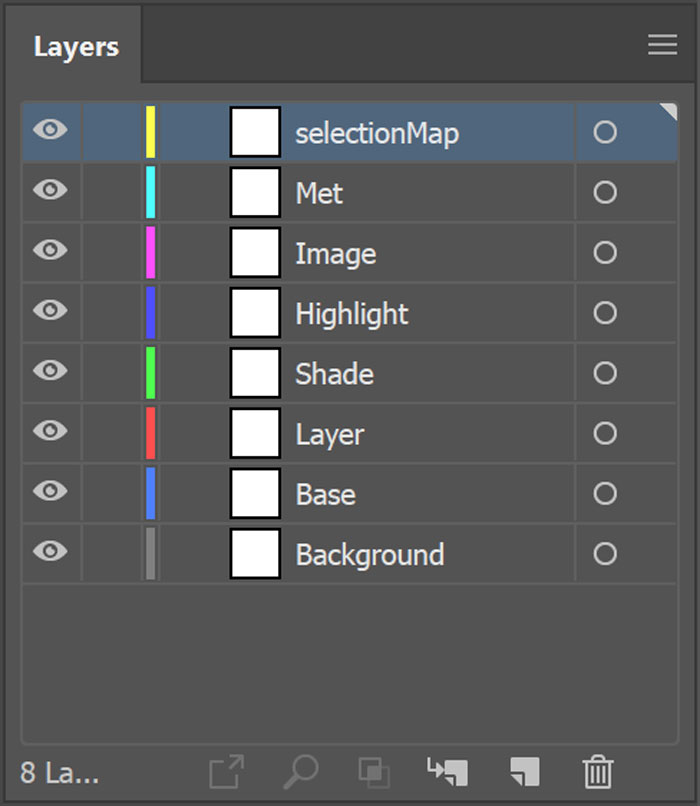
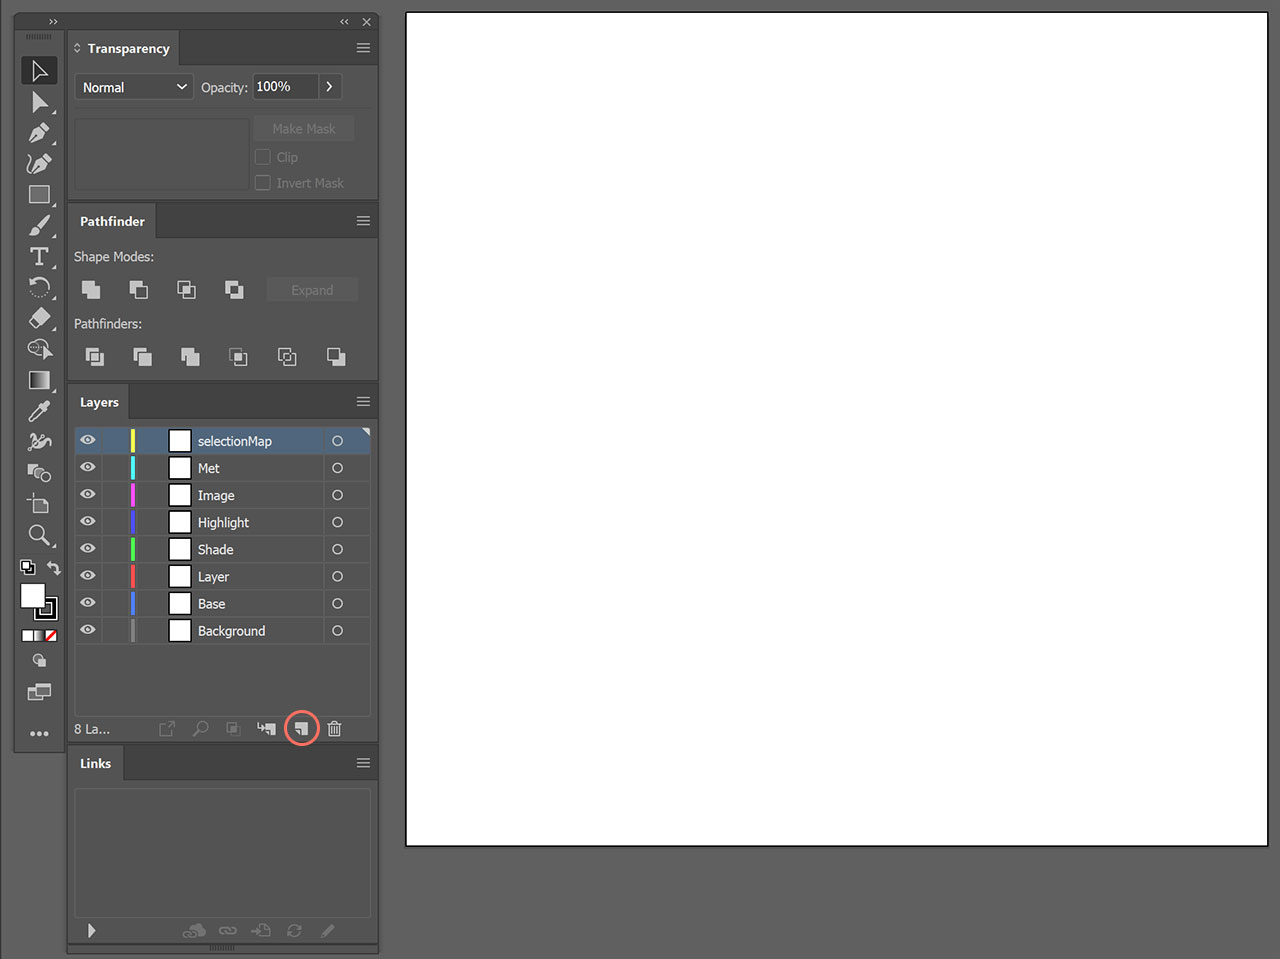
In the Layers window, click the Create New Layer icon 7 times, which will leave you with 8 empty layers in total. Then double-click every layer's name to rename it as in the image below.
These layer names and their order are essential! If you misspell them or arrange them in a different order, the file may eventually not work at all or at least cause serious errors!
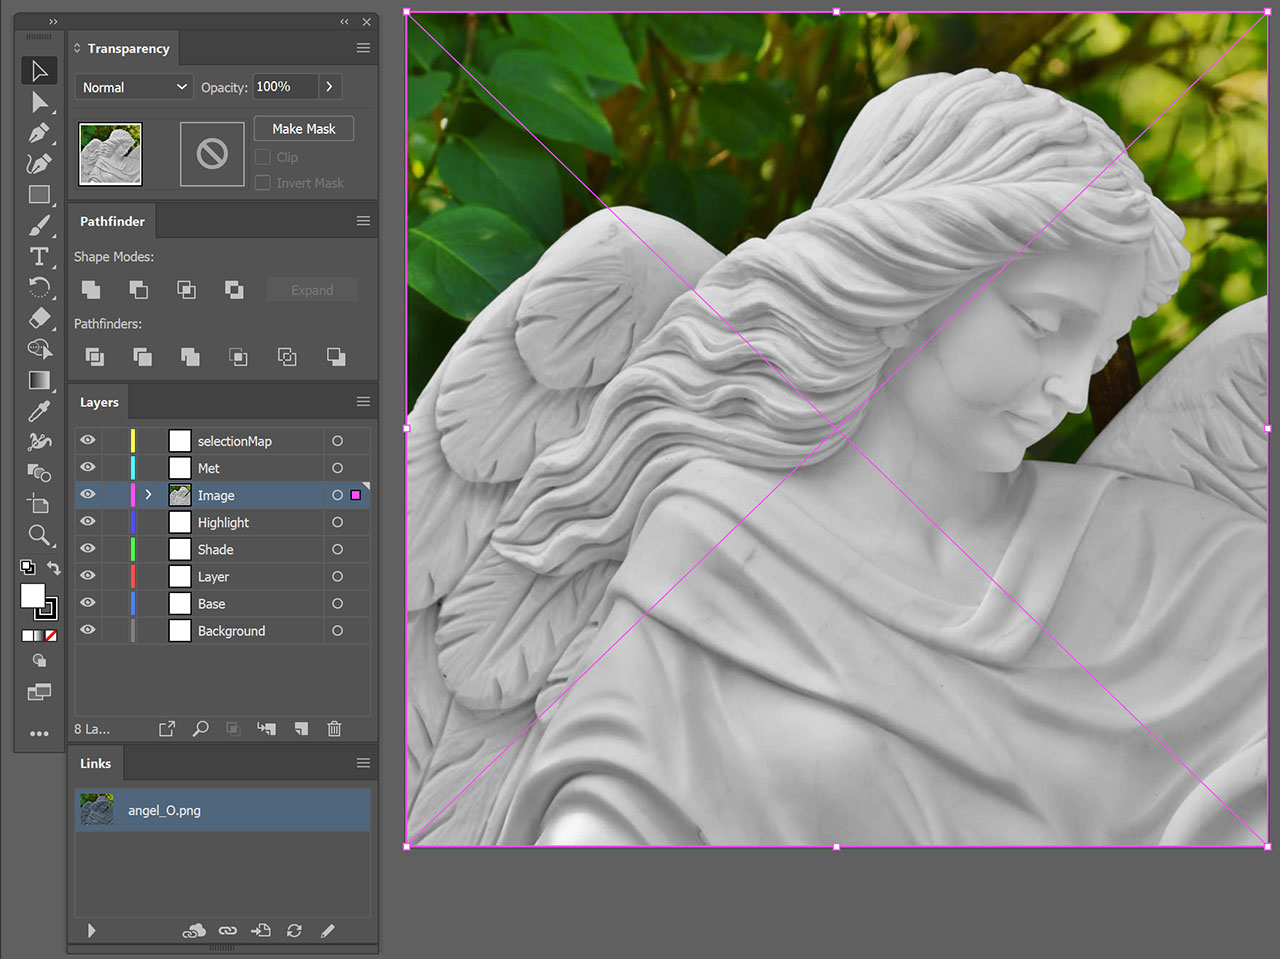
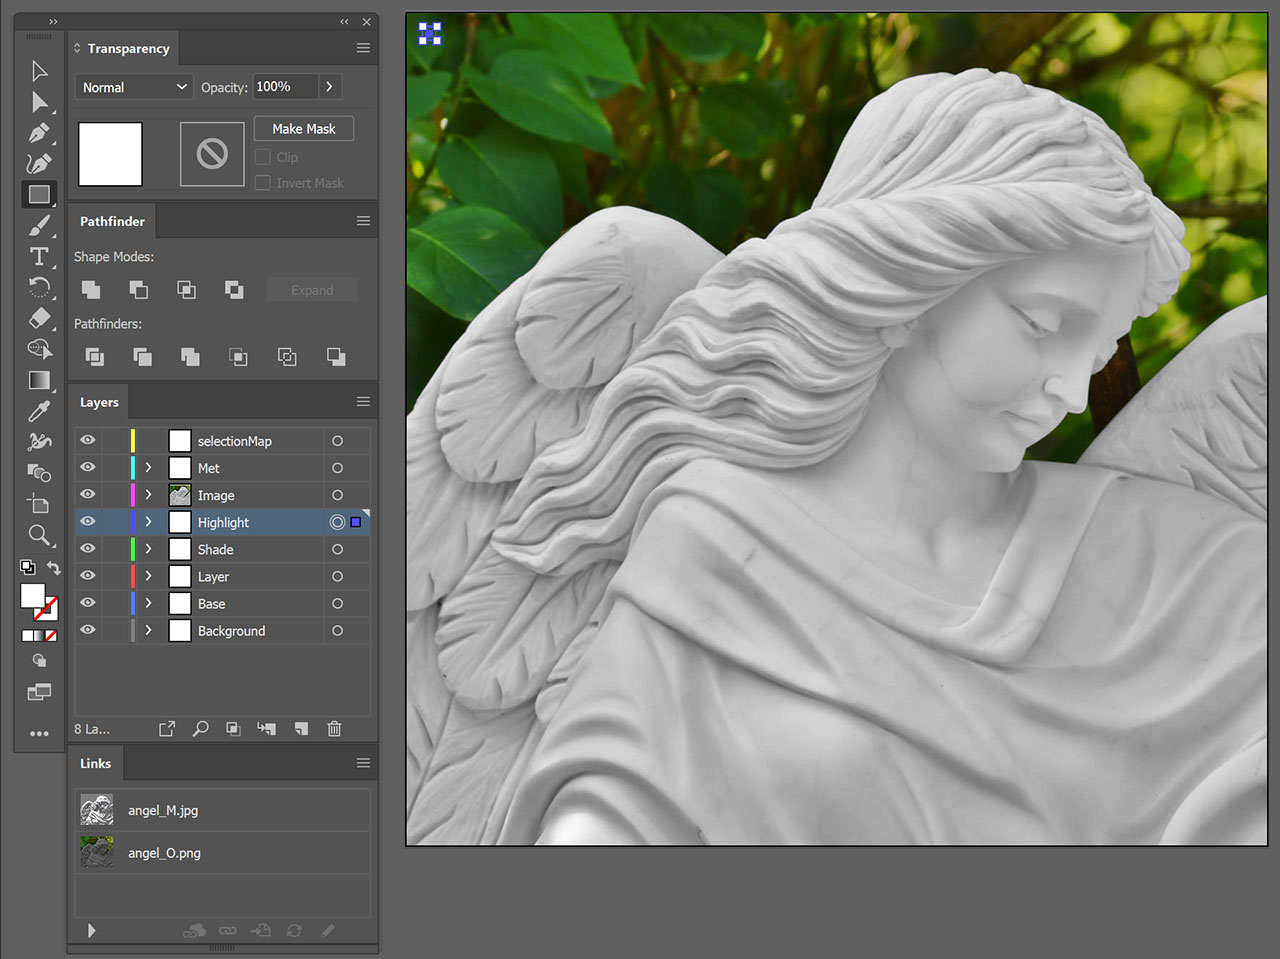
Click on the Image layer and drag your Overlay image from your Explorer (or finder if you're using a Mac) onto the canvas. The image should snap to the canvas' corners. If it doesn't, press ctrl + U to activate snapping:
Click on the Met layer and drag your Metallic filter image onto the canvas. Make sure it snaps to the corners. Then click the circle icon of your Met layer first and then double-click the second icon in your Transparency window:
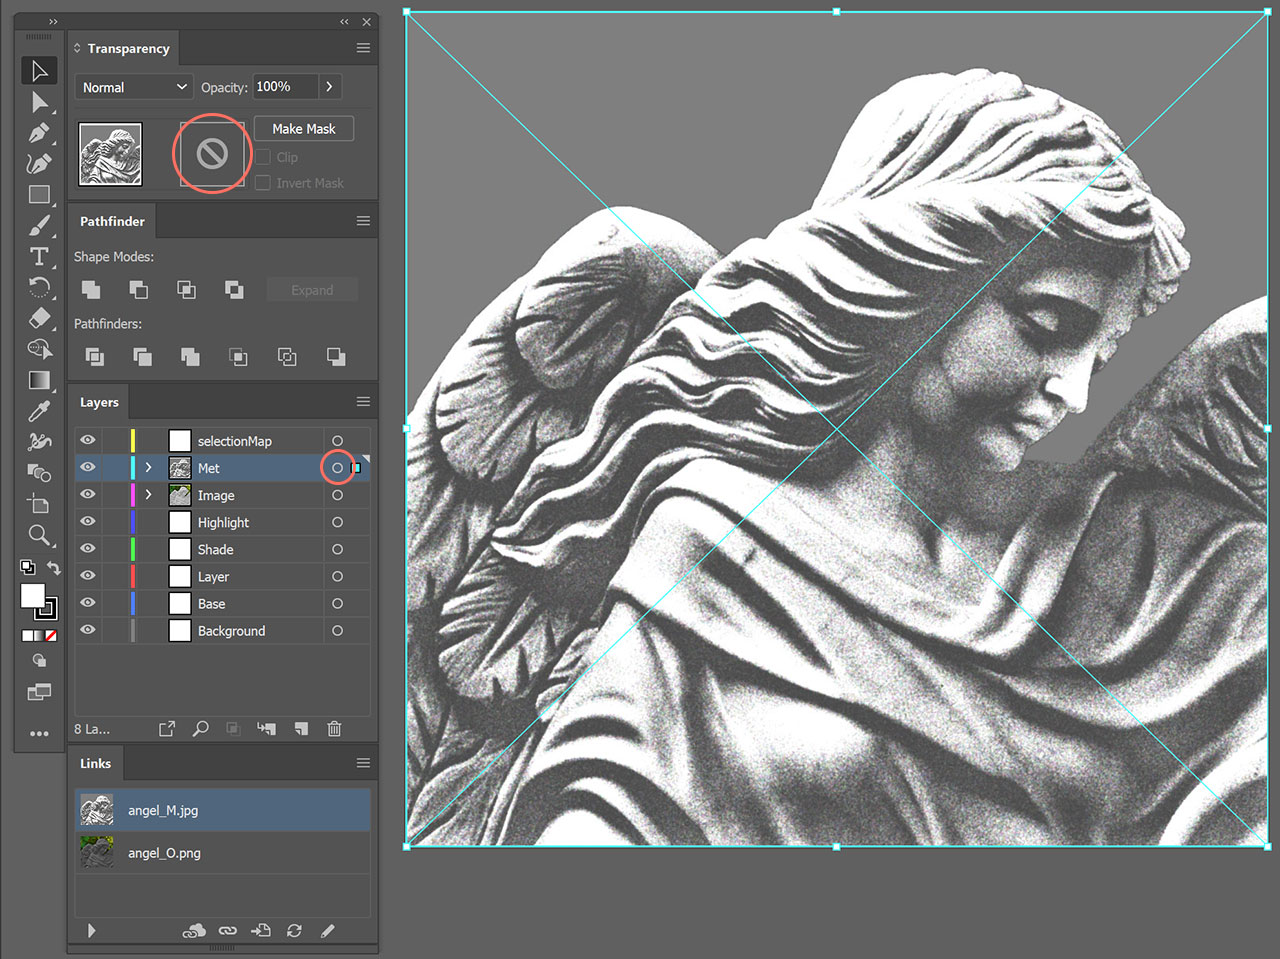
You just created an opacity mask for your Met layer. Your Metallic filter image should now be invisible, because there are no white contents inside this mask. We will leave this blank and leave the mask again by clicking the first icon in the Transparency window to get back to our canvas.
Note: At this point Illustrater may have applied the mask to your Met layer AND to the image you placed there. So expand the Mat layer and select the image. If the Transparency window shows you that the Metallic filter image has a mask, press the Release button in that window to remove it. Otherwise the filter will not work.
If you want to use a Background layer (we mentioned that you may as well skip this), press M to activate the Rectangle Tool. Click on your Background layer and draw a rectangle that covers your whole image. With the rectangle still selected, you can use the colour picker to define its colour. We'll be leaving it blank in our example:
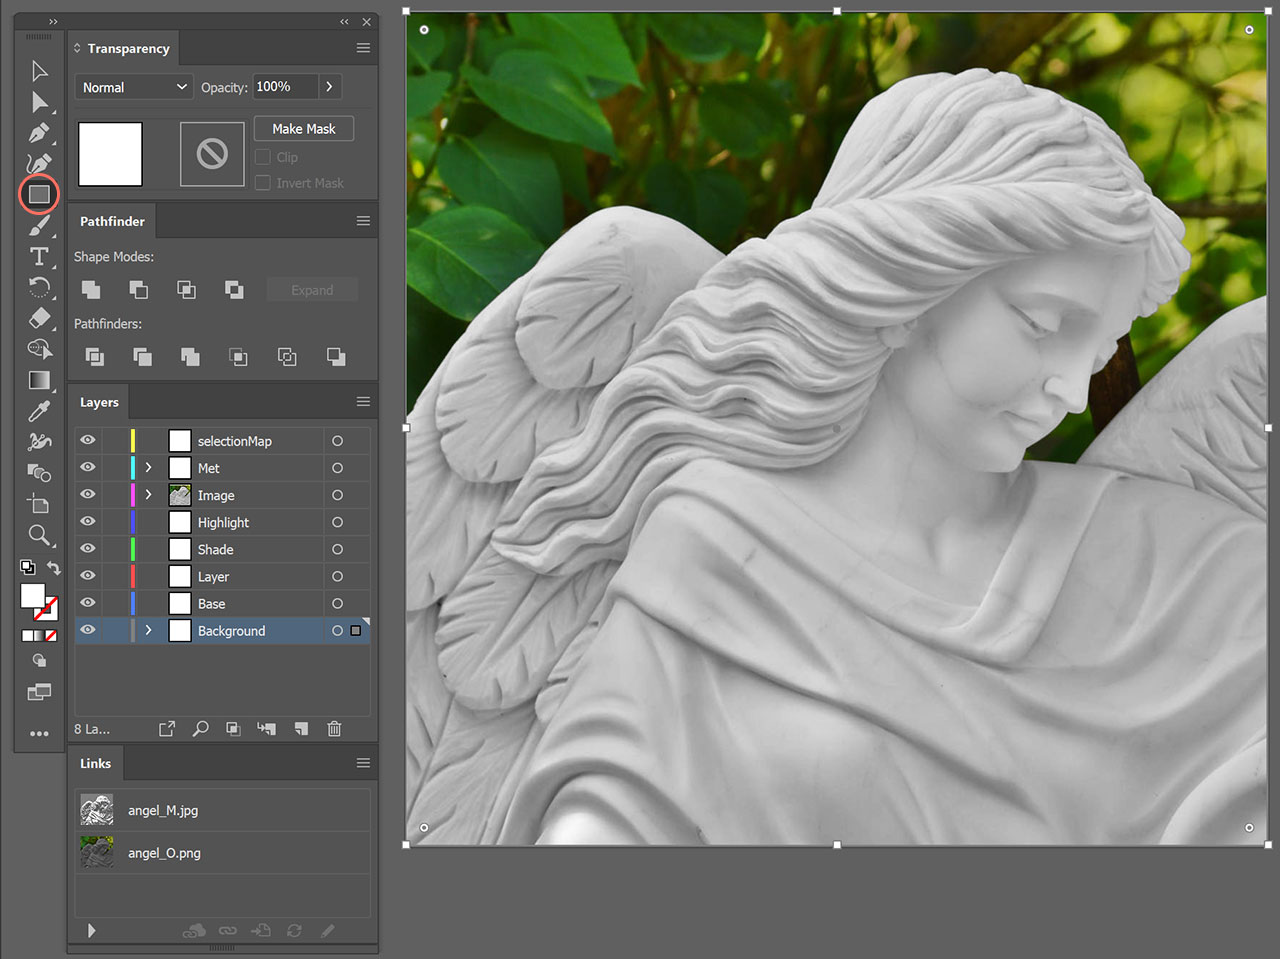
Next select your Base layer and draw a little rectangle in the corner of your image. Illustrator will ignore/remove empty layers when exporting our SVG, so we need some sort of content here. The rectangle will create a little coloured icon in the very right corner of your layer. We will need this for the upcoming step:

While holding Alt drag the little square icon of your layer (which represents all of the layer's contents) onto the layer above. This will create a duplicate on Layer:
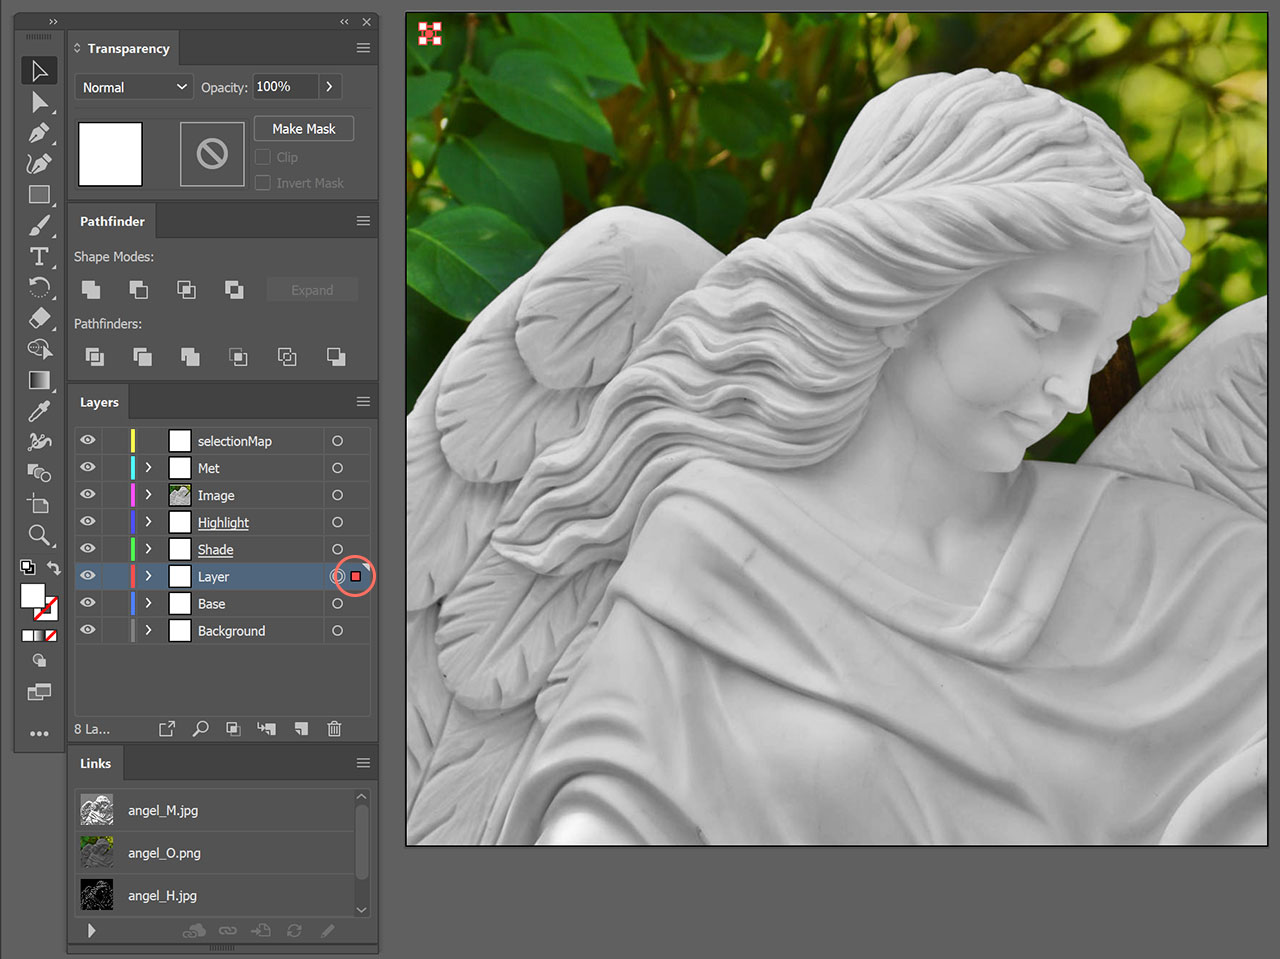
Do the same for Shade:

... and for Highlight. Now you can be sure, that these three layers won't get deleted during our export:
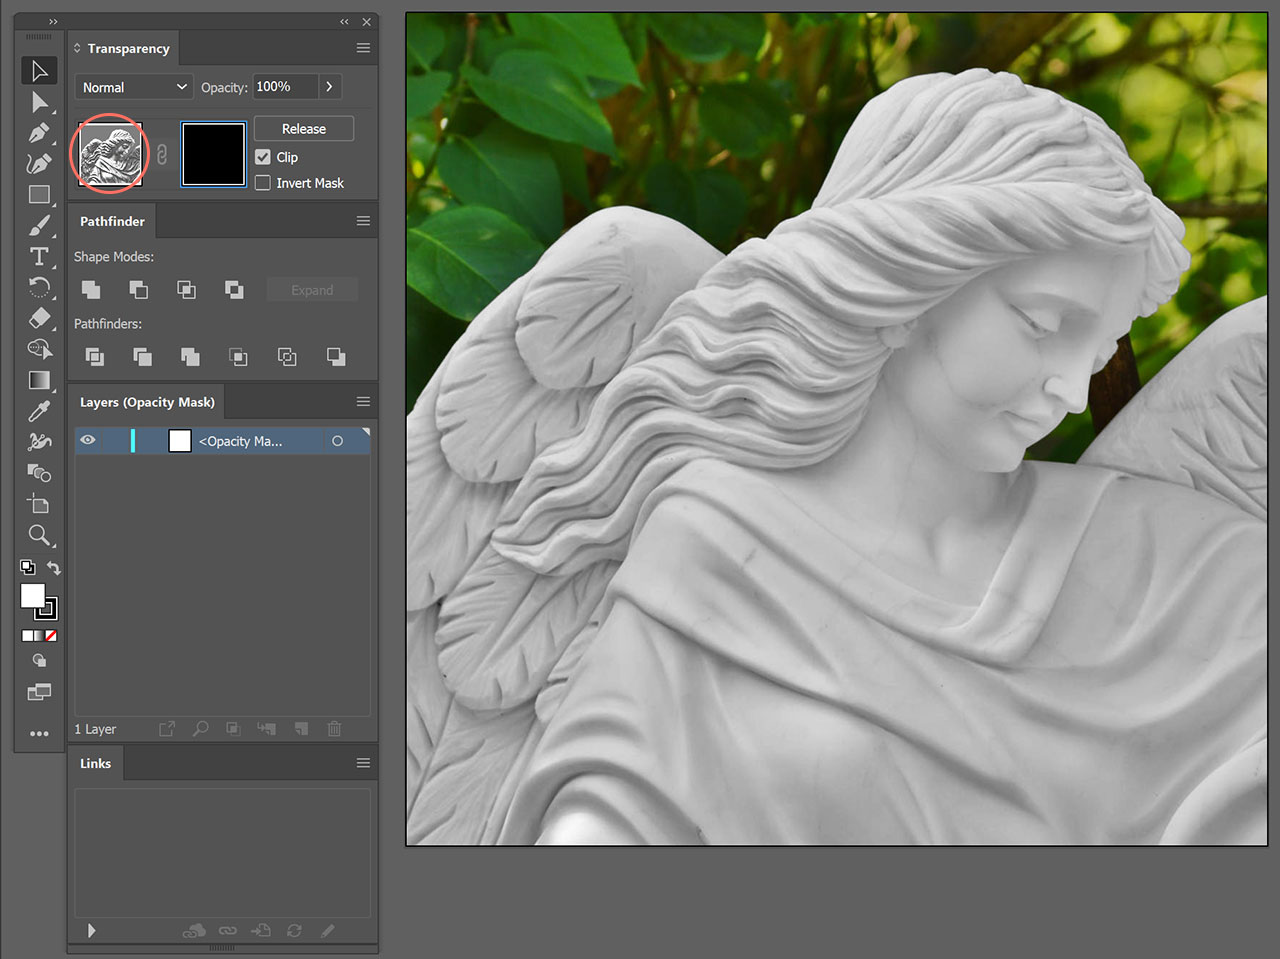
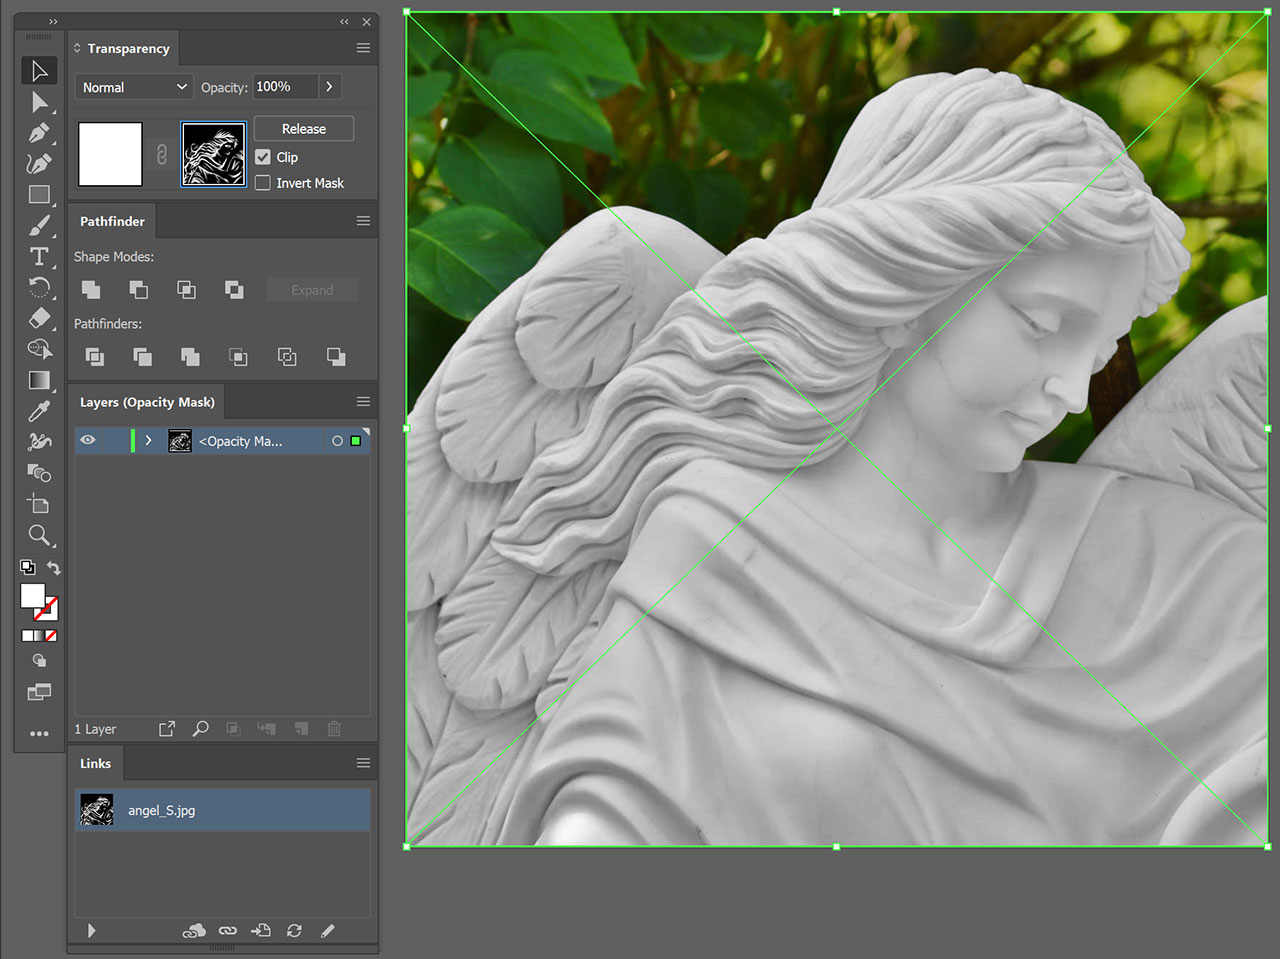
Make sure the little circle icon of your Highlight layer is selected and double-click the second icon in your Transparency window to apply a mask to that layer:

Here we will place our Highlight mask image by draging it in. Then go back to your canvas by clicking the white icon in the Transparency window:

Select the Shade layer and follow the same procedure with the Shade mask image that you did in the previous steps:
Also repeat those steps for Layer:

2.2 Creating interactive Elements for your SVG
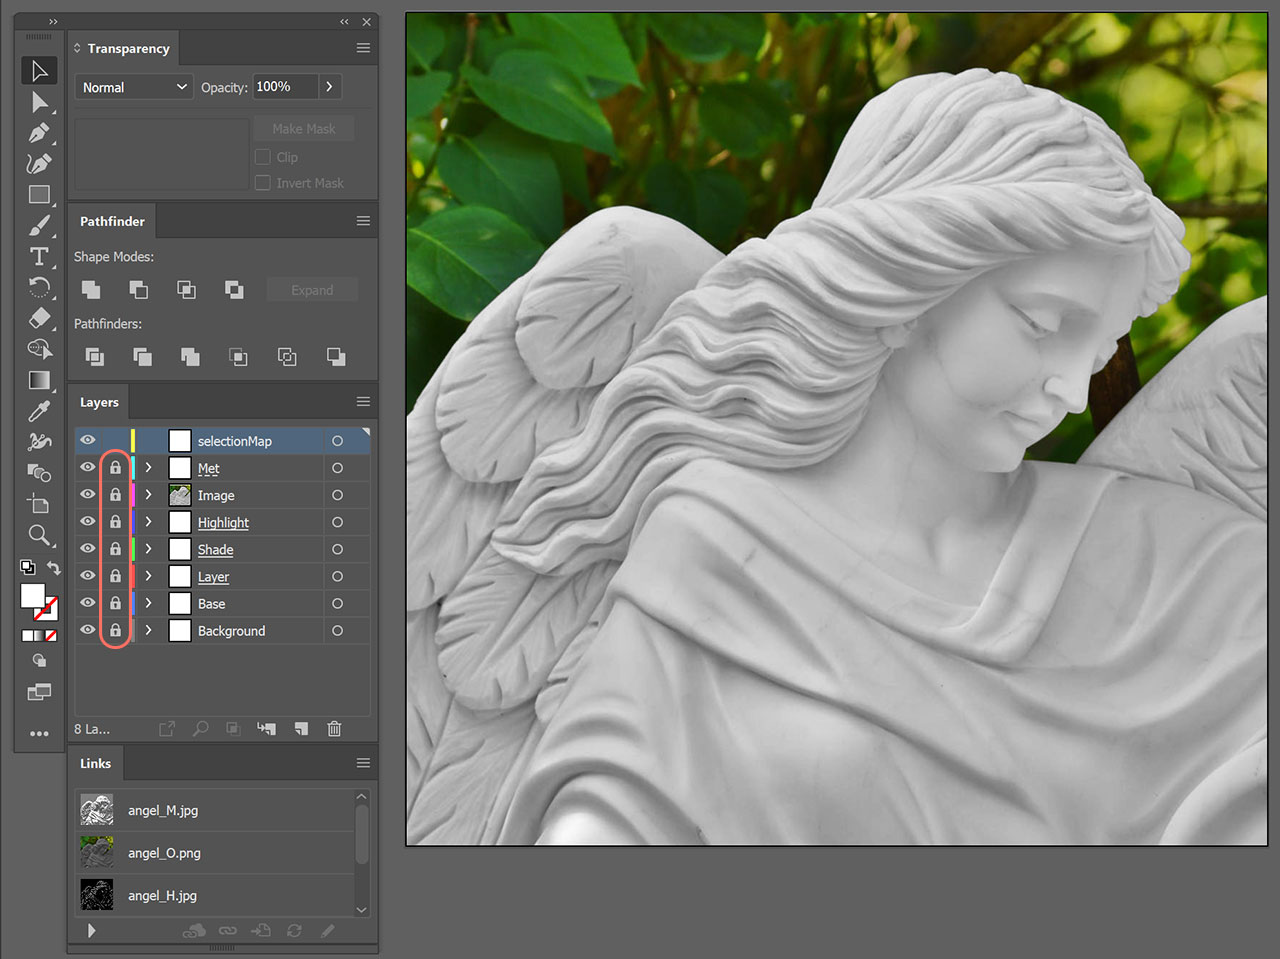
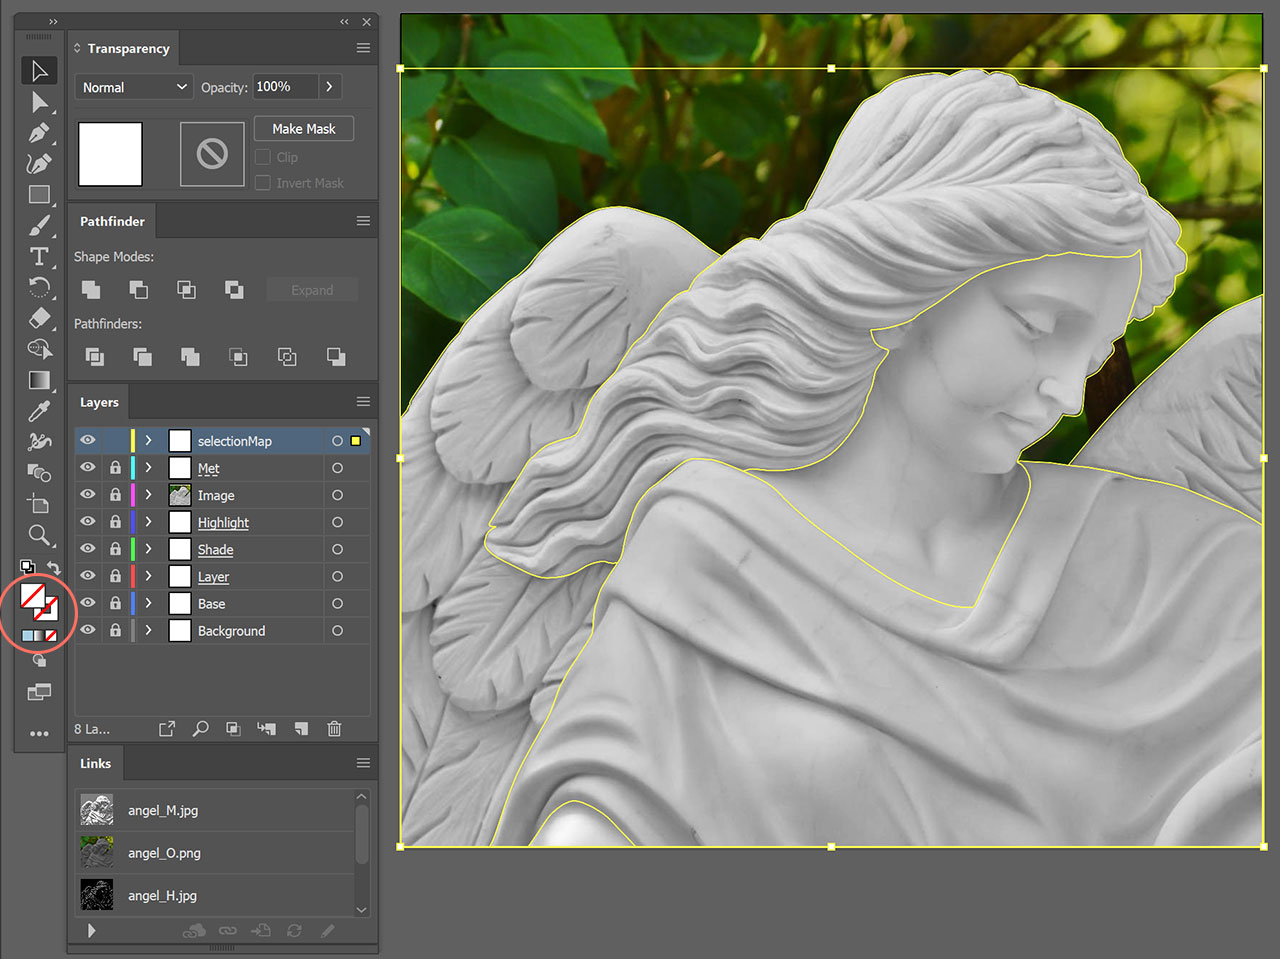
To avoid destroying our process, lock all layers except for selectionMap by clicking the areas highlighted in the image below:
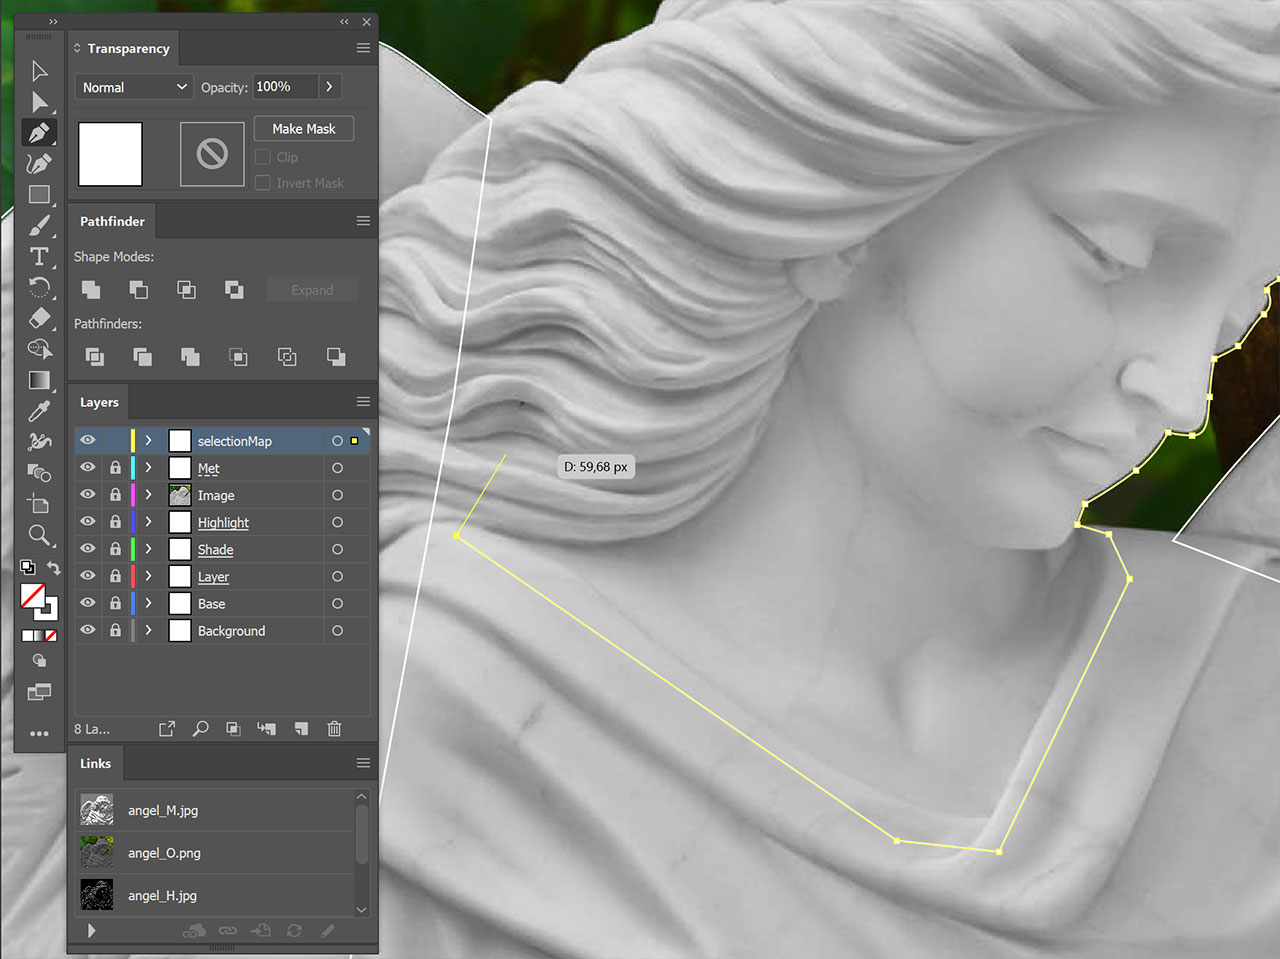
Press P to activate the Path tool and set the colour picker to an empty fill and a white outline. Then start drawing the areas that will be selectable in your SVG. Depending on your image this may be the most time consuming part, it just as well might be only 1 form. But you're going to need at least one. If you're having trouble with this tool, you should look up some tutorial videos about drawing curves.
Note: impcat will only address its controls to Path objects! If you draw a rectangle or a circle, the SVG will contain Rect or Circle objects. These will not be affected by the colouring function! It has to be exclusively Path objects!
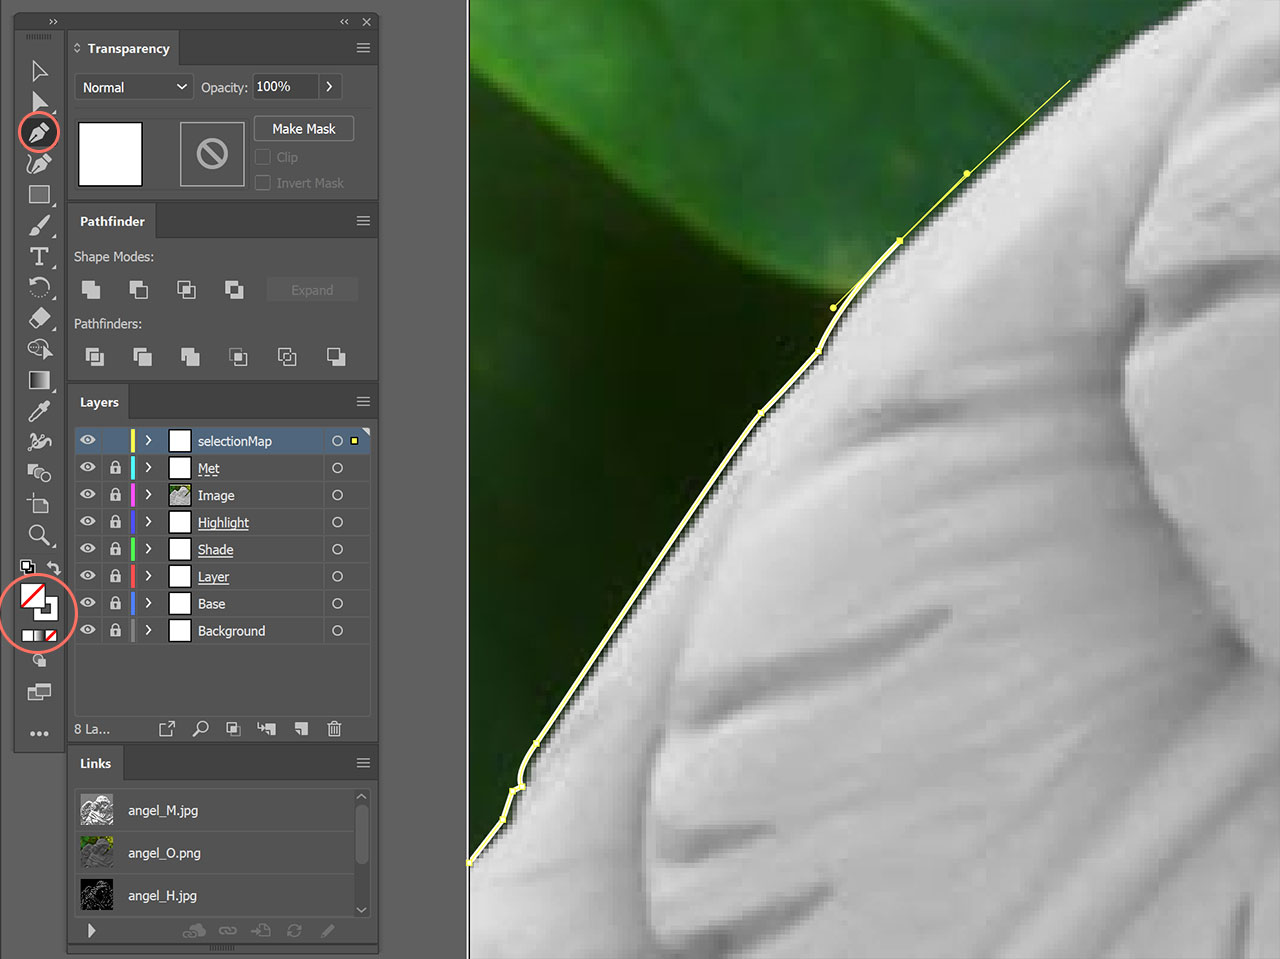
Along the sillouhette of your editable object the path may have a 1 to 2 pixel margin. Also, in those areas that will be overlapping (like in this case the robes will be overlapping the skin), you can keep it rough. The overlapping paths are going to be the precise ones:
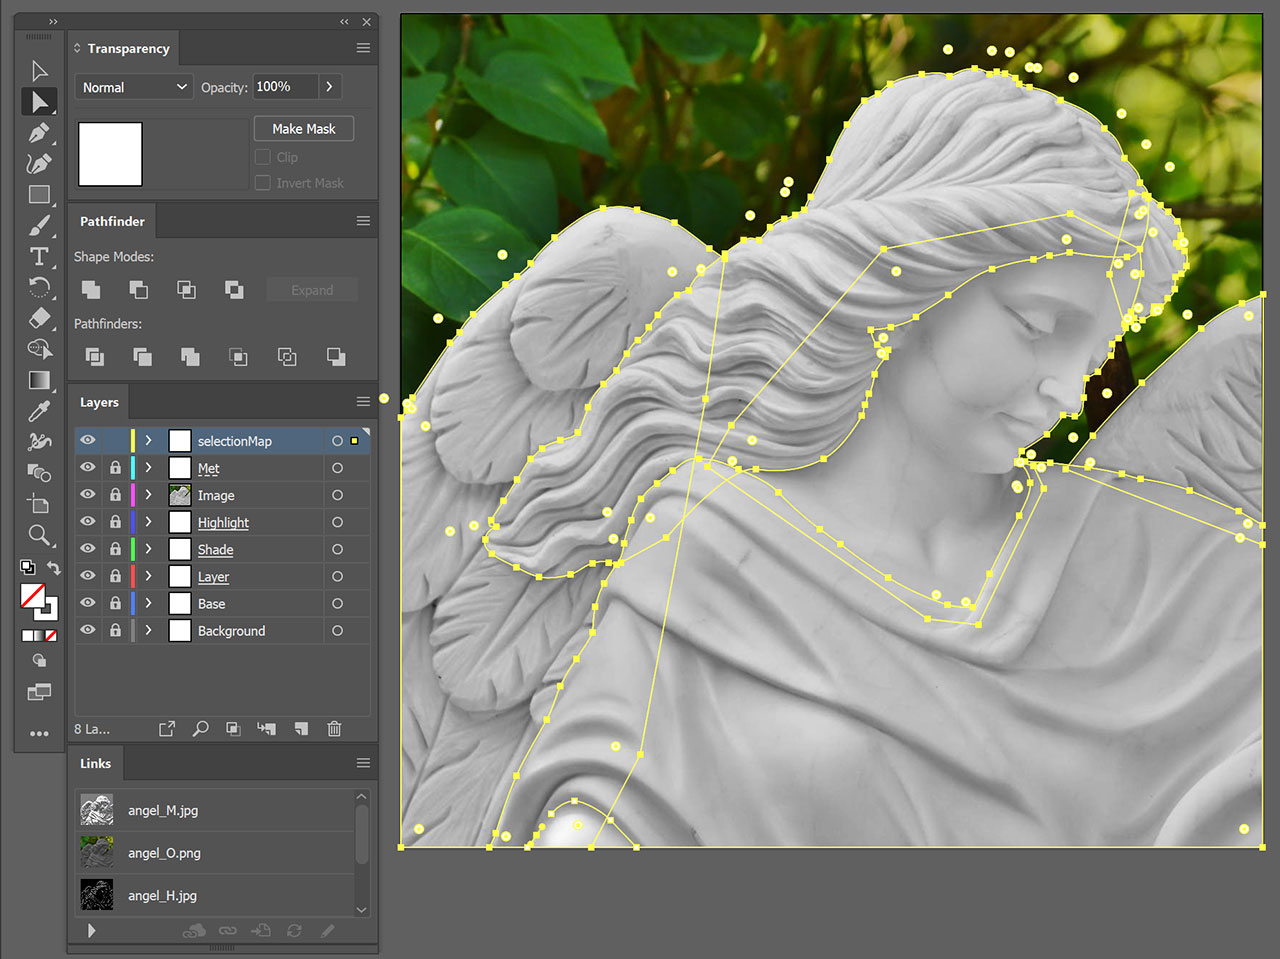
Once you're finished, you should have a lot of overlapping curves:
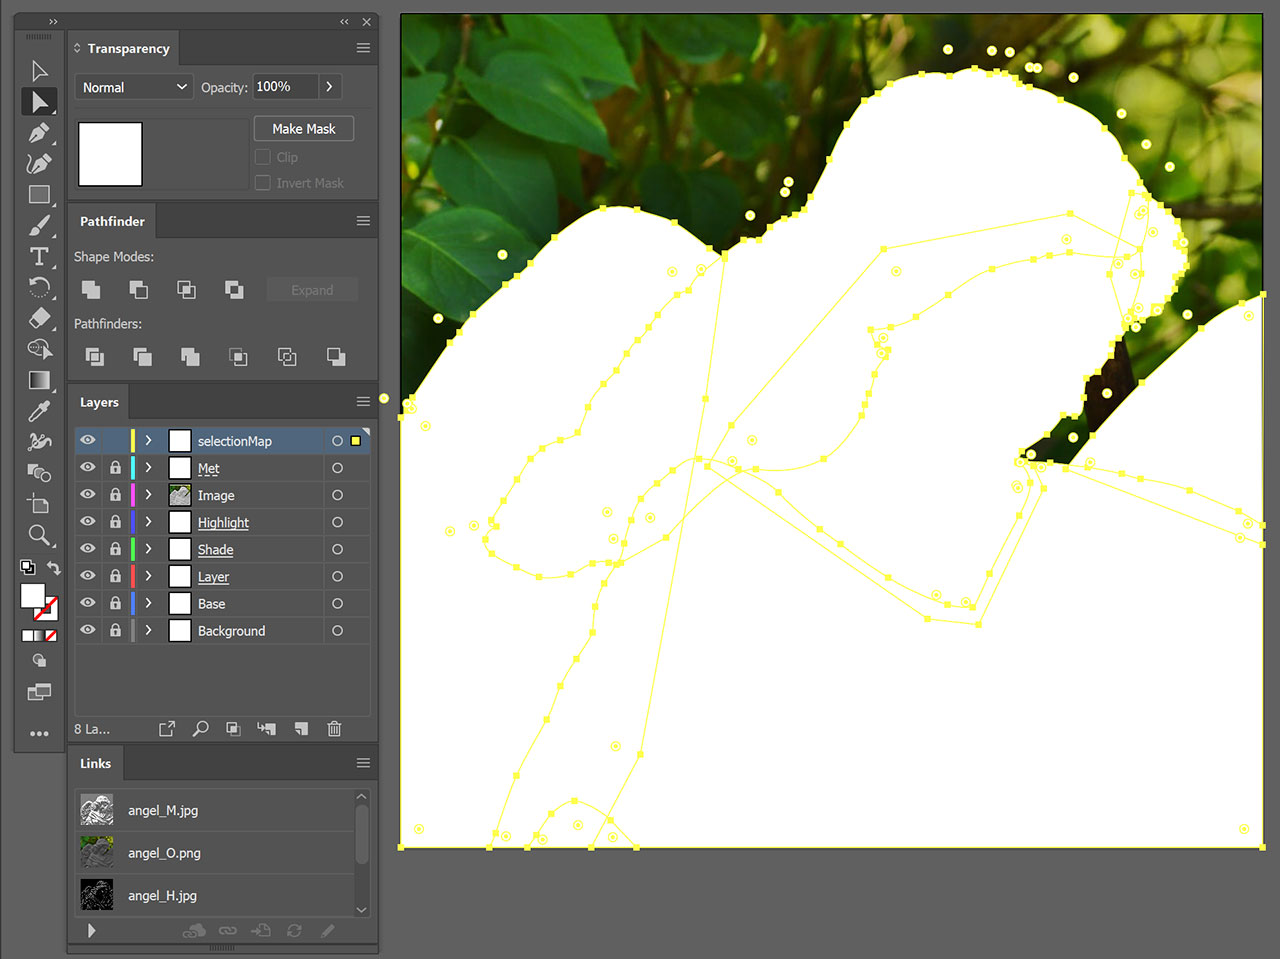
Press Ctrl + A to select all paths and press Shift + X to switch their appearance to white fill and no outline:
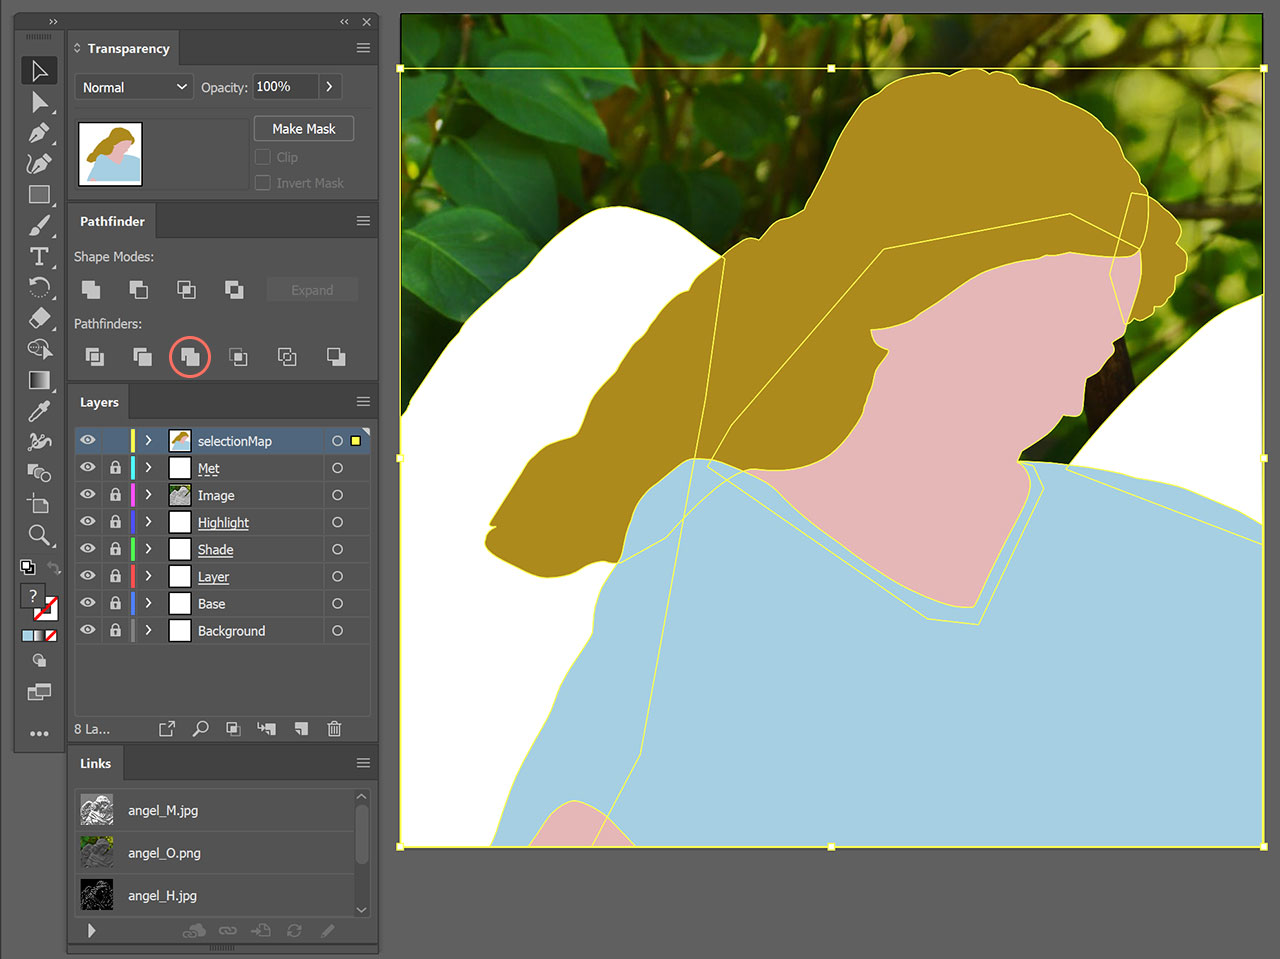
Now we need to add different colours to every path. Press V to activate the Selection tool, then select your paths individually and give them unique colours using the colour picker. Otherwise they will get merged in the next step.
If you have trouble recognizing where your paths meet, you can drag the Image layer to the top. But don't forget to drag it back to its original position before exporting the SVG file!

Select all your paths by pressing Ctrl + A and click the Merge tool in the Pathfinder window:
This will not only remove the overlappings, but also group our paths in a way we do not want:
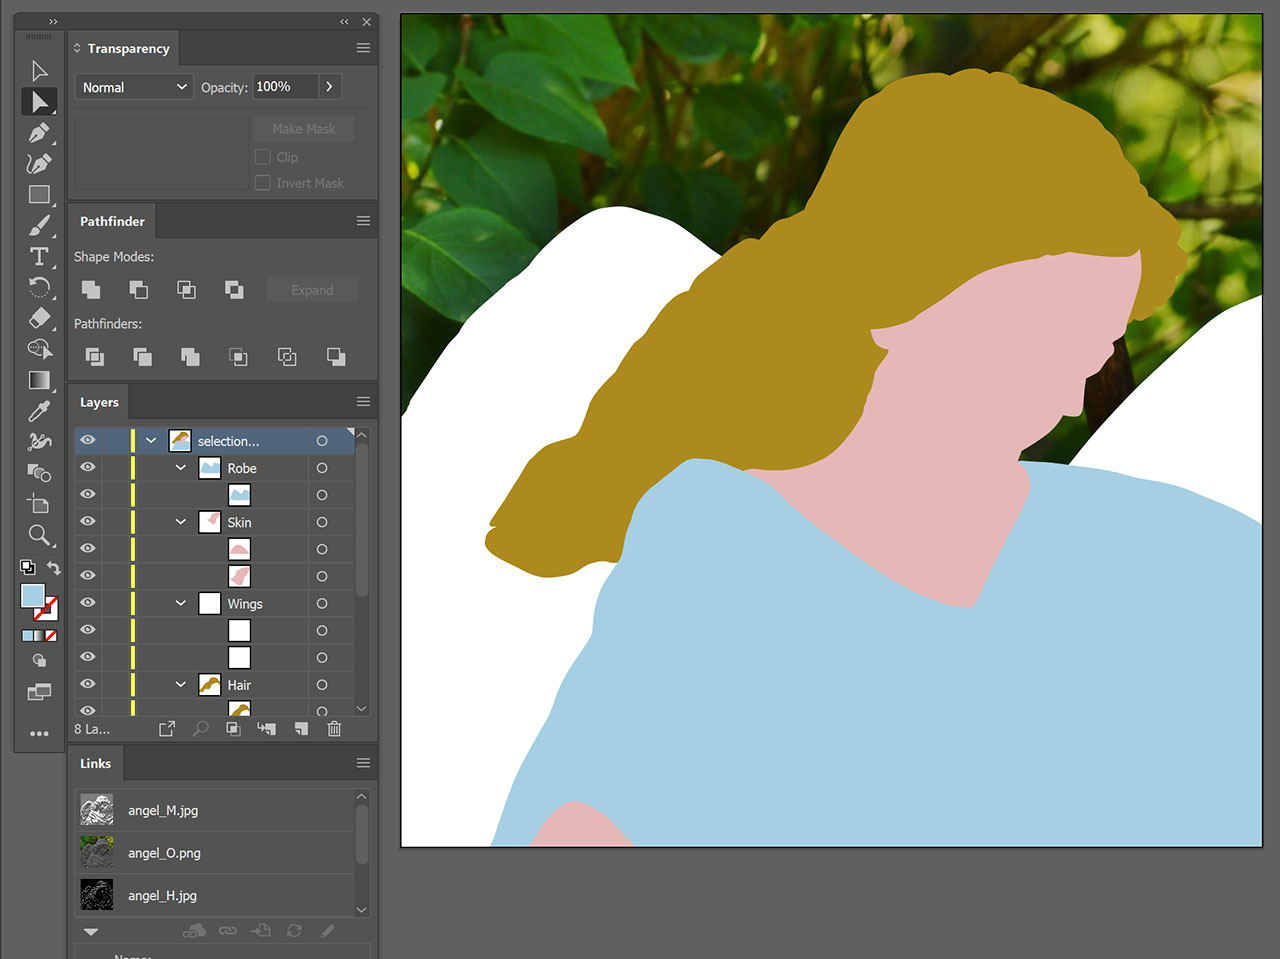
We're going to need a carefully sorted structure of path groups. This is an extremely important step! So let's clean this up:
What we need is the selectionMap layer with exactly that specific name.
Inside this layer we need our groups with unique names (no spaces or special characters), and inside each group one or multiple paths.
In our case the Hair or Robe groups each have only one path in it, but Wings and Hair each have two. This way impcat will treat these areas as one selection, but even if you want only one path as a selectable item, it still needs to be inside a group.
To create a clean group structure, activate the Direct Selection tool by clicking A, select only the path(s) you want inside a custom group (hold Shift to select multiple), press Ctrl + X to cut them out and press Ctrl + F to paste them back in at the same coordinates, but no longer inside that old group. Press Ctrl + G to group them, double-click the new group's name to give it its unique name and confirm. While your new group is still selected, use the colour picker to change the fill colour to blank (as shown in the next image) or a special colour like black, so you can see which paths have already been grouped and cleaned up.
Repeat those steps for all your paths until everything is cleaned up. The group that was automatically generated during the merging process should now be empty and can be deleted:
Press Ctrl + A to select all paths and use the colour picker to make their fill and their outline blank:
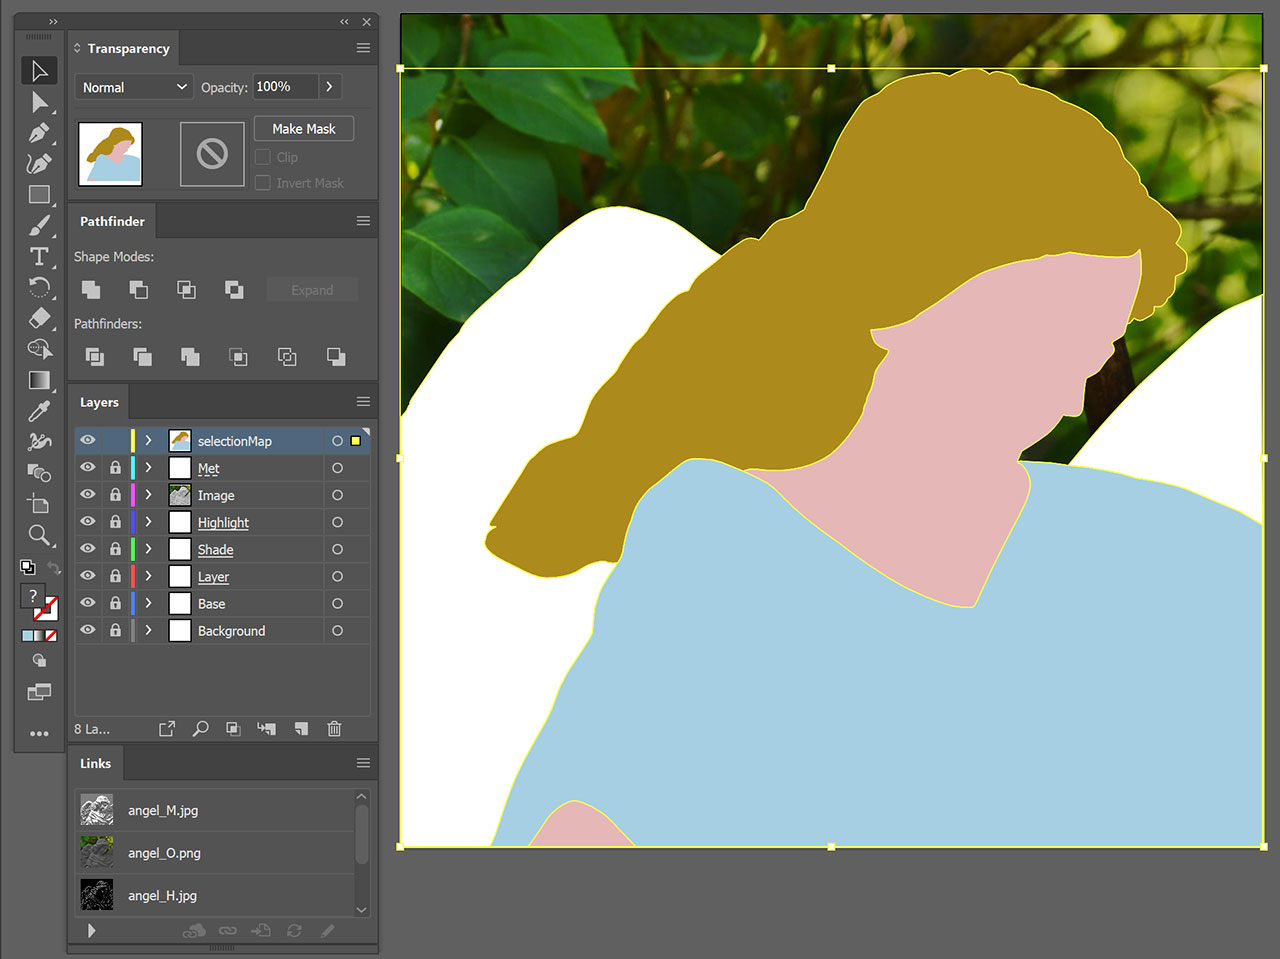
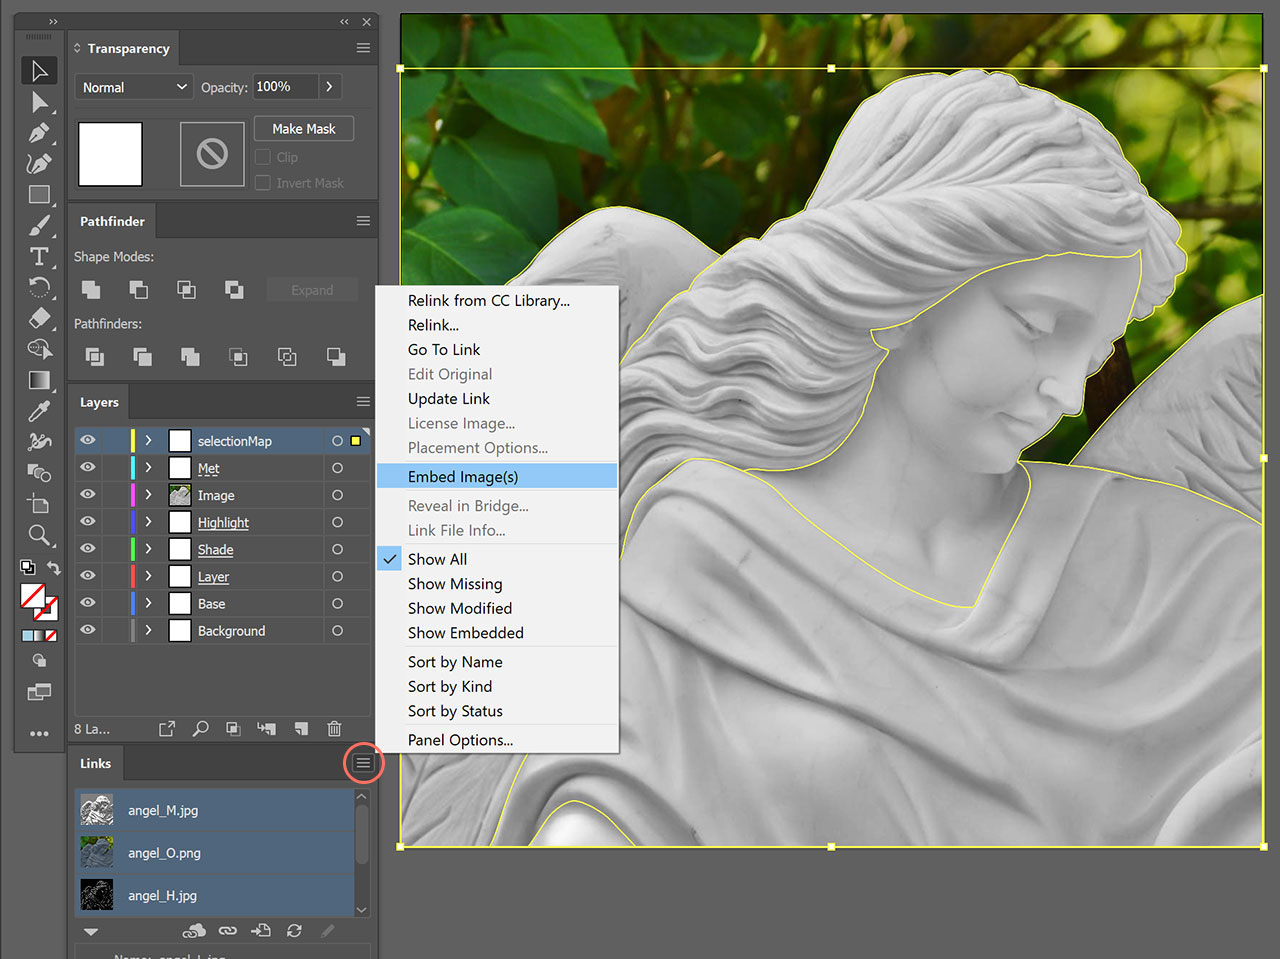
Unlock all layers, and in your Links window select all images. Click the menu icon in the top right corner of that window and select Embed Image(s). Also make sure that your Image layer is below the Met layer, in case you moved it upwards during the earlier steps:
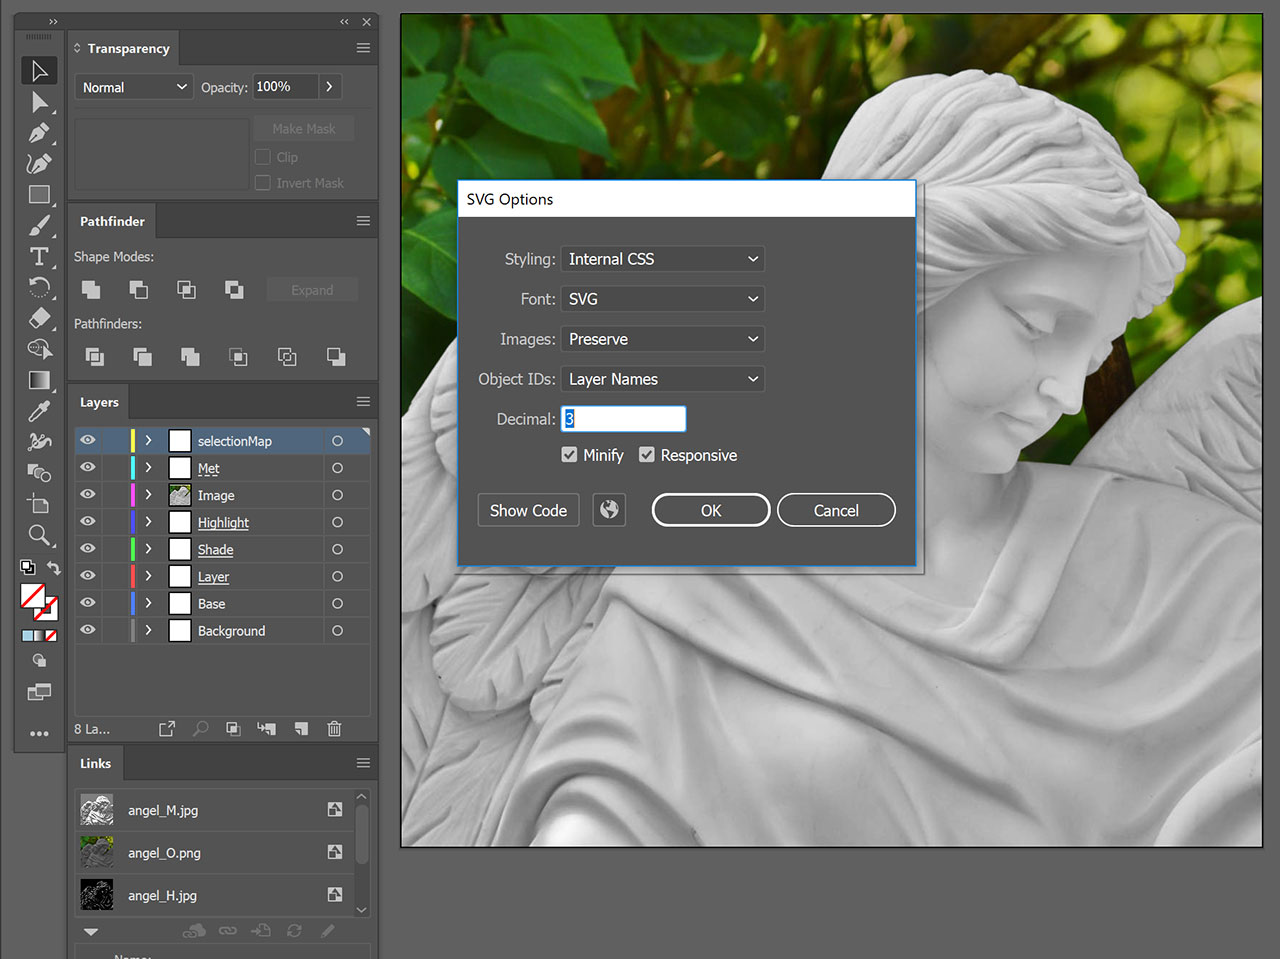
Click the File menu, select Export > Export as..., select .SVG as file type and confirm. This will give you a prompt with export options. You can leave these at their defaults, but we recommend to set the Decimal to 3. Confirm and you're done:
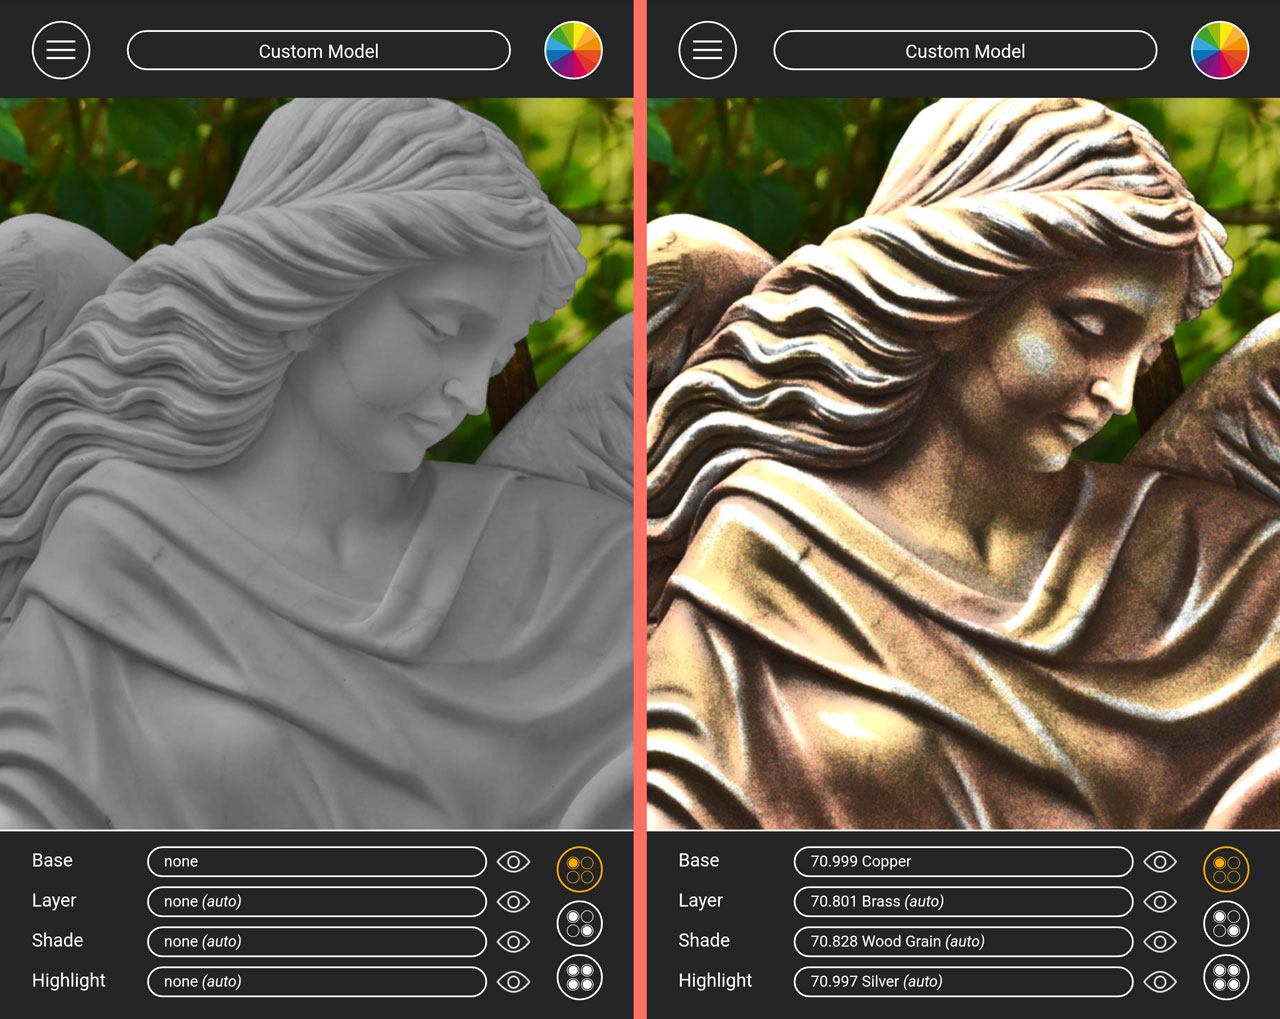
Result
If you followed these steps correctly you should now have a fully functional SVG: